Changes to Booklet
Changed Operations to Adjust the Fold and Staple Position of the Saddle Stitch When Making Booklets (Booklet Copying)
When Adjusting the Saddle Stitch Fold Position and Staple Position 
1 | Press <Copy>, and then press <Options>  <Booklet> <Booklet>  <Booklet Scan> on the copy basic features screen. <Booklet Scan> on the copy basic features screen. |
2 | Press <Adjust Saddle Stitch Fold Position/Stitch Position>  <Next>. <Next>. |
3 | Select the paper source with the loaded usable paper, and press <Start Printing>. A test page is printed. |
4 | Select the current state of the fold position and set the shift width, and press <Next>. Check the current state of the fold position and the shift width on the test page. |
5 | Select the current state of the staple position and set the shift width. Check the current state of the staple position and the shift width on the test page. |
6 | Press <OK>. |
7 | Press <Start Printing> to print the test page again, and check the adjustment results. To end the adjustment without printing the test page, press <Close>. |
8 | Press <Done>. If further adjustment is needed, press <Re-Adjust> and repeat Steps 3 to 6. |
9 | Press <OK>. |
Adding Operations to Adjust the Saddle Stitch Fold Position and Staple Position
Adjust the saddle stitch fold position and staple position so that they are at the center of the paper. Print a test page, check the current state of the fold position and the shift width on the test page, and then perform adjustment.
1
Press  (Settings/Registration)
  <Adjustment/Maintenance>
  <Adjust Action>
  <Adjust Saddle Stitch Fold Position/Stitch Position>.
 (Settings/Registration)
  <Adjustment/Maintenance>
  <Adjust Action>
  <Adjust Saddle Stitch Fold Position/Stitch Position>.
2
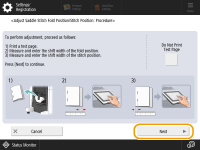
Check the displayed instructions, and press <Next>.

If the test page has already been printed, press <Do Not Print Test Page> to select it, and then press <Next>.
3
Select the paper source with the loaded usable paper, and press <Start Printing>.
A test page is printed.
4
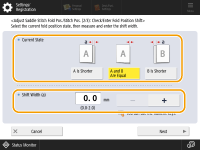
Select the current state of the fold position and set the shift width.

Check the current state of the fold position and the shift width on the test page.
5
Press <Next>.
6
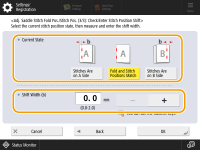
Select the current state of the staple position and set the shift width.

Check the current state of the staple position and the shift width on the test page.
7
Press <OK>.
8
Press <Start Printing> to print the test page again, and check the adjustment results.
To end the adjustment without printing the test page, press <Close>.
9
Press <Done>.
If further adjustment is needed, press <Re-Adjust> and repeat Steps 4 to 8.