
Adjusting the Image Position Using the Guide Sheet
If the images on the front and back sides are misaligned with each other, you can adjust the alignment of the images by scanning the test pages with the guide sheet.
|
Adjustment for the image position on long sheets cannot be performed using the guide sheet. |
 |  |
 |
Clean the platen glass and the underside of the feeder before adjustment. Cleaning the Platen Glass/Cleaning the Feeder Use the following conditions to print the guide sheet. Accurate adjustment results may not be obtained if the guide sheet is not printed appropriately. Paper size: A3 or 11" x 17" Finish: Uncoated, 1-Sided Coated, or 2-Sided Coated Type: None (Normal) Basis Weight: Paper that two-sided printing can be performed on and is 80 g/m2 or heavier (paper that is 200 g/m2 or heavier is recommended) If an edge of the test page is cut incorrectly or folded, or the image is not correctly printed on the test page, the message <Correctly place the test page on the platen glass.> may appear during the scanning process. Adjustment may not be performed correctly with some types of paper, such as textured paper with rough surface or colored paper. If adjustment is not performed correctly when <Use Scanner> is selected, select <Do Not Use Scanner> instead. |
1
Press <Change> for <Adjust Image Position>.
2
Press <Output Guide Sheet>.

3
Select the paper source that contains the paper to use, and press <Start Printing>.
The guide sheet is printed.
4
Press <Use Scanner>.

5
Enter the number of test page to make, and press <Next>.
|
The larger the number of output test pages, the more accurate the adjustment is. If specifying multiple output test pages, make sure that all of the test pages are scanned in the order they are output. If the order is changed or the scanning process is not performed successively, the adjustment may not be made correctly. |
6
Select the paper source that contains the paper type to adjust, and press <Start Printing>.

The test page is printed.
7
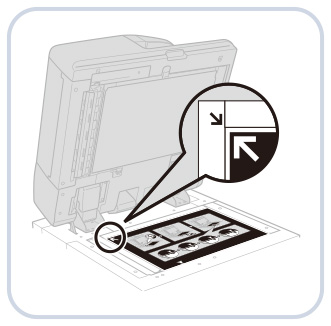
Place the guide sheet on the platen glass, and align the arrow of the sheet with the arrow on the platen glass.
8
Align the mark  (blue) on the test page for the first scan operation with the mark on the guide sheet.
(blue) on the test page for the first scan operation with the mark on the guide sheet.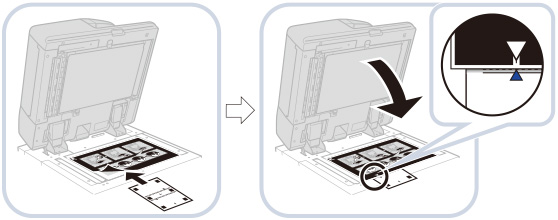
9
Close the feeder, and press <Start Scanning>.

|
Open and close the feeder gently. Make sure that the guide sheet remains aligned when closing the feeder. |
10
Turn the test page upside down, and align the mark  (yellow) on the test page for the second scan operation with the mark on the guide sheet
  press <Start Scanning>.
(yellow) on the test page for the second scan operation with the mark on the guide sheet 11
Turn the test page over, and align the mark  (green) on the test page for the third scan operation with the mark on the guide sheet press <Start Scanning>.
(green) on the test page for the third scan operation with the mark on the guide sheet 12
Turn the test page upside down, and align the mark  (red) on the test page for the fourth scan operation with the mark on the guide sheet press <Start Scanning>.
(red) on the test page for the fourth scan operation with the mark on the guide sheet 13
Adjustment is complete.
If you have specified multiple output test pages, repeat steps 6 to 10 for all of the output test pages. In this case, adjustment is complete when all of the test pages have been scanned.
Make sure that the test pages are scanned in the order they are output.
|
If you need to adjust the image position more precisely after adjusting it using the guide sheet, select <Do Not Use Scanner> and make necessary adjustments for individual adjustment setting items. |