Adjusting the Color
 | Adjust the density of yellow, magenta, cyan, and black separately. |
1
Press <Access Stored Files>. <Home> Screen
2
Select a mail box, select a file you want to print and press <Print>.
3
Press <Change Print Settings>, <Options> and <Color Balance>.
4
Press <-> or <+> for each color to adjust the color balance.
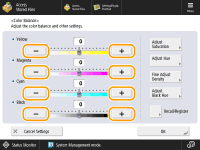 (Items shown on the screen may differ depending on your model and options.) |
5
Perform other adjustment.
 If four settings appear (<Adjust Saturation>, <Adjust Hue>, <Fine Adjust Density>, <Adjust Black Hue>)
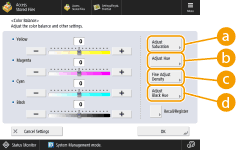
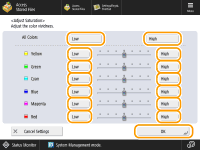
 <Adjust Saturation>
To set the saturation for all colors, use the <Low> or <High> button for <All Colors>. To set each color separately, use the <Low> or <High> button for each color. When adjustment is complete, press <OK>.
 <Adjust Hue>
To set the hue for all colors, use the  or
or  button for <All Colors>. To set each color separately, use the buttons to the left and right of each color. When adjustment is complete, press <OK>.
or button for <All Colors>. To set each color separately, use the buttons to the left and right of each color. When adjustment is complete, press <OK>.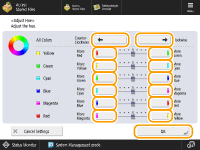
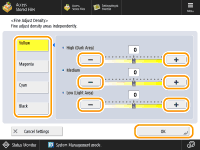
 <Fine Adjust Density>
Select a color and adjust its density level by its density area using the <-> or <+> button. When adjustment is complete, press <OK>.
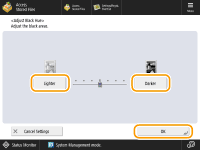
 <Adjust Black Hue>
Adjust towards the side of <Lighter> to prevent the image from becoming over-darkened. Adjust towards the side of <Darker> if text and images are too light. When adjustment is complete, press <OK>.
6
Press <OK>  <Close>.
7
Press <Start Printing>.
Printing starts.
TIPS |
You can register up to four settings after adjustment. After adjusting the color, press <Recall/Register> |
 |
To recall registered settings, press <Recall/Register>, select a button, and press <OK>. You can change the button names of <C1> to <C4>. Select the button to change, press <Rename>, and enter a new name. To delete registered settings, select the button |