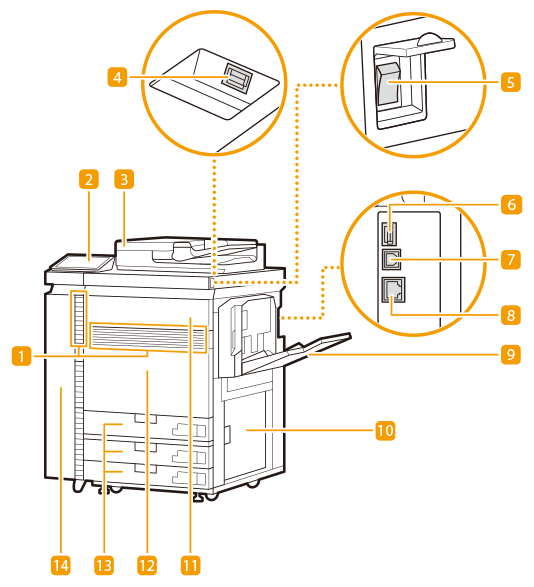
Front Side

 Ventilation slots
Ventilates and cools the inside of the main unit. Note that placing objects near the ventilation slots will interfere with ventilation.
 |
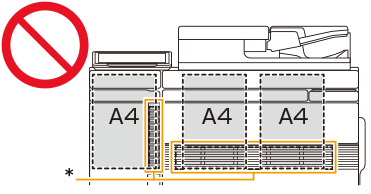
Do not block the ventilation slots when attaching documents to the machine with a magnet. If the ventilation slots are blocked, the temperature inside the main unit will rise, the quality of the image to be affected.  * Ventilation slots There are the ventilation slots on the sides and back in addition to the front of the main unit. |
 Control panel (Optional)
The control panel consists of the indicators, touch panel display, etc. You can perform all the operations and specify settings from the control panel. Control Panel (Optional)
 Feeder (Optional)
Automatically feeds originals into the machine for scanning. When two or more sheets are loaded in the feeder, originals can be scanned continuously. Duplex Color Image Reader Unit-P
 USB port (Front side of the machine)
You can connect devices such as a USB memory device to the machine.

The USB port (front side of the machine) supports USB 2.0.
 Main power switch
Press the power switch when turning ON or OFF the machine.
 USB port (Rear-right side of the machine)
You can connect devices such as an external hard disk to the machine. Backing Up/Restoring Data

The USB port (rear-right side of the machine) supports USB 3.0.
 USB connector
Connect a USB cable when connecting the machine and a computer.

The USB connector supports USB 2.0.
 LAN port
Connect a LAN cable when connecting the machine to a wired LAN router, etc. Setting up the Network Environment
 Multi-purpose tray (Optional)
Load paper into the multi-purpose tray when you want to use a type of paper different from that which is loaded in the paper drawer.
 Right cover of the main unit
Open this cover when clearing a paper jam inside the machine. Paper Jams in a Paper Source of the Main Unit
 Toner replacement cover
Open this cover when replacing the toner cartridge. Replacing the Toner Cartridge
 Front cover of the main unit
Open this cover when clearing a paper jam. Paper Jams in the Front Cover of the Main Unit
 Paper drawer 1/paper drawer 2/paper drawer 3
Load the type of paper that you frequently use. Paper Drawer
 Front-left cover of the main unit
Open this cover when clearing a paper jam. Paper Jams in the Front Cover of the Main Unit
Also, open this cover when replacing the waste toner container. Replacing the Waste Toner Container
 |
For more information about the configuration of optional equipment installed on the machine, see Options. |
Connecting a USB Memory Device
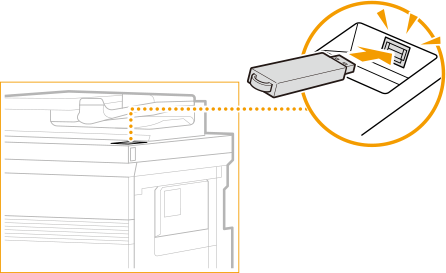
You can connect a USB memory device to the USB port located on the front side of the machine, and directly print data from the USB memory device. Originals scanned using the machine can also be saved directly to the USB memory device. Working with Data in Memory Media

 |
Make sure that the USB memory device is oriented properly when connecting it to the machine. If it is not connected properly, it may cause the USB memory device or machine to malfunction. Make sure to follow the proper procedure when removing the USB memory device. Removing the memory media Failure to do so may cause the USB memory device or machine to malfunction. You can use a USB memory device with a FAT16 (up to 2 GB) or FAT32 (up to 32 GB) file system. |
 |
Unsupported devices and usagesMemory media with security functions Memory media that does not meet the USB specification Memory card readers connected via USB Connecting memory media via an extension cable Connecting memory media via a USB hub |