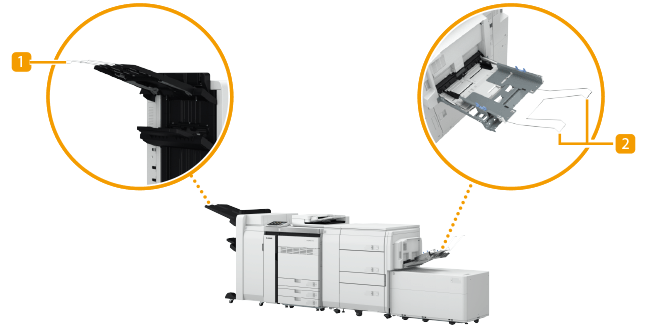
Long Sheet Tray-B
This tray supports long sheet paper whose length is 487.8 mm or more in the feeding direction.

 Extension output tray
This tray is designed to be attached to a finisher. Attach it to the upper tray (Tray A) of the "Staple Finisher-AG" or "Booklet Finisher-AG."

For the "Staple Finisher-AC" and "Booklet Finisher-AC," attach it to Tray C.
 Extension supply tray
This tray is designed to be attached to "Stack Bypass Alignment Tray-D."
 |
For information on the available paper, see Available Paper. |
Loading Paper into the Long Sheet Tray-B (Optional)
This tray enables long sheet paper to be fed into the machine. Using this tray requires the "Stack Bypass-D" and "Stack Bypass Alignment Tray-D."
 |
Do not use curled paper. Doing so may cause a paper jam or printing error. Precautions Regarding the Curling of Paper Be sure to correctly set the paper type. When printing on special types of paper, such as heavy paper or transparencies, be sure to correctly set the paper type, especially if you are using heavy paper. If the type of paper is not set correctly, it could adversely affect the quality of the image. Moreover, the fixing unit may become dirty and require a service repair, or the paper could jam. You cannot use finishing functions such as folding or stapling with this tray. Some thick paper, depending on the paper type, may cause paper jams if several sheets are loaded into the "Long Sheet Tray-B." In this case, adjust the curl correction level to the plus side. (The curl amount should be set to 5 mm or less.) Curl Correction for Each Paper Drawer Feed vellum paper one sheet at a time, and remove each sheet as it is delivered to the output tray. Loading several sheets together may cause paper jams. When printing long sheet, remove the output immediately. If paper of other sizes is printed or another tray is selected as the output destination while the output long sheet is still left on the output tray, the output on the bottom may become depressed or stained. To avoid depression or stain, we recommend that you place a blank long sheet on the output tray before outputting. |
1
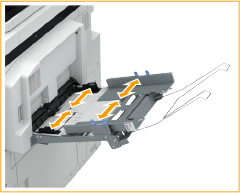
Loosen the four fixing screws of the paper alignment guides of the "Stack Bypass Alignment Tray-D."

2
Spread the paper guides apart.
Move the paper guides outward until they are slightly farther apart than the actual width of the paper.
 | Adjust the position of the paper alignment guides. |
 | Adjust the position of the paper guides of the "Stack Bypass-D."  |
3
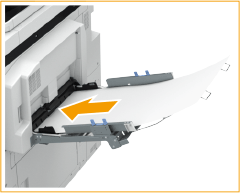
Load the paper into the "Long Sheet Tray-B. "

Only one sheet can be set at one time.

Check that the loaded paper stack lies flat. If the distance between the paper alignment guides is smaller than the paper width, the central area of the paper may become slightly raised. In this case, paper feeding may not be possible.
4
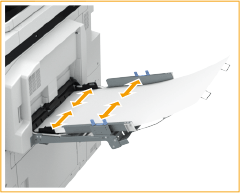
Align the paper guides against the edges of the paper.
Move the paper guides inward until they are aligned securely against the edges of the paper.

5
Tighten the four fixing screws.
6
Check the paper size and paper type, and press <OK>.
If you load free size paper, or if the displayed size or type is different from the actual paper that is loaded, see Specifying Paper Size and Type in the Multi-purpose Tray (Optional).