Managing Printer Certificates
NOTE |
Expired certificates cannot be managed in this software. |
Adding a Certificate
This section describes the method for adding a certificate to the certificate list.
1.
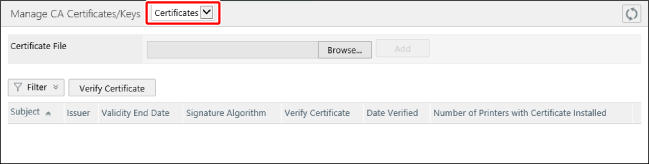
Select the [Data Management] menu > [Certificates].
2.
Select [Certificates] from the drop-down list on the top of the [Manage CA Certificates/Keys] page.
3.
Select the file to add in [Certificate File], and click [Add].
Viewing the Registered Certificates
1.
Select the [Data Management] menu > [Certificates].
2.
Select [Certificates] from the drop-down list on the top of the [Manage CA Certificates/Keys] page.
[Verify Certificate] button
Executes .NET Framework certificate validation on a certificate managed in this software.
List
[Subject] | The subject information included in the registered certificate file. |
[Issuer] | The issuer information included in the registered certificate file. |
[Validity End Date] | The expiration date of the certificate. |
[Signature Algorithm] | The signature algorithm used for checking the certificate. |
[Verify Certificate] | The result of performing verification by clicking [Verify Certificate] on the top of the list. If [Invalid] is displayed, place the mouse cursor over it to display the reason that [Invalid] is displayed. The reason that [Invalid] is displayed is in the language set for the operating system of the computer where this software is running. |
[Date Verified] | The date and time that [Verify Certificate] was executed. |
[Number of Printers with Certificate Installed] | The number of printers with the certificate installed. Click this to display a list of the installed printers. |
Deleting a Certificate
1.
Click [ ] next to the key to delete.
] next to the key to delete.[] is displayed when no printers with the target certificate installed exist.
] is displayed when no printers with the target certificate installed exist.