Connecting to the Other Devices
The machine can be connected to a computer (Windows server) or Advanced Space of other Canon multifunction printers on a network. The machine can print/send data saved in the connected Windows server or Advanced Space. Conversely, other multifunction printers can retrieve data from the Advanced Space of the machine.
 |
To connect the machine to the storage spaces on other multifunction printers, settings of the other printers are also necessary. Setting Advanced Space to Public |
1
Press  (Settings/Registration).
 (Settings/Registration).
2
Press <Function Settings>  <Store/Access Files>
  <Network Settings>.
 <Store/Access Files>
  <Network Settings>.
3
Specify each item.
 Registering multifunction printers to connect to
Register the Windows server or Advanced Space of other multifunction printers to connect to.
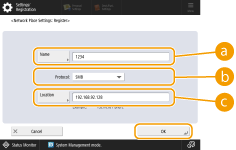
1 | Press <Network Place Settings>  <Register>. <Register>. |
2 | Enter the necessary information and press <OK>.   <Name> <Name>Enter the name of the Advanced Space to connect to. As a name entered here is displayed on the list at the time of access, enter a name that is easy to read.  <Protocol> <Protocol>Select <SMB> or <WebDAV>, depending on whether the Windows server or Advanced Space of destination is made available as an SMB server or WebDAV.  <Location>/<Host Name> <Location>/<Host Name><Location> is displayed when you select <SMB>, and <Host Name>is displayed when you select <WebDAV> in the protocol setting. Enter the address in <Location> as "\\ (host name or IP address) \share" to connect to a shared space, or "\\ (host name or IP address) \users" to connect to personal space. Enter the address in <Host Name> as "https:// (host name or IP address)", and press <Next>. Then, enter "/share" for the shared space or "/users" for the personal space in <Folder Path>.  Do not register something other than the Advanced Space of another imageRUNNER ADVANCE series machine or a Windows server which is opened externally, as this may cause the machine to malfunction. |
 Controlling communication protocols
Select the communication protocol to use when making an external reference to a Windows server or Advanced Space of other Canon multifunction printers on a network. However, if only one of them is used, you can increase the security by disabling unnecessary settings.
1 | Press <Protocol for External Reference>. |
2 | Press <On> of the protocol you use, then press <OK>.  When connection via SMB is not used, set the <SMB> setting to <Off>. When connection via WebDAV is not used, set the <WebDAV> setting to <Off>. |
 Verifying the certificate when connecting
When the Windows server or Advanced Space to connect to is set to use TLS, you can verify the TLS server certificate sent from the connected device when connecting. Because a connection will be canceled if an error occurs, attacks such as identity theft by third parties can be prevented.
1 | Press <Confirm TLS Certificate for Network Access>. |
2 | Press <On>  <OK>. <OK>.When you press <On>, the screen for adding the verification items is displayed. If you need to verify the CN (Common Name), add a check mark.  If you do not verify the certificate, TLS communication is performed, even with an invalid certificate. |