Specifying the Mail Box Settings
You can set a password and name for the Mail Box as well as change the period of time before files are automatically deleted.
1
Press  (Settings/Registration).
 (Settings/Registration).
2
Press <Function Settings>  <Store/Access Files>
  <Mail Box Settings>
  <Set/Register Mail Boxes>.
 <Store/Access Files>
  <Mail Box Settings>
  <Set/Register Mail Boxes>.
3
Select the desired box.
4
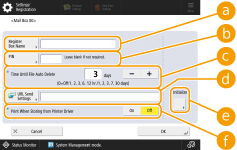
Specify the settings necessary and press <OK>.
 (Items shown on the screen may differ depending on your model and options.) |
 <Register Box Name>
Enter a name for the box.
 <PIN>
<PIN>Set a password for the box. Enter a number of up to seven digits, press <Confirm>, enter the same password, and then press <OK>.

Passwords with only "0" are not allowed.
If you forget your password, there is no way to retrieve it. Be careful not to forget the password.
 <Time Until File Auto Delete>
Press <->/<+> to change the period of time until saved files are automatically deleted. When set to "0," files will not be deleted.
 <URL Send Settings>
Notifies you by e-mail of the location (URL) of the box where files are saved. This setting is helpful for checking saved files from the Remote UI screen.
 <Initialize>
Restores all the settings to the factory default values. Note that you cannot initialize the settings when files are stored in the box.
 <Print When Storing from Printer Driver>
Specify whether to print a file when it is sent from a computer and saved in the box.
 |
<Time Until File Auto Delete> and <Print When Storing from Printer Driver> can be specified for all boxes at the same time. See <Time Until File Auto Delete> and <Print When Storing from Printer Driver>. |