Setting the Date/Time
Adjust the machine's date/time. These settings should be made properly as the date/time is used in cases such as sending an e-mail automatically at a specified time.
1
Press  (Settings/Registration).
 (Settings/Registration).
2
Press <Preferences>  <Timer/Energy Settings>
  <Date/Time Settings>.
 <Timer/Energy Settings>
  <Date/Time Settings>.
3
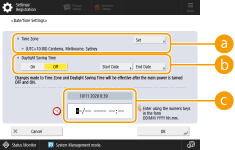
Enter the date/time.

 <Time Zone>
Select the time zone for your area.

UTC is an acronym for Universal Coordinated Time. The standard (time zone) for each country is determined on the basis of UTC. For communication via the Internet, precise time zone setting is essential.
 <Daylight Saving Time>
To set daylight saving time, press <On> and set the date/time for <Start Date> and <End Date>. To set the date, specify the day of the week and the week of the month.

If daylight saving time is set, the time can be put forward an hour compared to the time zone or time during a specified period in the summer.
 Date and time
Enter 4 digits for the year, 4 digits for the month and day, and 4 digits for the time in the same way that the current time appears on the display.

The order of the date and time may differ, depending on the country/region.
Time is entered in 24-hour notation.
If you make a mistake, press  (Clear) and enter again from the year.
 (Clear) and enter again from the year.
4
Press <OK>.
 |
If you changed the setting of <Time Zone> or <Daylight Saving Time>, you need to restart the machine by turning the power OFF. Press the power switch to turn OFF the machine (Turning OFF the Machine). When 10 or more seconds have elapsed after the main power indicator turned off, turn ON the machine again (Turning ON the Machine). |
 |
Adjust the time regularly when the clock is noticeably incorrect. You can also specify to automatically synchronize the date and time with a server on the network using SNTP. Making SNTP Settings |