Setting a Proxy
A proxy (or HTTP proxy server) refers to a computer or software that carries out HTTP communication for other devices, especially when communicating with resources outside the network, such as when browsing Web sites. The client devices connect to the outside network through the proxy server, and do not communicate directly to the resources outside. Setting a proxy not only facilitates management of traffic between in-house and outside networks but also blocks unauthorized access and consolidates anti-virus protection for enhanced security. Administrator privileges are required in order to configure these settings.

1
Start the Remote UI. Starting the Remote UI
2
Click [Settings/Registration] on the portal page. Remote UI Screen
3
Click [Network Settings]  [Proxy Settings].
 [Proxy Settings].
4
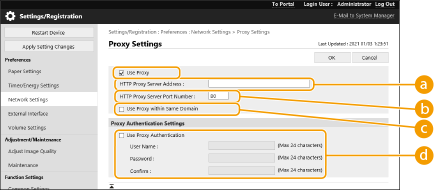
Select the [Use Proxy] check box and specify the required settings.

 [HTTP Proxy Server Address]
Enter the address of the proxy server. Specify the IP address or host name depending on the environment.
 [HTTP Proxy Server Port Number]
Change the port number as necessary.
 [Use Proxy within Same Domain]
Select the check box to also use the specified proxy server for communication with devices in the same domain.

This setting is only displayed for the proxy settings screen of the main line.
 [Use Proxy Authentication]
To use the authentication function of a proxy server, select this check box and enter the user name for authentication in [User Name] and the new password to set in [Password] using alphanumeric characters.
5
Click [OK].
 |
Batch importing/batch exportingThis setting can be imported/exported with models that support batch importing of this setting. Importing/Exporting the Setting Data This setting is included in [Settings/Registration Basic Information] when batch exporting. Importing/Exporting All Settings |