Registering Destinations to the Address Book (Remote UI)
You can register destinations to the Address Book using Remote UI from a computer.
Use Remote UI to register file save locations (shared folder or FTP server).
Use Remote UI to register file save locations (shared folder or FTP server).
Administrator privileges are required to register destinations using Remote UI.
Required Preparations |
When registering a shared folder as a destination, prepare the following information and keep it close by: Name or IP address of the computer with the shared folder Viewing the System Information of the Computer Viewing the Network Connection Information of the Computer Path to the shared folder User name and password used for accessing the shared folder (if Restrict Access is set) When registering an FTP server as a destination, prepare the following information and keep it close by: IP address of the FTP server Path to the folder where to save the data. User name and password used for accessing the FTP server (if Restrict Access is set) |
1
Log in to Remote UI in System Manager Mode. Starting Remote UI
2
On the Portal page of Remote UI, click [Address Book]. Portal Page of Remote UI
3
Click [Favorites] or [Coded Dial].
4
Click an item displayed as [Not Registered].
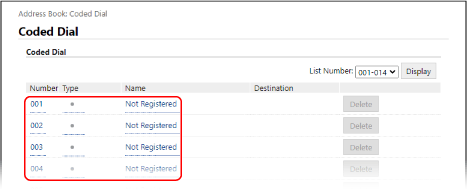
The [Register New Destination] screen is displayed.
If the [Enter PIN] screen is displayed, enter the Address Book PIN, and then click [OK].
5
Select the destination type, and click [OK].
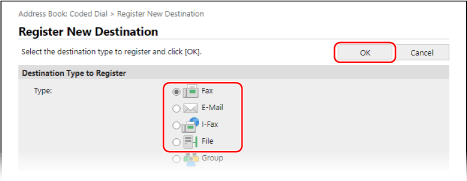
When registering file save locations (shared folder or FTP server), select [File].
When registering group destinations, see the following.
Registering Groups to the Address Book (Remote UI)
Registering Groups to the Address Book (Remote UI)
6
Set the destination information.
You can register a destination without entering its name, but by entering the name, you can search for it by its initials when specifying the destination.
 When Registering E-Mail Addresses (E-mail, I-Fax)
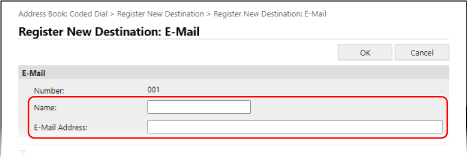
Enter the name and e-mail address.
When Registering File Save Locations (Shared Folder, FTP Server)
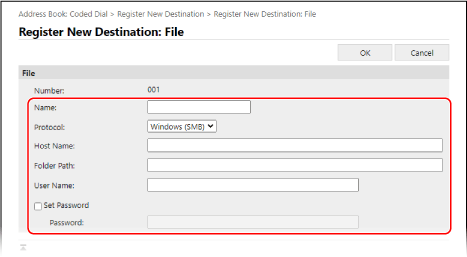
1 | Enter the name. |
2 | Select [Protocol]. When registering a shared folder, select [Windows (SMB)]. |
3 | In [Host Name], enter the name or IP address of the computer. Shared Folder Enter the name or IP address of the computer with the shared folder. FTP Server Enter the IP address of the FTP server. * When using a DNS server, you can enter the host name or FQDN instead of the computer name or IP address. |
4 | Enter the path to the folder. Shared Folder Enter the path to the shared folder. Use "\" as a separator. Input example: when the shared folder path is C:\users\public\share users\public\share FTP Server Enter the path to the folder to which to save the file. Use "/" as a separator. Specifying "/" at the start creates an absolute path, and omitting this creates a relative path from the current directory of the user logged into the FTP server. If there is no folder at the entered path, a folder with the entered name is created when the file is saved for the first time. * However, if there is no parent folder, or you do not have write permission to the parent folder, a sending error occurs without a folder being created. |
5 | Enter the user name and password, as needed. If Restrict Access is enabled for the shared folder or FTP server, enter the user name and password used for accessing the shared folder or FTP server. To enter a password, select the [Set Password] checkbox, and then enter the password. |
When Registering a Fax Number
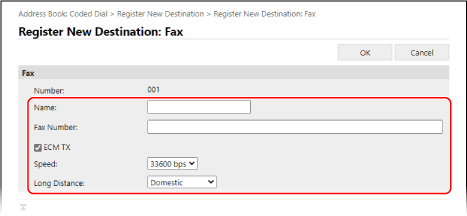
1 | Enter the name and fax number. |
2 | Set the fax sending details, as needed. If a send error occurs or it takes time to send a fax to a registered fax number, set the fax sending details. [ECM TX]*1 When this is selected and an error occurs for an image being sent, the machine corrects the image so as not to send a distorted image. [Speed]*1 If it takes time to start sending a fax, such as when there is a poor phone line connection, the machine lowers the communication start speed. [Long Distance] If a communication error occurs when sending a fax to an international destination, select [International (1)]. If the error does not improve, select [International (2)] and [International (3)] in that order. *1 If this is not set here, the setting in [Settings/Registration] [ECM TX] [TX Start Speed] |
7
Click [OK].
The destination is registered to the Address Book.
8
Log out from Remote UI.
 |
Editing or Deleting Registered DestinationsYou can edit the registered information by clicking the destination you want to edit in the screen in Step 4. In Step 4, click [Delete] to the right of the destination you want to delete, and the destination will be deleted. If the destination in the Address Book is specified with "Favorite Settings," the edit or delete operation is also applied to "Favorite Settings." Registering and Calling Up Favorite Settings |