Replacing the Waste Toner Container
The waste toner container collects waste toner (excess toner generated during printing). A message appears on the control panel when the waste toner container is full or nearly full. In this case, follow the instructions of the message to replace the waste toner container.
Do not replace the waste toner container before the message appears on the control panel.
Waste toner cannot be reused. Do not mix the waste toner with new toner.
You can press [ ] at the bottom right of the screen to display a step-by-step video of how to replace the waste toner container.
] at the bottom right of the screen to display a step-by-step video of how to replace the waste toner container.* You can play the replacement procedure video at any time by pressing [ Settings/Registration] on the [Home] screen or other screen. [Replace Waste Toner Container]
Settings/Registration] on the [Home] screen or other screen. [Replace Waste Toner Container]Check the precautions in "Important Safety Instructions" included with the machine before replacing the waste toner container.
1
Open the waste toner cover.
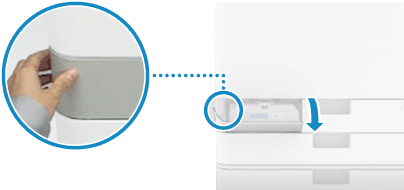
Open the cover while holding the left side.
2
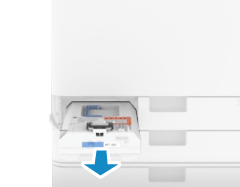
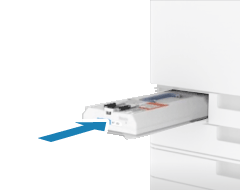
Remove the waste toner container.
1
Pull out the waste toner container halfway.
2
Hold the handle on top and pull the waste toner container straight out while being careful not to spill the toner inside.
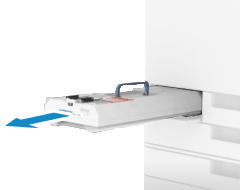
Prepare a piece of paper or cloth that can get dirty, and temporarily place the removed waste toner container on it.
3
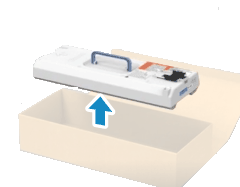
Remove the new waste toner container from the box.
4
Wrap the used waste toner container in the bag and place it in the box.

The bag is in the box of the new waste toner container.
After wrapping the waste toner container in the bag, twist close the opening of the bag and place it in the box so the toner does not spill.
5
Install the new waste toner container.
Install it with the Canon logo facing the rear, and firmly push it in as far as it will go. If the waste toner container is not pushed all the way in, toner may scatter when the waste toner container is removed.
6
Close the waste toner cover.