Preparing for a Shortcut Key to Store Scanned Data to a Computer
This section describes how to register the information, such as the computer for storing the scanned data or the scan settings, to the button on the [Home] screen.
Use the control panel to configure the settings. You cannot configure the settings using Remote UI from a computer.
Required Preparations |
Make preparations such as installing the scanner driver (ScanGear MF) and application (ScanGear MF) to the computer used as the save location. Preparing to Save Scanned Data to a Computer |
1
On the control panel, press [Menu] in the [Home] screen. [Home] Screen
2
Press [Function Settings]  [Send] [Scan and Send Settings] [Shortcut Key Settings].
The [Shortcut Key Settings] screen is displayed.
3
Press [Register].
The [Select Shortcut Key] screen is displayed.
4
Select the shortcut key to which you want to register settings.
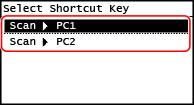
Select [Scan -> PC1] or [Scan -> PC2].
5
Select the connection method to a computer.
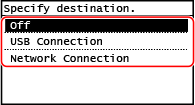
If [Off] is selected, the shortcut key information registered in Step 4 in canceled.
When [USB Connection] is selected, go to Step 7.
6
Select the destination computer.
Select from computers on the network where the machine participates.
7
Select the scan type.
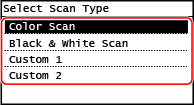
The [Shortcut Key Settings] screen is displayed.
8
Press  on the control panel.
on the control panel.The [Home] screen is displayed.
 | |
Confirming the registered information of the shortcut keyYou can confirm the registered information of the shortcut key selected in Step 4 by selecting the shortcut key on the screen displayed with the following steps:
Checking or Changing Scan Setting or Save LocationYou can check and change the scan setting selected in step 7 by using the MF Scan Utility on the computer used as the save location. Starting MF Scan Utility |