Setting the Paper Size and Type for the Paper Drawer
By default, the paper type is set to Plain 1 or Plain 2. When paper of a different type is loaded or the size displayed on the control panel is different from the loaded paper, change the paper settings.
This section describes how to configure the settings using the control panel.
You can also configure the settings using Remote UI from a computer. However, you cannot use Remote UI to configure some of the settings. Managing the Machine from a Computer (Remote UI)
You can also configure the settings using Remote UI from a computer. However, you cannot use Remote UI to configure some of the settings. Managing the Machine from a Computer (Remote UI)
1
On the control panel, press [ Settings/Registration] in the [Home] screen or other screen. [Home] Screen
Settings/Registration] in the [Home] screen or other screen. [Home] ScreenThe [Settings/Registration] screen is displayed.
2
Press [Preferences]  [Paper Settings] [Paper Settings].
The [Paper Settings] screen is displayed.
3
Select the paper drawer whose setting you want to change, and set the paper size.
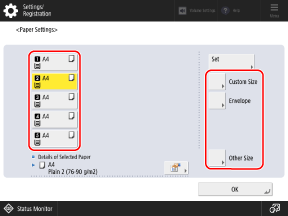
The paper drawers are displayed with the following icons. The paper sources displayed vary depending on the installed options.
 : Paper drawer 1
 : Paper drawer 2
 : Paper drawer 3
 : Paper drawer 4
 : Paper drawer 5
When Standard Size Paper Is Loaded
The paper size is detected automatically. Paper Sizes That Can Be Detected Automatically
If the displayed paper size is different from the loaded paper, the paper may not be loaded correctly. Reload the paper.
If paper of a size that is not detected automatically is loaded, press [Unrecognized Standard Size] to select the size of the loaded paper.
When [Custom] is displayed, press [Custom Size] [Cancel Settings] to display the correct size.
When Custom Size Paper Is Loaded
1
Press [Custom Size].
2
Enter the values in [X] and [Y], and press [OK].
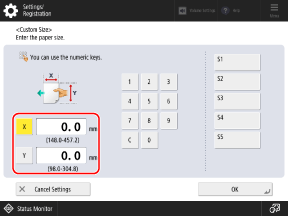
Press [X] and [Y] to select them, and enter the values.
When frequently used non-standard sizes are registered, you can call these up by pressing [S1] to [S5].
When Envelopes Are Loaded
1
Press [Envelope].
2
Select the size of the loaded envelopes.
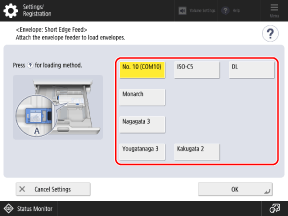
3
Press [OK].
Depending on the size of the envelopes, [Next] may appear. Press [Next], enter the envelope flap length, and then press [OK].
When Other Size Paper Is Loaded 

1
Press [Other Size].
2
Select the paper size.
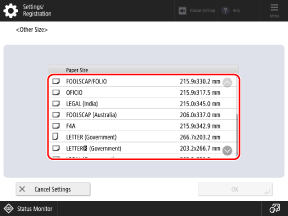
3
Press [OK].
4
Set the paper type.
1
Select the paper drawer whose setting you want to change, and press [Set].
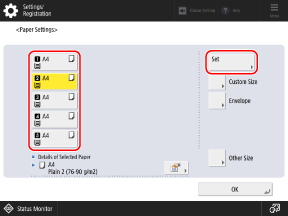
2
Select the type of loaded paper.
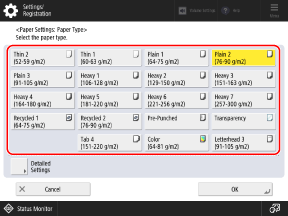
If the Loaded Paper Type Is Not Displayed
Press [Detailed Settings], and select the paper type from the displayed list.
* If the loaded paper type is not displayed in the list, register the paper type. Registering Frequently Used Paper Types
3
Press [OK].
The screen returns to the [Paper Settings] screen.
5
Press [OK].
The paper size and type are set.
6
Replace the paper size label, as needed. Paper Drawer
If a paper size label is affixed to the paper drawer, replace the paper size label after changing the paper size.