Loading Paper in Long Sheet Feeding Tray-A (Option)
When you use Long Sheet paper, load the paper in the Long Sheet Feeding Tray-A.
IMPORTANT
For details on the paper that can be used, see the following:
Usable Paper
Usable Paper
Using curled paper can cause paper jams or printing errors.
Be sure to configure the paper type settings correctly. Specifying the Paper Size and Type
* The image quality may be degraded if the settings are not configured properly, particularly when you use special paper such as Heavy paper. In addition, the fixing assembly may become dirty or a paper jam may occur, and repair by your service representative may be required.
* The image quality may be degraded if the settings are not configured properly, particularly when you use special paper such as Heavy paper. In addition, the fixing assembly may become dirty or a paper jam may occur, and repair by your service representative may be required.
You cannot staple paper, fold paper, or use other finishing functions.
You cannot print on Long Sheet paper when [Settings/Registration]  [Function Settings] [Printer] [Printer Settings] [Custom Settings] [Print Quality] [Resolution] is set to [1200 dpi].
Install the optional Long Sheet output tray or the finisher to prevent paper from falling out of the output tray. Long Sheet Feeding Tray-A and Long Sheet Catch Tray-D
1
Slide the paper guides to the outside.
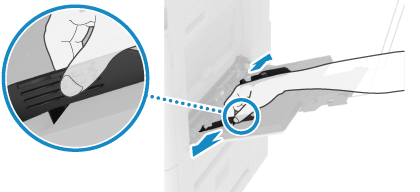
Set the width of the paper guides slightly wider than the width of the paper.
2
Load the paper with the print side face down.
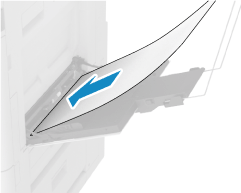
Insert the paper until the edge of the paper is against the paper tray.
Load one sheet at a time.
3
Align the paper guides with the width of the paper.
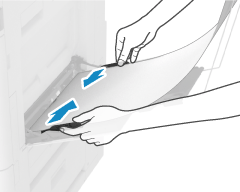
Use both hands to position the paper guides so that they match the width of the paper exactly.
Paper guides that are aligned and are too loose or too tight can cause misfeeds or a paper jam.
4
Set the paper size and type. Setting the Paper Size and Type for the Multi-purpose Tray
By default, when the machine detects paper loaded in the multi-purpose tray, the screen for setting the paper is displayed on the control panel. Set the paper size and type each time you load paper.