Registering Frequently Used Paper Types
You can copy one of the paper types already registered in the machine, change the name and paper information, and register it as a new paper type (custom type).
If misfeeds or print quality degradation occurs with a certain paper type, you may be able to solve the problem by using a custom paper type in which the paper information is changed according to the characteristics of the paper.
If misfeeds or print quality degradation occurs with a certain paper type, you may be able to solve the problem by using a custom paper type in which the paper information is changed according to the characteristics of the paper.
You can copy one of the paper types already registered in the machine, change the name and paper information, and register it as a new paper type (custom type).
If misfeeds or print quality degradation occurs with a certain paper type, you may be able to solve the problem by using a custom paper type in which the paper information is changed according to the characteristics of the paper.
This section describes how to register frequently used paper types using the control panel.
You can also perform registration using Remote UI from a computer. Managing the Machine from a Computer (Remote UI)
Administrator or DeviceAdmin privileges are required.
You can also perform registration using Remote UI from a computer. Managing the Machine from a Computer (Remote UI)
Administrator or DeviceAdmin privileges are required.
1
Log in to the machine as an administrator. Logging In to the Machine
2
On the control panel, press [ Settings/Registration] in the [Home] screen or other screen. [Home] Screen
 Settings/Registration] in the [Home] screen or other screen. [Home] Screen
The [Settings/Registration] screen is displayed.
3
Press [Preferences]  [Paper Settings]
  [Paper Type Management Settings].
 [Paper Settings]
  [Paper Type Management Settings].
The [Paper Type Management Settings] screen is displayed.
4
Copy a paper type.
1
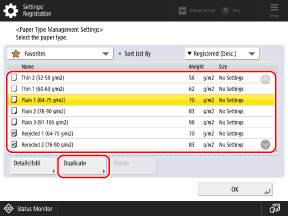
Select a paper type from the list and press [Duplicate].

The [Duplicated Paper Type Name (Max 100 characters)] screen is displayed.
Select one of the pre-registered paper types that is similar to the paper you want to register as a custom paper.
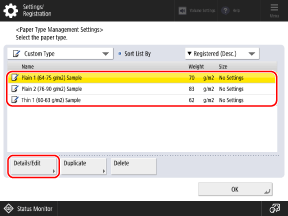
Using the pulldown menu at the top left of the screen, you can filter the paper types so that only basic paper types (paper types registered as the default setting), or only custom paper types are displayed in the list.
From the pulldown menu at the top right of the screen, you can change the list order of the paper types.
2
Enter the name of the custom paper type.
Enter a name that does not duplicate with any existing paper type.
3
Press [OK].
The custom paper type is registered.
5
Change the information of the registered custom paper.
1
Select the custom paper from the list, and press [Details/Edit].

The [Details/Edit] screen is displayed.
2
Press [Change] for the item you want to change, and change the paper information. [Details/Edit] Screen
You can change the information such as basis weight and paper type, as well as the image quality and print position according to the characteristics of the paper.
3
Press [OK].
The changes are applied.
6
Press [OK].
NOTE
When using the registered custom paper, change the paper setting of the paper drawer in which the paper is loaded.
You cannot delete the paper types registered as the default settings.