Scan from the Smartphone
You can operate a printer in the app to import scanned data to the smartphone or send scanned data to a specified e-mail address.
You can also send destinations and other information to the printer in advance to use for scanning.
Perform Scanning from the Smartphone
You can save the scanned data to the smartphone.
Procedures
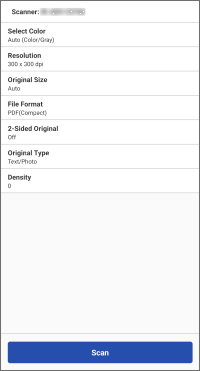
1. In the menu area of the home screen, tap [Scan].
Change the scan settings on the displayed screen, as required.
When scanning both sides of an original using a feeder, set [2-Sided Original] to match the binding direction of the original.
2. Tap [Scan].
If a message prompting you to launch Scan for Mobile is displayed, press [Scan for Mobile] on the control panel of the printer.
When scanning from the platen glass, follow the message displayed on the printer to select whether to continue scanning.
When scanning is complete, the scanned data is saved and a preview is displayed on the smartphone.
Select the app to use for displaying the preview, as required.
 NOTE
NOTEYou can use the following setting to specify the destination folder for saving scanned images.
Home screen > [ ] (Menu) > [App Settings] > [Save Folder Name]
] (Menu) > [App Settings] > [Save Folder Name]To use Scan for Mobile on a printer with the Access Management System function enabled, privileges must be assigned to each user. Assign usage privileges for Scan for Mobile to the users that will perform scanning.
Other Scan Methods
PDF* / JPEG / TIFF / OOXML (pptx or docx)
* You can specify compact, OCR, or encrypted PDF files.
Only file formats supported by the printer are displayed.
Send the Scan Destination to the Printer
You can send the destination to use for scanning and related information to the printer.
 |
Provide Address |
Prerequisites
User information must be set in [] (Menu) > [App Settings] > [User Information] on the home screen (if the user authentication function is set in the printer)
] (Menu) > [App Settings] > [User Information] on the home screen (if the user authentication function is set in the printer)NOTEThe operation in step 3. is not required if the following setting is enabled.
Home screen > [] (Menu) > [App Settings] > [Provide Address] > [Provide Address to Selected Printer]
] (Menu) > [App Settings] > [Provide Address] > [Provide Address to Selected Printer]Procedures
1. In the menu area of the home screen, tap [Provide Address] (or the same button inside [ ] (Functions)).
] (Functions)).2. Follow the instructions on the displayed screen to enter the destination information and other settings → tap [Next].
Display the QR code from [Mobile Portal] on the printer and scan it with the smartphone to send the destination to the printer.
Send Data Scanned on a Smartphone via E-mail
Prerequisites
Check the following.
Confirm that job execution from a smartphone is enabled in the printer.
Confirm that the software keyboard is closed on the keyboard authentication screen of the printer.
Confirm that the following setting is disabled in this app.
Home screen > [] (Menu) > [App Settings] > [User Information] > [Log in as Guest user]
] (Menu) > [App Settings] > [User Information] > [Log in as Guest user]To send scanned data to your own e-mail address, configure the following setting.
Home screen > [] (Menu) > [App Settings] > [Send To]
] (Menu) > [App Settings] > [Send To]Procedures
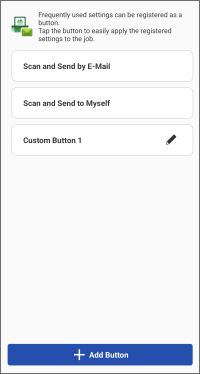
1. In the menu area of the home screen, tap [Scan and Send by E-Mail] (or the same button inside [] (Functions)).
] (Functions)).2. Perform the required operations for the destination.
To send to a specified destination
(1) Tap [Scan and Send by E-Mail].
To change the scan settings, tap [Detailed Settings].
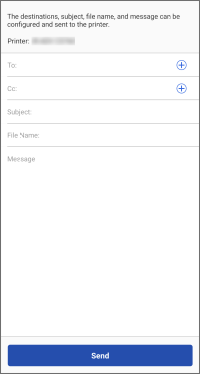
(2) Enter the destination, subject name, and text.
You can also tap [+] to open the address book of the smartphone and specify a destination.
To send to yourself
(1) Tap [Scan and Send to Myself].
To change the scan settings, tap [Detailed Settings].
(2) Enter the subject name and text.
3. Place the originals on the printer.
4. Tap [Start] in this app.
The job may be canceled if you place the originals after tapping [Start].
5. Confirm the destination on the displayed screen, then tap [OK].
NOTEThis app may not be able to browse addresses, depending on the address book app you are using. If this happens, use a different address book app.