88W0-01S
Printing on Custom-Size Paper
Steps for registering a paper size on the machine and printing from a computer are described here.
Perform step 1 and step 2.
Step 1 Registering a paper size on the machine
To register a custom-size paper loaded in the paper drawer
1
Load custom-size paper in the paper drawer.
2
Select <Paper Settings> in the Home screen.
3
Select the paper drawer where the custom-size paper is loaded.
4
Select <Register Custom Paper>.
5
Select <X> or <Y>, and enter the length of each side.
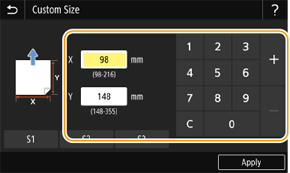
6
Select <Apply>.
7
Select the paper type.
Next, print from a computer. Step 2 Printing from a computer
To register a custom-size paper loaded in the multi-purpose tray
1
Load custom-size paper in the multi-purpose tray.
2
Select <Custom>.
3
Select <X> or <Y>, and enter the length of each side.
4
Select <Apply>.
5
Select the paper type.
Next, print from a computer. Step 2 Printing from a computer
Step 2 Printing from a computer
Printing from a Windows computer
This section explains the example of Windows 10.
1
Register the paper size in the printer driver.
1
Select [ Start]
  [
[ Settings].
Start] Settings].2
Click [Devices] [Printers & scanners].
3
Select the machine and then click [Manage].
4
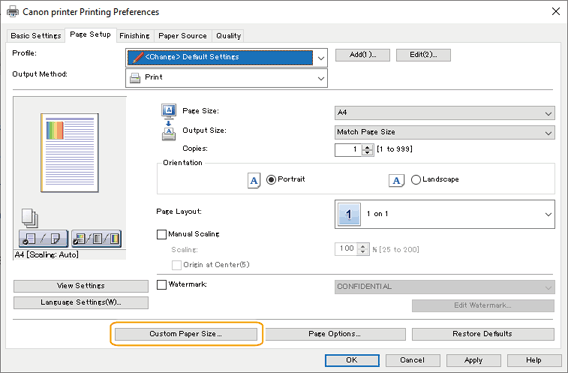
Click [Printing preferences].
The printer driver window appears.
5
Select the [Page Setup] tab, and click [Custom Paper Size].
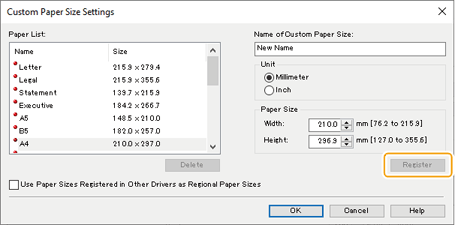
6
In the [Custom Paper Size Settings] dialog box, specify [Name of Custom Paper Size], [Unit], and [Paper Size], and then click [Register].
7
Click [OK] [OK].
2
Select the registered paper size and then print.
1
Select [Print] in the application menu.
2
Select the machine in the print window, and then click [Preferences], [Printer properties], or [Properties].
3
In the print settings window of the printer driver, click [Basic Settings] or [Page Setup].
4
Select the paper size of the registered paper in [Page Size].
5
Select the paper size of the registered paper in [Output Size].
6
Click [OK].
7
Click [Print] or [OK] in the print window.
Printing from a Mac computer
This section macOS 10.15 as an example.
1
Register the paper size in the printer driver.
1
Select [Page Setup] in the [File] menu of the application.
If [Page Setup] is not displayed, select [Print].
2
Select the machine in [Printer].
3
Select [Manage Custom Sizes] in [Paper Size].
4
Click [+] at the bottom of the displayed dialog box.
5
Double-click [Untitled] and set a name.
6
Specify the [Width] and [Height] of the custom-size paper in [Paper Size].
7
Specify margins in [Top], [Bottom], [Left], and [Right] of [Non-Printable Area] and then click [OK].
2
Select the registered custom-size paper and then print.
1
Select [Page Setup] in the [File] menu of the application.
2
Select the machine in [Printer].
3
Select the registered paper in [Paper Size].
4
Click [Print].