43XC-034
How to Re-create Standards for Automatic Color Tone Correction
Standard values for automatic color tone correction are already registered as factory defaults. However, you can create new standard values best for your usage environment.
These factory-default standard values are just general values. You can create new standard values for your usage environment and use them for automatic color tone correction, allowing you to calibrate the machine with greater accuracy.
These factory-default standard values are just general values. You can create new standard values for your usage environment and use them for automatic color tone correction, allowing you to calibrate the machine with greater accuracy.
Required Calibration
This section explains how to create new standard values for calibration.
IMPORTANT
Before performing automatic color tone correction, you need to perform automatic gradation calibration. If automatic gradation calibration has already been done, proceed to step 6.
1
Load the paper into the paper deck.
Load Canon Océ Top Colour Paper(81.4 g/m2) into the paper deck.
2
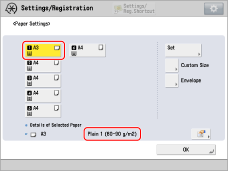
Make sure that the paper type in the paper deck is the same as the loaded paper.
 "Settings/Registration" > "Preferences" > "Paper Settings" > "Registering the Paper Size and Type for a Paper Source" in the User's Guide
Press  → [Preferences] → [Paper Settings] → [Paper Settings] to check the paper type.
 → [Preferences] → [Paper Settings] → [Paper Settings] to check the paper type.
3
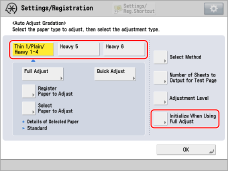
Select the paper that you want to correct, then press [Initialize When Using Full Adjust].
 "Adjustment for Image Quality and Finishing (Calibration)" > "Adjust Image Quality" > "Automatic Gradation Adjustment" in the User's Guide > see the subsection "Selecting Paper for Calibration"
Press  → [Adjustment/Maintenance] → [Adjust Image Quality] → [Auto Adjust Gradation] to select the paper.
 → [Adjustment/Maintenance] → [Adjust Image Quality] → [Auto Adjust Gradation] to select the paper.
The selected paper is displayed in yellow.
4
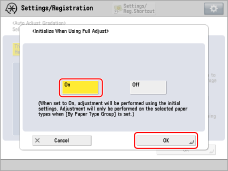
Press [On] → press [OK].
5
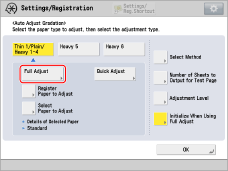
Perform automatic gradation calibration (full calibration).
 "Adjustment for Image Quality and Finishing (Calibration)" > "Adjust Image Quality" > "Automatic Gradation Adjustment" in the User's Guide > see the subsection "Full Adjustment"
Select the paper deck where you loaded the paper in step 1 as the paper source for test printing.
6
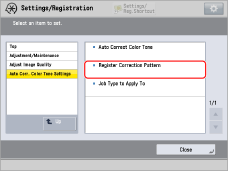
Create and register a new standard for automatic color tone correction.
 "Adjustment for Image Quality and Finishing (Calibration)" > "Adjust Image Quality" > "Automatic Color Tone Correction" in the User's Guide > see the subsection "Registering Correction Pattern"
Select "Plain 1 (80 g/m2 to 90 g/m2)" for the paper type that you will use for test printing.
Select the paper deck where you have loaded "Canon Océ Top Colour Paper (81.4 g/m2)" as the paper source for test printing.
Calibrating for Paper You Want to Use for Printing
You need to calibrate the machine for the paper you will register as paper for calibration. Make sure you complete the procedure in "Required Calibration", even if you are not going to use "Canon Océ Top Colour Paper (81.4 g/m2)".
This section explains how to create new standard values for calibration. You must use uncoated paper for the calibration even if you are using some type of paper other than uncoated paper for printing. If this is the case, use an uncoated paper that is as close as possible to the basis weight of the paper you are using for printing. For more information, see "How to Identify the Types of Paper You Can Use for Calibration" at the end of this document.
IMPORTANT
Before performing automatic color tone correction, you need to perform automatic gradation calibration. If automatic gradation calibration has already been done, proceed to step 7.
1
Load the paper you want to use for calibration.
Make sure that "Canon Océ Top Colour Paper (81.4 g/m2)" is also loaded properly for use, in addition to the paper you want to register as paper for calibration (one type or three types).
2
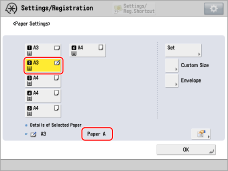
Change the paper type of the paper drawer to match the paper type loaded in step 1.
 "Settings/Registration" > "Preferences" > "Paper Settings" > "Registering the Paper Size and Type for a Paper Source" in the User's Guide
Press  → [Preferences] → [Paper Settings] → [Paper Settings] to set the paper type.
 → [Preferences] → [Paper Settings] → [Paper Settings] to set the paper type.
3
Register the paper you want to use for calibration.
 "Adjustment for Image Quality and Finishing (Calibration)" > "Adjust Image Quality" > "Automatic Gradation Adjustment" in the User's Guide > see the subsection "Registering Paper for Calibration"
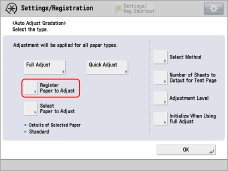
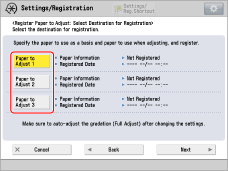
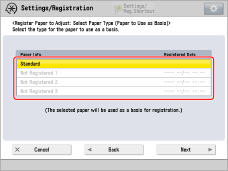
Select "Standard" for the type of the paper to use as a basis.
Select the paper drawer into which you have loaded the following recommended papers as the paper source containing the paper to use as a basis.
For the European and Asia-Pacific Regions
Canon Océ Top Colour Paper (100 g/m2)
For the American Region
Hammermill Color Copy Digital (28 lb bond (105 g/m2))
Select the paper drawer in which the paper you registered as paper for calibration has been loaded as the paper source that is loaded with custom paper to be used as the paper type to adjust.
4
Select the paper you registered in step 3 for [Select Paper to Adjust].
 "Adjustment for Image Quality and Finishing (Calibration)" > "Adjust Image Quality" > "Automatic Gradation Adjustment" in the User's Guide > see the subsection "Selecting Paper for Calibration"
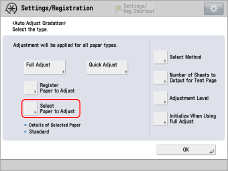
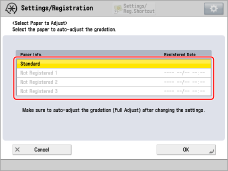
5
Confirm that the paper you registered in step 3 is selected.
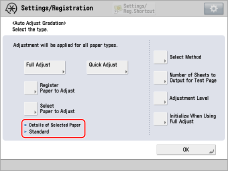
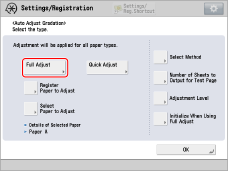
6
Perform automatic gradation calibration (full calibration) with the paper registered for calibration.
 "Adjustment for Image Quality and Finishing (Calibration)" > "Adjust Image Quality" > "Automatic Gradation Adjustment" in the User's Guide > see the subsection "Full Adjustment"
Select the paper drawer in which the paper you registered as paper for calibration has been loaded as the paper source for test printing.
7
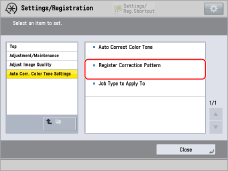
Create and register a new standard for automatic color tone correction.
 "Adjustment for Image Quality and Finishing (Calibration)" > "Adjust Image Quality" > "Automatic Color Tone Correction" in the User's Guide > see the subsection "Registering Correction Pattern"
Select the type of paper you will print on as the paper type that you will use for test printing.
Select the paper drawer in which the paper you registered as paper for calibration has been loaded as the paper source for test printing.
IMPORTANT
When standards for calibration are overwritten, the data is lost. Be careful not to overwrite the existing standard for calibration for the recommended paper when you register a new standard of calibration for the paper you can use for calibration.