43XC-031
How to Calibrate the imagePRESS Server and Subsequent Steps
You need calibrations from Command WorkStation according to the type of paper you use and you need to apply the calibration results when you print.
Adjust the calibration settings registered on Command WorkStation.
Add a new calibration setting for each type of paper you use.
This describes the procedure for using an output profile with the calibration setting when you print.
Update Already Registered Calibration Settings for Registered Types of Paper
This section explains how to update an already registered calibration setting by using a built-in inline sensor as an example.
Follow the same procedure below when you want to update the calibration settings registered by default on the imagePRESS Server for the recommended paper.
NOTE
When you perform the calibration with a manual spectrophotometer (X-Rite i1 Pro 2), you need to connect the spectrophotometer to a machine on which Command WorkStation is installed. Note that doing these operations overwrites any calibration values that you have registered.
You may have to purchase the spectrophotometer separately from the imagePRESS Server. Contact your local authorized Canon dealer.
1
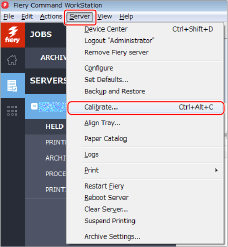
Click [Server] → [Calibrate] in Command WorkStation.
2
Select [Recalibrate], and then click [Next].
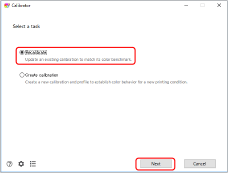
[Recalibrate]
Updates an existing calibration.
[Create calibration]
Creates a new calibration and profile.
3
Select the target calibration setting from the [Calibration name] pull-down, and then click [Next].
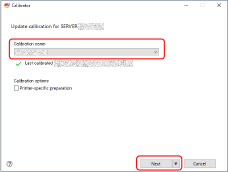
[Calibration name]
Select the paper you will use for the calibration. (Select "Plain (80 to 105 g/m2)" here.)
[Last calibrated:]
Displays the last date and time of the last calibration with the elapsed time.
[Printer-specific preparation]
Proceed to the calibration for the device when checking this box.
Types of Paper for Printing
When you want to update the calibration setting registered by default for recommended paper, use the paper below that matches with the [Calibration name].
For the European and Asia-Pacific Regions
Canon Océ Top Colour Paper (100 g/m2): Plain (80 to 105 g/m2)
Canon Océ Top Colour Paper (250 g/m2): Heavy (106 to 400 g/m2)
OK Top Coat Plus (127.9 g/m2): Coated (70 to 209 g/m2)
Futura Gloss Cover (271 g/m2): Heavy Coated (210 to 400 g/m2)
Canon Océ Top Colour Paper (250 g/m2): Heavy (106 to 400 g/m2)
OK Top Coat Plus (127.9 g/m2): Coated (70 to 209 g/m2)
Futura Gloss Cover (271 g/m2): Heavy Coated (210 to 400 g/m2)
For the American Region
Hammermill Color Copy Digital (28 lb bond (105 g/m2)): Plain (80 to 105 g/m2)
Mohawk Options Navajo Smooth Brilliant White (90 lb Cover (243 g/m2)): Heavy (106 to 400 g/m2)
OK Top Coat Plus (34 lb bond (127.9 g/m2)): Coated (70 to 209 g/m2)
Futura Gloss Cover (100 lb Cover (271 g/m2)): Heavy Coated (210 to 400 g/m2)
Mohawk Options Navajo Smooth Brilliant White (90 lb Cover (243 g/m2)): Heavy (106 to 400 g/m2)
OK Top Coat Plus (34 lb bond (127.9 g/m2)): Coated (70 to 209 g/m2)
Futura Gloss Cover (100 lb Cover (271 g/m2)): Heavy Coated (210 to 400 g/m2)
NOTE
The paper names are subject to change without notice. For more information, contact your local authorized Canon dealer.
4
Select each item, and then click [Next].
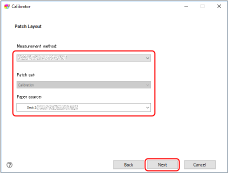
[Measurement method]
Select the calibration method. (Select "XXXXXXXX Inline" here.)
[Patch set]
When you select XXXXXXXX Inline, you cannot select the patch set.
[Paper source]
Select the paper deck where you have loaded the paper which you want to update the calibration setting of.
5
A calibration page is printed.
When you select a manual spectrophotometer (X-Rite i1 Pro 2) in [Measurement method]

1
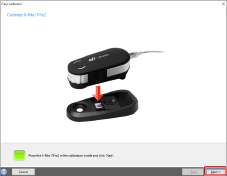
Place the spectrophotometer X-Rite i1 Pro 2 on the cradle, and then click [Next].
2
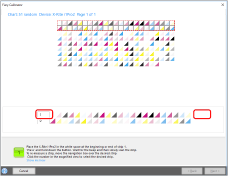
Place the sensor of the spectrophotometer on the calibration page.
Place several sheets of paper that is the same as the paper for the calibration so that the color or pattern of the surface where the calibration is done (such as a desk) does not show through, and place the calibration paper on the top.
Focus the sensor of the spectrophotometer on the white area that is located at the beginning or end of strip "1."
3
Hold the spectrophotometer button and scan strip "1."
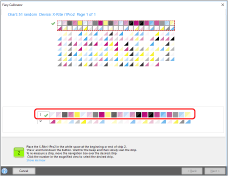
Hold the spectrophotometer button. Keep holding the button and move the spectrophotometer from the left to the right, or from the right to the left, to scan strip "1."
Release the button after you have finished scanning.
NOTE
To keep the scanning accuracy, use the ruler provided with the spectrophotometer.
4
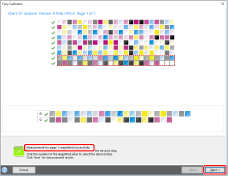
Scan strips "2" to "9" in the same way.
5
After "Measurement for page 1 completed successfully." appears, click [Next].
6
Click [Apply & Close].
When you click  , a chart of the measurement result appears. Check that the curve in the measurement result is not significantly different from the standard curve.
 , a chart of the measurement result appears. Check that the curve in the measurement result is not significantly different from the standard curve.
7
After "Measurements are successfully applied to ..." appears, click [OK].

6
Click [Apply & Close].
When you click  , a chart of the measurement result appears. Check that the curve in the measurement result is not significantly different from the standard curve.
 , a chart of the measurement result appears. Check that the curve in the measurement result is not significantly different from the standard curve.
7
After "Measurements are successfully applied to ..." appears, click [OK].

Register a New Calibration Setting According to the Type of Paper You Use
This section explains how to calibrate for the type of paper you will use by using a built-in inline sensor as an example.
You can print more accurately by linking the calibration setting for the type of paper with the output profile for use.
NOTE
When you perform the calibration with a manual spectrophotometer (X-Rite i1 Pro 2), you need to connect the spectrophotometer to a machine on which Command WorkStation is installed. Note that doing these operations overwrites any calibration values that you have registered.
You may have to purchase the spectrophotometer separately from the imagePRESS Server. Contact your local authorized Canon dealer.
1
Click [Server] → [Calibrate] in Command WorkStation.

2
Select [Create calibration], and then click [Next].
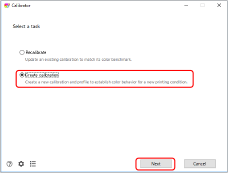
[Recalibrate]
Updates an existing calibration.
[Create calibration]
Creates a new calibration and profile.
3
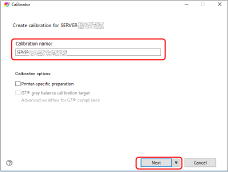
Enter a calibration name in [Calibration name], and then click [Next].
4
Select [Instrument] and click [Print].
When you select X-Rite i1 Pro 2, select also the patch set and chart size.
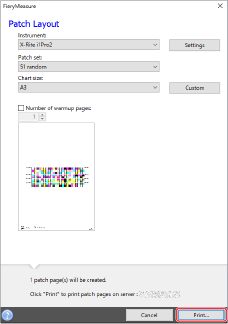
The job properties screen of patch chart print is displayed.
5
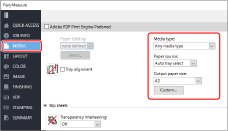
Select the [MEDIA] tab, and then specify each setting.
Select the paper deck in which the target paper for the standard creation is loaded, and then specify the paper type and size.
6
Click [OK] to print the calibration page.
When you select a manual spectrophotometer (X-Rite i1 Pro 2) in [Instrument]

1
Place the spectrophotometer X-Rite i1 Pro 2 on the cradle, and then click [Next].

2
Place the sensor of the spectrophotometer on the calibration page.
Place several sheets of paper that is the same as the paper for the calibration so that the color or pattern of the surface where the calibration is done (such as a desk) does not show through, and place the calibration paper on the top.
Focus the sensor of the spectrophotometer on the white area that is located at the beginning or end of strip "1."

3
Hold the spectrophotometer button and scan strip "1."

Hold the spectrophotometer button. Keep holding the button and move the spectrophotometer from the left to the right, or from the right to the left, to scan strip "1."
Release the button after you have finished scanning.
NOTE
To keep the scanning accuracy, use the ruler provided with the spectrophotometer.
4
Scan strips "2" to "9" in the same way.
5
After "Measurement for page 1 completed successfully." appears, click [Next].

6
Link the calibration setting with the output profile and click [OK].
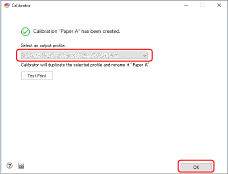
The calibration setting for the paper you want to print on is added to the list.
NOTE
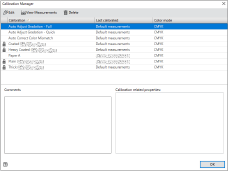
Click [Server] → [Calibrate] in Command WorkStation to open the calibrator screen. In the calibrator screen, click  to display the calibration manager screen, and then check the calibration setting that you add beforehand.
 to display the calibration manager screen, and then check the calibration setting that you add beforehand.

How to Apply a Calibration Setting when You Print
Setting Output Profiles to a Job
You can set output profiles to each job in the imagePRESS Server. Follow the procedure below to use an arbitrary profile temporarily.
1
Double-click the job in Command WorkStation.
[Job Properties] is displayed.
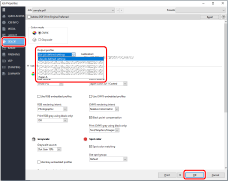
2
Select the [COLOR] tab, select any output profile in [Output Profile], and then click [OK].
Applying an Output Profile to Paper Catalog
1
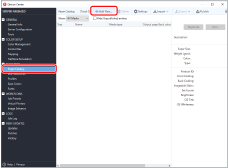
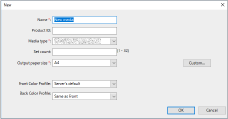
Click [Paper Catalog] → [Add New] in the device center screen.
2
Register attributes of the paper you want to print on in the imagePRESS Server.
Specify a name, type, and size of the paper, and then select the output profile you set in step 11, for [Front Color Profile].
NOTE
If the front and back surfaces of the paper are different, you can select [Back Color Profile] and [Front Color Profile] separately.
For detailed information on the setting items, see the user manual or the Help for the imagePRESS Server.
3
Click [OK].
See "How to Create a Custom Output Profile" for information about how to use profile creation software to create output profiles.
Calibration Settings and Output Profiles

You need to link the output profile to the calibration settings to use them for the paper you want to print on. You can use a calibration setting with several output profiles, but each output profile must be linked with only a single calibration setting.
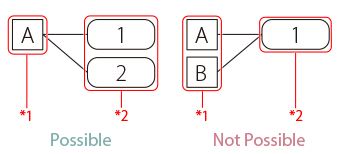
*1 Calibration setting
*2 Output profiles