43XC-00K
Improving the Finish of Booklets
If you are not satisfied with how your booklets are finished, such as the page layout being different from what you expected, or the starting and/or ending page of the main document not being printed on the pages you expected, check the following.
NOTE
This section explains how to specify each setting to make a saddle stitch booklet that opens to the left (left binding) as an example.
Confirming the Basic Settings
1
Double-click the job in Command WorkStation on the imagePRESS Server.
[Job Properties] is displayed.
2
Select the [LAYOUT] tab, and then click [Booklet].
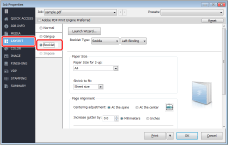
3
Confirm that [Saddle] and [Left Binding] are selected for <Booklet Type>.
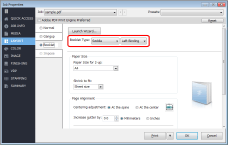
4
Confirm that the appropriate paper size is selected from the <Paper Size> drop-down list.
NOTE
Select a paper size for <Paper Size> that is twice as large as the size of the booklet you want to make. For example, if you select A4 for <Paper Size>, the finished booklet size is A5.
When making a saddle stitched booklet, two pages of the original document are printed on each sheet of paper (2-up). For example, if you select A4 for <Paper Size>, and parts of the image and text on the page are larger than A5, those parts are cropped from the printouts. To avoid this, select [Sheet size] or [Imageable area] in <Shrink to fit>. This automatically reduces the size of the original pages, without unwanted cropping, so that they can be printed on the size of paper you selected.
Confirming the Position of Text and Images on the Page
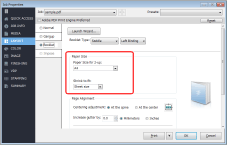
1
Confirm the settings for <Centering adjustment> and <Increase gutter by> under <Page Alignment>.
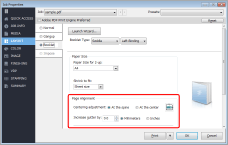
If parts of images or text are hidden by the binding
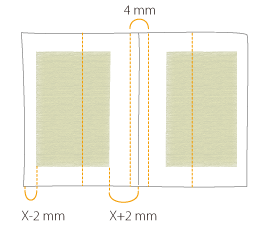
If you select <At the spine> for <Centering adjustment>, be sure that "0.0" is not set for <Increase gutter by>. If "0.0" is set, the print position of each page is aligned to the center of the paper without a gutter. When the pages are stitched together, the printed image and text may be hidden. Be sure to specify an appropriate value for <Increase gutter by>. For example, if you set "4.0" (mm), the images and text on both the left and right pages are moved 2 mm toward the fore-edges.
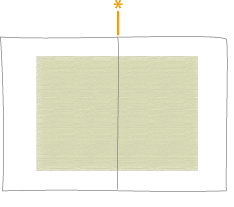
* Binding position
If you select <At the spine> for <Centering adjustment>, and set "0.0" for <Increase gutter by>
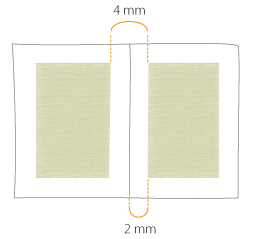
If you select <At the spine> for <Centering adjustment>, and set "4.0" (mm) for <Increase gutter by>
If parts of images or text are too close to the fore-edges
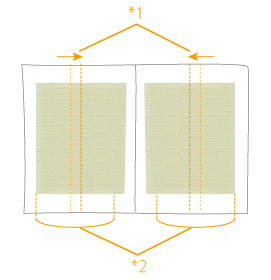
If the images or text are printed too close to the fore-edges, even though you set the print position to the center of the page*, confirm that the value for <Increase gutter by> is set to "0.0". For example, if you set "4.0" (mm), images and text on both the left and right pages moves 2 mm toward the fore-edge. If there is an image on a gutter, set to a negative value to move the margin to the gutter.
* If you select <At the center> for <Centering adjustment>, the images and text on both the left and right pages are centered on each page.
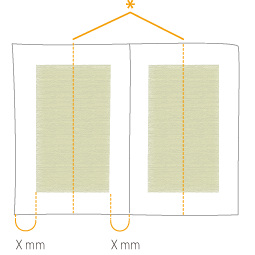
* Center of the page
If you select <At the center> for <Centering adjustment>, and set "0.0" for <Increase gutter by>
If you select <At the center> for <Centering adjustment>, and set "4.0" (mm) for <Increase gutter by>
*1 Input the measurements to the center of the paper as negative values.
*2 Actual image width
Select <At the center> for <Centering adjustment> and input a negative value for <Increase gutter by> to move the image to the gutter side.
Adjusting Margins with Creep Compensation
A problem, when binding a booklet with very thick paper or many pages, is that progressively more paper is trimmed from the pages the closer they are to the center of the booklet. If the booklet is trimmed as is, the type area position near the center and near the covers will differ. To avoid this, type areas need to be moved slightly closer to the fore-edges on some pages. This is called creep compensation. If the type area positions are inconsistent, check that the creep compensation settings are correct.
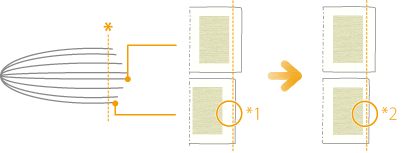
* Trimming position
*1 Without creep compensation, the outer margins after the booklet is trimmed are inconsistent.
*2 With creep compensation, the outer margins after the booklet is trimmed get consistent.
1
Select the check box for <Compensate creep>, and then select a type of paper from the drop-down list.
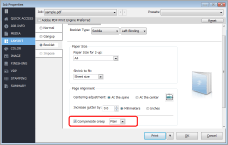
When making a booklet containing many pages by using plain paper
Select [Plain].
When making a booklet by using heavy paper (heavy basis weight)
Select [Heavy].
Checking the Cover Settings
If you have any of the following problems, confirm that the settings for the cover are appropriate.
The first page of the main document is printed on the front cover, even though you want to add a front cover using a pre-printed cover.
The main document is printed on the inside of the front cover, even though you want the front cover to be blank.
Feeding Pre-printed Covers from a Different Paper Source than for the Main Document
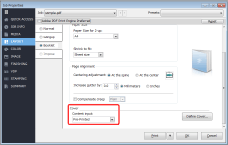
1
Confirm [Pre-Printed] is selected from the <Content input> drop-down list for <Cover>.
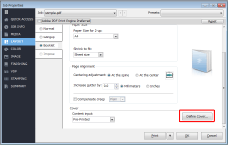
2
Click [Define Cover] to confirm the settings are appropriate.
Leaving the Inside of the Front Cover Blank
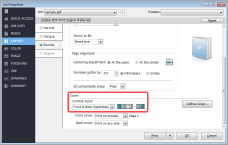
1
Confirm [Front & Back Separately] is selected from the <Content input> drop-down list for <Cover>.
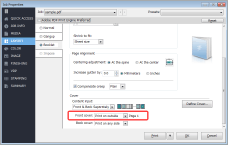
2
Confirm [Print on outside] is selected from the <Front cover> drop-down list.
Various Settings for Printing Covers
You can specify various ways to print covers depending on what you select for the <Front cover> and <Back cover> settings.
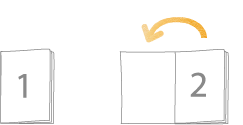
If [Print on outside] is selected for the <Front cover>
The machine starts printing the first page of the print data on the outside of the front cover and does not print on the inside of the front cover, and then continues printing the second page of the print data on the page following the front cover.
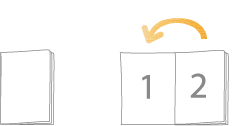
If [Print on inside] is selected for the <Front cover>
The machine prints the first page on the inside of the front cover and the following pages in order after that. It does not print on the outside of the front cover.
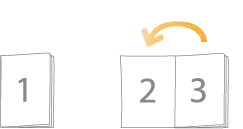
If [Print on both sides] is selected for the <Front cover>
The machine prints the first page on the outside of the front cover and the following pages in order after that. It prints on the inside of the front cover too.
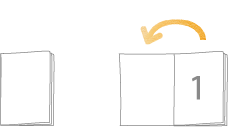
If [Do not print] is selected for the <Front cover>
The machine does not print on either side of the front cover. It prints the first page on the next page after the front cover and the following pages in order.
NOTE
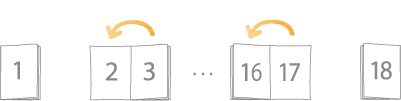
Confirm the settings for <Back cover> as well as the settings for <Front cover>. For example, if you set [Print on outside] for both <Back cover> and <Front cover>, and print a job that has a total of 18 pages, the pages are printed as shown below.
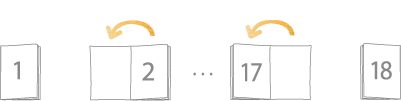
If the total number of pages in the print data does not match the settings for <Front cover> and <Back cover>, unwanted blank pages may be inserted. If the printed result of the booklet differs from what you expected, adjust the total number of pages in the print data by inserting blank pages.
If [Print on any side] is selected for the <Back cover>
The pages are printed in the order that they appear in the data, regardless of whether the first page is intended to be a cover page or body page. When you print data consisting of 18 pages, the data is printed as follows.