9870-00J
[Windows] Printing on a custom paper size
If you cannot print on a custom paper size, the set paper size may not match the range of paper sizes supported by the device. This problem may be able to be solved by setting the custom paper sizes supported by your device.
Check one of the following to solve the problem.
When using the Generic Plus driver
If the above does not solve the problem or you are using a driver other than the Generic Plus driver
NOTE
Screens and operations may differ, depending on the environment of your computer and the following conditions.
The device you are using and its settings, firmware version, and option configuration
The driver you are using and its version
Prerequisites
When starting the computer, log on as a member of Administrators.
Setting a configuration profile type suitable for your device
1
Click [ Start]
  [
[ Settings] in Windows.
 Start]
  [
[ Settings] in Windows.
2
Click [Devices].
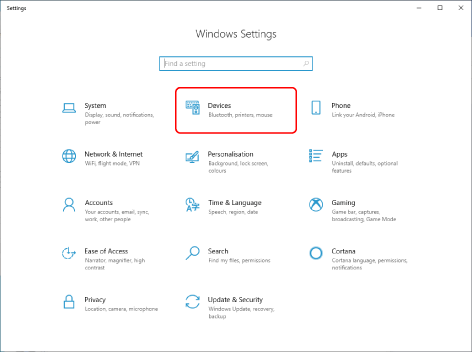
3
Click [Printers & scanners].
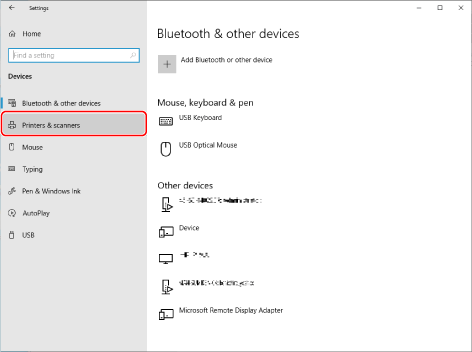
4
Select the device whose settings you want to configure → click [Manage].
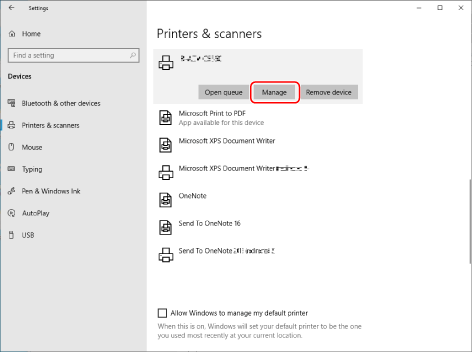
5
In [Manage your device], click [Printer properties].
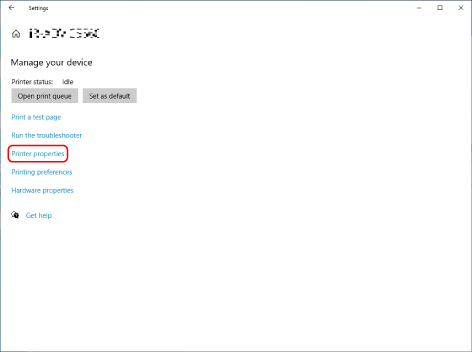
6
Display the [Device Settings] sheet.
7
Confirm that a configuration profile type suitable for your device is set in [Configuration Profile].
For information on the configuration profile types suitable for your device, refer to the manual of the printer driver.
If a configuration profile type suitable for your device is set, the procedure is complete. If not, proceed to step 8.
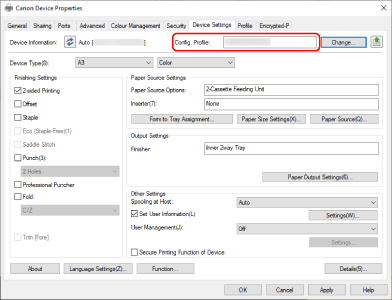
Click [Details] → display the [Other Settings] sheet of the displayed dialog box.
9
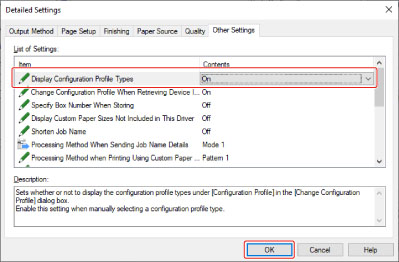
Select [On] for [Display Configuration Profile Types] → click [OK].
10
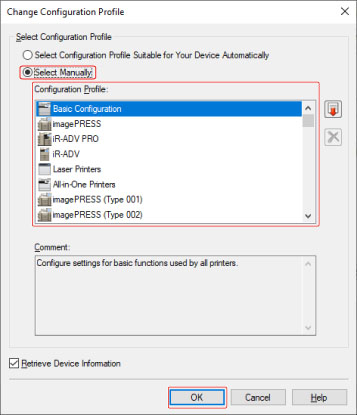
Click [Change] next to [Config. Profile] in the [Device Settings] sheet.
11
Select [Select Manually] → select the configuration profile that matches the device you are using → click [OK].
Refer to the printer driver manual to confirm the combination of device and configuration profile.
12
Click [Apply] in the [Device Settings] sheet → click [OK].
Setting the custom paper sizes supported by your device
1
Click [ Start]
  [
[ Settings] in Windows.
 Start]
  [
[ Settings] in Windows.
2
Click [Devices].

3
Click [Printers & scanners].

4
Select the device whose settings you want to configure → click [Manage].

5
In [Manage your device], click [Printer properties].

6
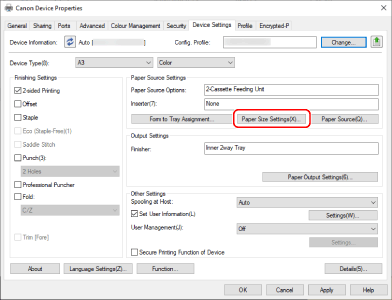
Display the [Device Settings] sheet.
7
Click [Paper Source Settings]  [Paper Size Settings].
 [Paper Size Settings].
8
Set the maximum and minimum custom paper sizes for your device in [Range] in the displayed dialog box.
For information on the paper sizes that can be set, refer to the manual of the device.
NOTE
This FAQ explains the example of Windows 10.