9870-01A
[Windows] Printing text and symbols correctly
Text or symbols may not be printed correctly when using a printer font.
Check one of the following to solve the problem.
When using the Generic Plus LIPS4 driver
Perform the remedy indicated in "1. Setting the internal spooling process." If this does not solve the problem, perform the remedy indicated in "2. Disabling the substitution of TrueType fonts."
When using the Generic Plus PS3 driver
NOTE
Screens and operations may differ, depending on the environment of your computer and the following conditions.
The device you are using and its settings, firmware version, and option configuration
The driver you are using and its version
1. Setting the internal spooling process
Set the internal spooling process for print data to [Enabled].
1
Click [ Start]
  [
[ Settings] in Windows.
 Start]
  [
[ Settings] in Windows.
2
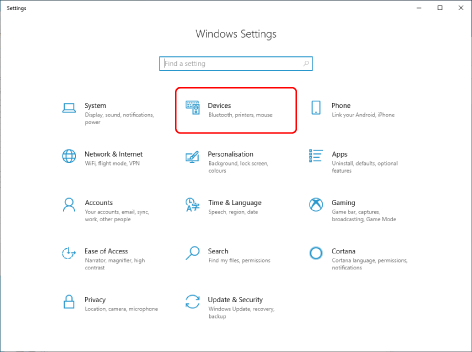
Click [Devices].
3
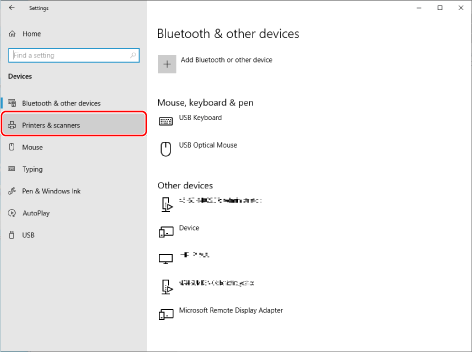
Click [Printers & scanners].
4
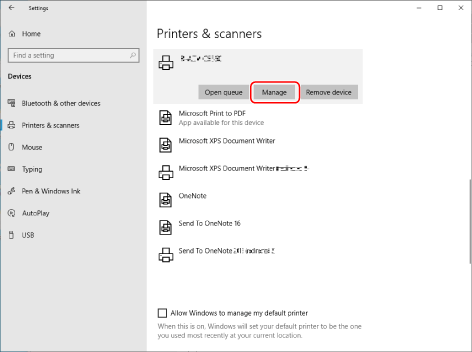
Select the device whose settings you want to configure → click [Manage].
5
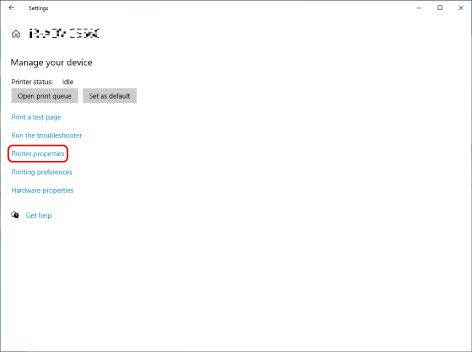
In [Manage your device], click [Printer properties].
6
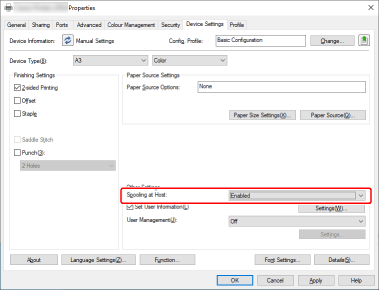
Display the [Device Settings] sheet.
7
Select [Enabled] for [Other Settings]  [Spooling at Host]
 [Spooling at Host]
8
Click [OK].
2. Disabling the substitution of TrueType fonts
1
Select the print menu of the application.
2
On the displayed print screen, select the device you are using → click [Preferences].
"Printer properties" or "Properties" may be displayed, depending on the application.
3
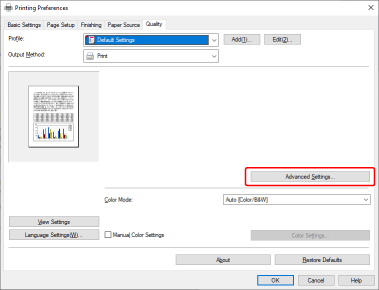
Display the [Quality] sheet of the print settings screen.
4
Click [Advanced Settings].
5
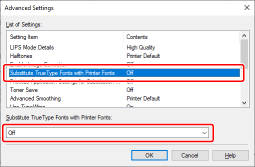
Set [Substitute TrueType Fonts with Printer Fonts] to [Off].
6
Click [OK].
Sending TrueType fonts to a device
1
Select the print menu of the application.
2
On the displayed print screen, select the device you are using → click [Preferences].
"Printer properties" or "Properties" may be displayed, depending on the application.
3
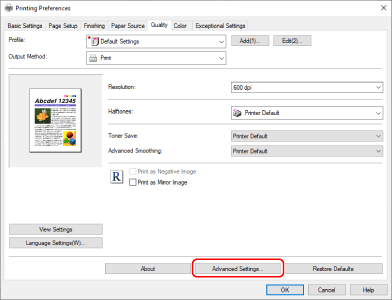
Display the [Quality] sheet of the print settings screen.
4
Click [Advanced Settings].
5
In the displayed dialog box, select [TrueType Font Settings] → click [Details].
6
In the [TrueType Font Details] dialog box, select [Substitution]  [Always Send TrueType Fonts] → click [OK].
 [Always Send TrueType Fonts] → click [OK].
7
In the [Advanced Settings] dialog box, click [OK].
Downloading TrueType fonts for use
Prerequisites
When starting the computer, log on as a member of Administrators.
1
Click [ Start]
  [
[ Settings] in Windows.
 Start]
  [
[ Settings] in Windows.
2
Click [Devices].

3
Click [Printers & scanners].

4
Select the device whose settings you want to configure → click [Manage].

5
In [Manage your device], click [Printer properties].

6
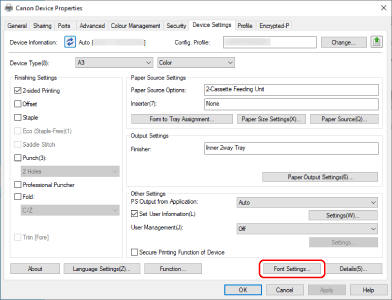
Display the [Device Settings] sheet.
7
Click [Font Settings].
8
In the displayed dialog box, select the font of the text that is not printed correctly → select [Download] for [Edit Printer Fonts] → click [OK].
NOTE
This FAQ explains the example of Windows 10.