9870-03C
[Windows] Attaching scanned images to documents (Color Network ScanGear 2)
You can start Color Network ScanGear 2 and scan originals placed in the device to attach scanned images to documents.
Color Network ScanGear 2 can be used to scan images from devices on the network. You can also adjust the brightness and density or specify the area to scan when scanning.
Configure the settings in the order indicated below.
Prerequisites
The device is turned ON
The device is connected to the network correctly
NOTE
Screens and operations may differ, depending on the environment of your computer and the following conditions.
The device you are using and its settings, firmware version, and option configuration
The driver you are using and its version
Selecting the Scanner in the Color Network ScanGear 2 Tool
When using Color Network ScanGear 2 for the first time, select the device to use in the Color Network ScanGear 2 Tool.
If it is already selected, proceed to the next step.
Prerequisites
Checking the IP address or host name of the device
The Color Network ScanGear 2 driver is not installed
1
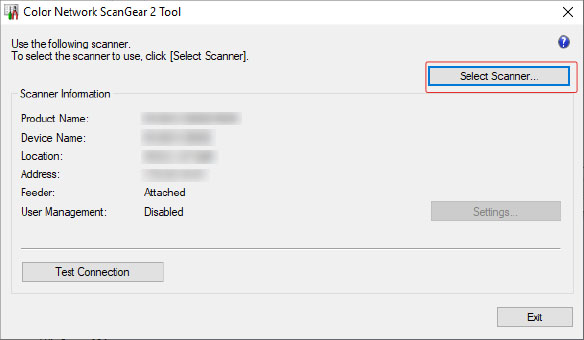
Select [Color Network ScanGear 2]  [Color Network ScanGear 2 Tool] from the Start menu of Windows.
 [Color Network ScanGear 2 Tool] from the Start menu of Windows.
2
Click [Select Scanner].

3
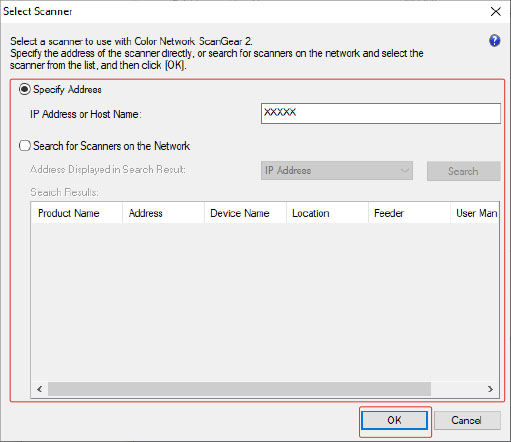
Select the device to use → click [OK].

When selecting the device by specifying its address
Select [Specify Address] → enter the IP address or host name of the device to use.
When discovering devices on a network
(1) Select [Search for Scanners on the Network] → select [IP Address] or [IP Address or Host Name] from [Address Displayed in Search Result] → click [Search].
(2) Select the device to use from the devices displayed in [Search Results].
NOTE
When devices on the network are discovered, only devices on the same subnet (the networks with the same network ID) are displayed in the list.
4
On the basic screen of the Color Network ScanGear 2 Tool, click [Test Connection] to confirm that the selected device is connected.
5
Click [Exit].
Turning [Scanner] Online on the Device
1
Press [ ] (Home) on the control panel.
 ] (Home) on the control panel.
2
Press [Scanner] on the Home screen.
3
Press [Online].
Scanning Using Color Network ScanGear 2
You can start Color Network ScanGear 2 from an application to attach scanned images to documents.
Prerequisites
The Color Network ScanGear 2 Tool is not running
1
Open the document to attach the images to from the application.
2
Start Color Network ScanGear 2 from the application.
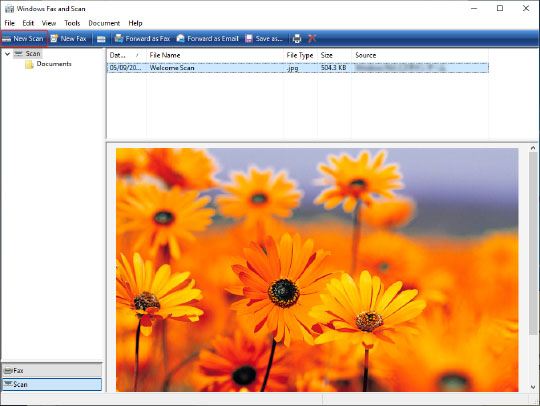
In this example, it is started from [Windows Fax and Scan].
(1) Select [Windows Accessories]  [Windows Fax and Scan], from the Start menu of Windows.
 [Windows Fax and Scan], from the Start menu of Windows.
(2) Click [New Scan].
Multiple drivers may be displayed, depending on the application. In this case, select [Color Network ScanGear 2].

3
On the Color Network ScanGear 2 screen, select the location where the originals are placed on the [Basic Settings] sheet  [Scanning Method].
 [Scanning Method].
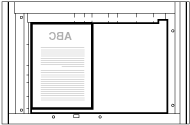
When placing originals on the platen glass, place the originals with the side to be scanned facing downward.

4
Configure the settings such as the color mode and resolution.
To preview the scanned image, place the original to scan on the platen glass and click [Preview]. The scanned image is displayed in the preview area when scanning is complete.
You can set the area to scan on the preview image.
The image cannot be previewed when scanning originals via the feeder.
5
Click [Scan].
Scanning starts.
After scanning is finished, if the Color Network ScanGear 2 screen does not close automatically, click the exit button on the top of the screen.
When scanning is complete, the scanned image is displayed in the document.
If scanning was performed by starting Color Network ScanGear 2 from [Windows Fax and Scan], the scanned image is saved to the [Scanned Documents] folder.
IMPORTANT
After clicking [Scan], do not operate the Color Network ScanGear 2 screen until the dialog box showing the scanning progress status is displayed.