5UU3-00E
Getting Clear Text and Lines from Your Machine
If you are not satisfied with printouts because of faint, blurry, or rough edges on text and lines, check the solutions below.

Eliminating the Basic Causes
Find the answers to your questions about how to solve your problems.
Are the Letters or Lines Too Small or Too Thin?
If the letters or lines in the data you are printing are too small or too thin, the printed letters and lines may appear faint.
Remedy
If possible, modify the data you are printing to enlarge the text and make the lines thicker.
Are You Using an Outline Font?
Outline fonts become thicker when they are printed, and they look different from their images on your computer screen.
Remedy
If you set [1200dpi] for [Resolution], it may reduce the thickness of fonts. For detailed procedure, see "Reducing the thickness of outline font."
If possible, print the image using a non-outline font.
Changing Print Settings for a Job with the imagePRESS Server
If printed text or lines are still faint or blurry after you follow the procedures in "Eliminating the Basic Causes," change the print settings in Command WorkStation on the imagePRESS Server. Note that if you change the following print settings, it may affect the print results, such as when printing photos. If possible, we recommend you change the settings gradually, so you can judge the effect of the changes that you make.
Printing figures, lines, and text with vivid clarity while keeping the smooth gradation of photographs
Printing text with vivid clarity while keeping the smooth gradation of photographs, figures, and lines
Reducing jagged edges on text and lines
Printing text thicker because the thin lines of Roman fonts appear faint
Printing black text and lines clearly
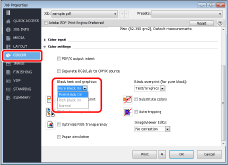
Changing Settings in the [IMAGE] Tab
1
Double-click the job in Command WorkStation.
[Job Properties] is displayed.
2
Click the [IMAGE] tab → change the print settings for [Printer's halftone], [Advanced smoothing], [Width adjustment], and [Resolution], if necessary.

Printing figures, lines, and text with vivid clarity while keeping the smooth gradation of photographs

We recommend you select [Pattern 2] or [Pattern 7] for [Printer's halftone].
If you want to keep the gradation of figures and lines, we recommend you select [Pattern 7].
Printing text with vivid clarity while keeping the smooth gradation of photographs, figures, and lines

We recommend you select [Pattern 4] for [Printer's halftone].
Reducing jagged edges on text and lines

We recommend you select [Level 1] or [Level 2] for [Advanced smoothing].
To use this function, you need to specify the settings for advanced smoothing in advance. For detailed information, see "Specifying the Settings for the Printout's Finish."
If you use this function, colors of the edges on text and lines and colors of the text and lines themselves may look darker.
Printing text thicker because the thin lines of Roman fonts appear faint

We recommend you select the check box for [Width adjustment].
To use this function, you need to specify the thickness and font color for the target text in advance. For detailed information, see "Specifying the Settings for the Printout's Finish."
Reducing the thickness of outline font

We recommend you select [1200dpi] for [Resolution].
In some cases, this may make lines too thin and faint because it prints text and lines exactly as they are in the data.
3
Click [OK].
Print a test sheet to check the sharpness of text and lines. If you are satisfied with the result, you can print the job.

Dither patterns have been set in this machine by default.
Dither Pattern | Name | Features |
Pattern 1 | This setting enhances the reproduction of halftones of color images. | |
 | Pattern 2 | Default setting |
 | Pattern 3 | This setting enhances the reproduction of highlight areas of black-and-white images. |
 | Pattern 4 | This setting improves the granularity of color images. |
If you select one from [Pattern 1] to [Pattern 7] for [Printer's halftone], the dither patterns above are automatically set depending on the output image.
Patterns | Images (Photographs) | Graphics (Figures and Lines) | Text (Letters) |
Pattern 1 | Resolution | Error diffusion | Error diffusion |
Pattern 2 | Gradation | Error diffusion | Error diffusion |
Pattern 3 | Resolution | Resolution | Error diffusion |
Pattern 4 | Gradation | Gradation | Error diffusion |
Pattern 5 | Gradation | Resolution | Resolution |
Pattern 6 | Gradation | Gradation | Resolution |
Pattern 7 | Gradation | Resolution | Error diffusion |
1
Press  → <Fiery>.
→ <Fiery>.
2
Press <Tools> → <Setup>.

3
Enter the password → press <Login>.

4
Press <Printer> → <Print Form Setup>.

5
Specify the settings for Advanced smoothing.
If you want to reduce jagged edges on lines, select <On> for <Advanced smoothing for graphics>.
If you want to reduce jagged edges on text, select <On> for <Advanced smoothing for text>.
If you want to apply the advanced smoothing settings to direct printing, such as PDF printing, select <Level 1> or <Level 2> for <Advanced smoothing>. (<Level 2> is more effective.)
6
Specify the settings for the text element.
If you want to make horizontal lines on the text thicker, select <Level 1> or <Level 2> for <Horizontal width adjustment>. (<Level 2> is more effective.)
If you want to make vertical lines in the text thicker, select <Level 1> or <Level 2> for <Vertical width adjustment>. (<Level 2> is more effective.)
If you want to specify the settings for the text element for black text only, select <Black only> for <Width adjustment color>.
If you want to apply the settings for the text element for direct printing, such as PDF printing, select <On> for <Width adjustment>.
7
Press <Save Changes>.
Changing Settings in the [COLOR] Tab
1
Double-click the job in Command WorkStation.
[Job Properties] is displayed.
2
Click the [COLOR] tab, and change the print settings in [Black text and graphics] according to what you are printing and how you want the printouts to appear.
Printing black text and lines clearly

We recommend you select [Pure Black On] or [Rich Black On] for [Black text and graphics].
You can make black elements in printouts more vivid if you select [Rich Black On] rather than [Pure Black On], because [Rich Black On] produces black by adding cyan to black.
3
Click [OK].
Print a test sheet to check the sharpness of text and lines. If you are satisfied with the result, you can print the job.