 (Status Monitor). Changing the Default Screen for Status Checking to the Print Job History Screen
CHYC-028
Checking the Print Job History
This section describes how to view and check print job history on this machine's control panel.
If you frequently check the print job history, you can specify that the print job history screen appears after you press (Status Monitor). Changing the Default Screen for Status Checking to the Print Job History Screen
(Status Monitor). Changing the Default Screen for Status Checking to the Print Job History ScreenNOTE
Screens differ depending on your model and the installed options. (The screens shown below are for configuring the Department ID Management settings.)
Checking the Print Job History
1
On the <Home> screen, press (Status Monitor).
(Status Monitor).2
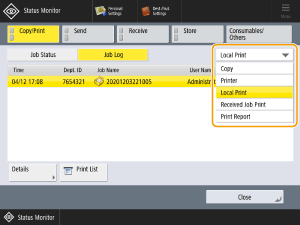
Press <Copy/Print>  <Job Log>.
3
Select the item for displaying the job history from the drop-down list.
Here, select <Local Print>.
<Copy>
Displays the copy job history.
<Printer>
Displays the print job history.
<Local Print>
Displays the local print job history, including print jobs from Fax Inbox and Memory RX Inbox.
<Received Job Print>
Displays the incoming print job history, including fax print jobs.
<Print Report>
Displays the report print job history.
4
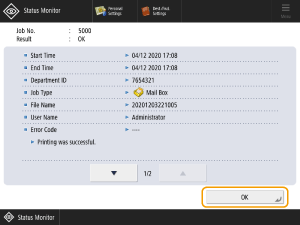
Select the print job you want to check the details for and press <Details>.
You can print a print history report by pressing <Print List>.
5
Once you have checked the details, press <OK>.
Changing the Default Screen for Status Checking to the Print Job History Screen
1
On the <Home> screen, press  (Settings/Registration).
(Settings/Registration).2
Press <Preferences> <Display Settings> <Default Screen (Status Monitor)>.
3
In <Default Status Type> select <Copy/Print>, in <Status/Log> select <Job Log> and in <Details> select <Local Print>.
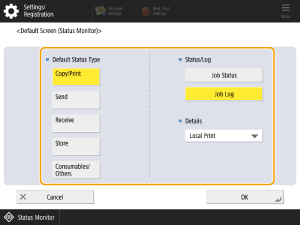
4
Press <OK>.
The print job history screen will now appear when you press (Status Monitor).
(Status Monitor).