 (Start). When scanning all of the originals is complete, press <Start Sending> to send the I-fax.
CHYE-00K
Using Internet Faxes (I-Fax)
This section describes how to send and receive faxes via the Internet.
NOTE
First check that the following settings have been completed:
You can use the send functions.
The network has been set up.
The destination machine can receive Internet/Intranet faxes.
The screens shown may differ depending on your model and the installed options.
Sending I-Faxes
1
Place your originals in the feeder or on the platen glass.
2
On the <Home> screen, press <Scan and Send> .
3
Press <Address Book> on the Scan Basic Features screen.
While there are various ways to specify the destination, this description explains how to specify a destination from the Address Book.
4
Select the destination and press <OK>.
If an access number is set when the destination is registered, press <Access No.> and enter the access number using the numeric keys. The corresponding destination is displayed in the Address Book.
To use the Remote Address Book, press <To Remote Address Book>. When <Change Address Book> appears, press <Change Address Book>  <Remote>.
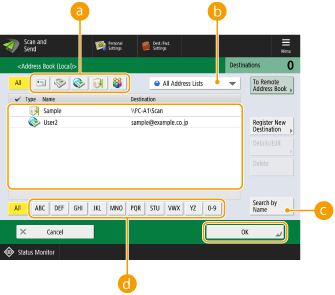
 Destination type buttons
Pressing  and
and  displays I-fax and group destinations, respectively.
and displays I-fax and group destinations, respectively. Drop-down list for selecting Address Book types
Enables you to display a specific group of destinations. When you are logged in to the machine with personal authentication management, selecting <Personal Address List> displays your personal Address Book.
 <Search by Name>
Enables you to search for a destination by its name.
 Search buttons by first letter
Enables you to narrow down a search by the first letter of the destination name.
NOTE
To use the Remote Address Book, configure the server machine settings. Set to share the Remote Address Book externally on the server machine.
5
Specify the scan settings from <Options> as needed.
6
Press (Start).
(Start).Originals are scanned and sending starts.
To cancel scanning, press <Cancel> or  (Stop) <Yes>.
(Stop) When <Press the [Start] key to scan the next original.> appears
Place the next original to scan and press (Start). When scanning all of the originals is complete, press <Start Sending> to send the I-fax.
(Start). When scanning all of the originals is complete, press <Start Sending> to send the I-fax.To cancel sending, press <To Status Monitor> select a document <Cancel> <Yes>.
When You Receive an I-Fax
When an I-fax is received
The Processing/Data indicator on the control panel blinks green. When receiving is complete, the document is automatically printed and the indicator turns off.
NOTE
To cancel receiving, press  (Status Monitor) <Receive> <Job Status> select a document <Cancel>.
(Status Monitor) To receive an I-Fax manually, press (Status Monitor) <Receive> <Job Status> <Check I-Fax RX>.
(Status Monitor) To check the receive status and size of an I-Fax received in multiple parts, on the <Home> screen, press <Fax/I-Fax Inbox> <Memory RX Inbox> <Divided Data RX Inbox>.
Output paper
An incoming I-fax is printed on the same size of paper as the document size received. When there is no paper matching the size of the received document, the document is printed according to the <Select Drawer> setting.