CHYE-00J
Notifying Completed Transmission by e-Mail when Faxes are Sent from a Computer (PC Fax)
This section describes how to have e-mail notifications of TX reports sent when faxes are sent from a computer (PC Fax).
Configure the [Job Done Notice] function in the fax driver before sending the fax.
NOTE
First check the following:
That the fax driver is installed
That there is a registered e-mail address for TX report notifications
Screens may differ depending on your model and the installed options.
Screens may differ depending on your computer system and driver type or version.
You are only notified of errors that occur between the device and the destination fax. Even when [Only Notify for Errors] is selected, you are not notified of errors that occur between the computer and the device.
To check whether a fax was sent successfully, refer to the fax transmission records and print queue on the device and the TX report between the computer and the device.
Windows
1
Select [ Start]
  [
[ Settings] on the computer.
Start] Settings] on the computer.2
Click [Devices] [Printers & scanners].
3
Click the icon of your device, and then click [Manage].
4
Click [Printer properties].
5
On the [Device Settings] tab, select [[Job Done Notice] Setting] and click [OK].
The settings enabled here can be selected in step 9.
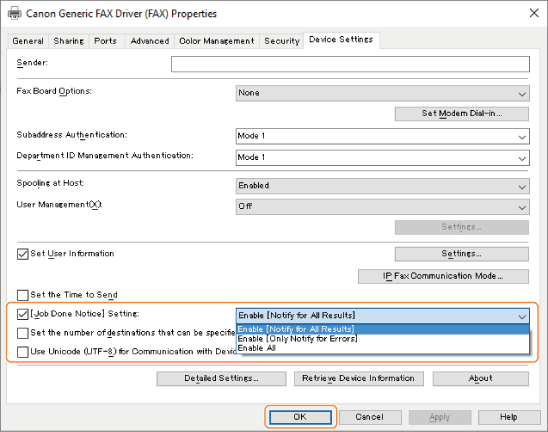
[Enable [Notify for All Results]]
Only [Notify for All Results] appears.
[Enable [Only Notify for Errors]]
Only [Only Notify for Errors] appears.
[Enable All]
Both [Notify for All Results] and [Only Notify for Errors] appear.
6
Select [Print] from the application menu.
7
Select this machine in the Print screen and click [Detailed Settings].
8
On the [Select Destination] tab, click [Detailed Settings].
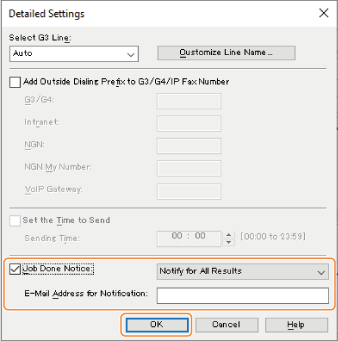
9
Select [Job Done Notice], enter an e-mail address in [E-mail Address for Notification] and click [OK].
The settings selected in step 5 appear in [Job Done Notice].
10
Click [Print].
Fax transmission starts.
macOS
This description is for macOS 10.15.
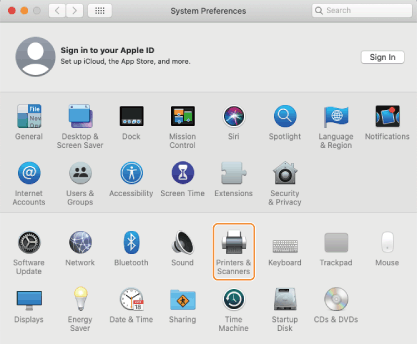
1
Open [System Preferences] and click [Printers & Scanners].
2
Select your device, and then click [Options & Supplies].
3
On the [Options] tab, select the [Job Done Notice] setting and click [OK].
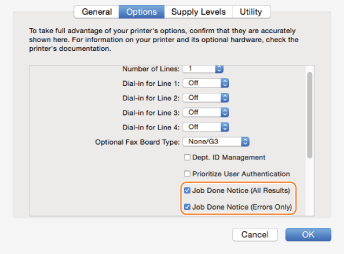
[Job Done Notice (All Results)]
[All Results] can now be selected in step 8.
[Job Done Notice (Errors Only)]
[Errors Only] can now be selected in step 8.
4
Select [Print] from the application [File] menu.
5
Select the device to be used in [Printer].
6
Select [Special Features] in the print dialog box pop-up menu.
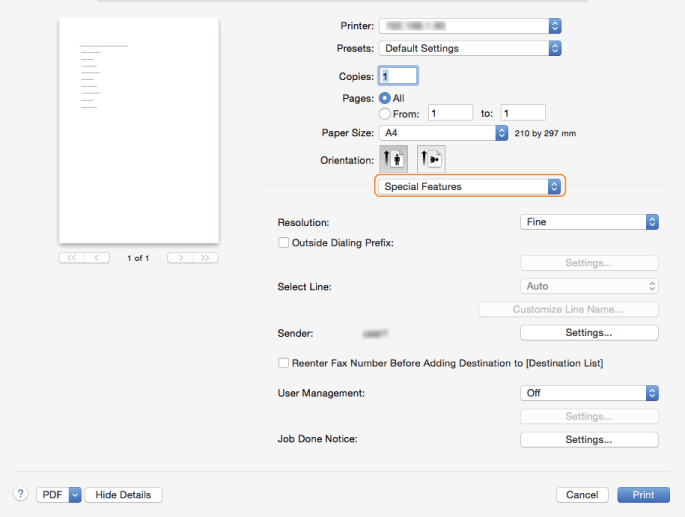
7
Click [Settings] in [Job Done Notice].
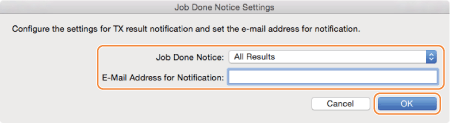
8
In the [Job Done Notice Settings] dialog box, select [Job Done Notice] and enter an e-mail address in [E-Mail Address for Notification]. Then click [OK].
The settings selected in step 3 appear in [Job Done Notice].
9
Click [Print].
Fax transmission starts.