CHYE-03W
Printing/Sending Communication Management Reports
This section describes how to print Communication Management Reports or send them to a file server.
NOTE
The Communication Management Report shows a log of faxes sent and received, e-mails, I-Faxes and data sent to or received from file servers.
Reports sent as files are in CSV format.
Configuring the Communication Management Report Display Settings
This procedure configures the settings to allow you to view and print Communication Management Reports.
1
Log in as an administrator on this machine's control panel. Logging In as an Administrator
2
On the <Home> screen, press  (Settings/Registration).
(Settings/Registration).3
Press <Management Settings>  <Device Management> <Display Job Log>.
4
Press <On> <OK>.
Printing Communication Management Reports Automatically
This procedure configures the settings for automatically printing Communication Management Reports. It also enables you to print separate reports for sending and receiving.
1
Log in as an administrator on the machine's control panel. Logging In as an Administrator
2
On the <Home> screen, press (Settings/Registration).
(Settings/Registration).3
Press <Function Settings> <Send> <Common Settings>.
4
Press <Communication Management Report>.
5
Specify each of the settings and press <OK>.
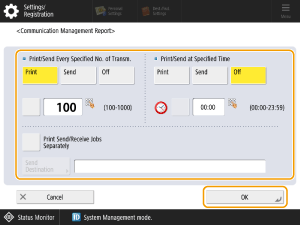
<Print/Send Every Specified No. of Transm.>
To automatically print a report when a specified number of document communications (100-1000) is completed, select <Print>and specify a number.
<Print/Send at Specified Time>
To automatically print a report at a specified time, enter the desired time using the numeric keys.
Times are shown in the 24-hour format. Enter the time as a four-digit number including zeros.
E.g.:
7:05: Enter 0705
23:18: Enter 2318
7:05: Enter 0705
23:18: Enter 2318
If you make an error when entering the time, press  (Clear) and enter the four-digit number again.
Communication Management Reports are printed for a specified number of entries starting with the most recent entries. As a result, if the specified number of entries is exceeded in the specified time, older communication results are not printed.
<Print Send/Receive Jobs Separately>
Set this to <On> to print separate reports for sending and receiving.
Sending Communication Management Reports Automatically
Use this procedure to have Communication Management Reports automatically sent to a file server.
1
Log in as an administrator on the machine's control panel. Logging In as an Administrator
2
On the <Home> screen, press (Settings/Registration).
(Settings/Registration).3
Press <Function Settings> <Send> <Common Settings>.
4
Press <Communication Management Report>.
5
Specify each of the settings and press <OK>.
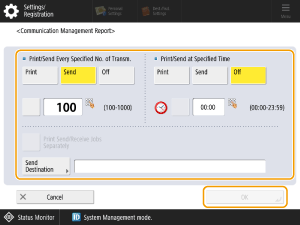
<Print/Send Every Specified No. of Transm.>
To automatically send a report when a specified number of document communications (100-1000) is completed, select <Send> and specify a number.
<Print/Send at Specified Time>
To automatically send a report at a specified time, enter the desired time using the numeric keys.
Times are shown in the 24-hour format. Enter the time as a four-digit number including zeros.
E.g.:
7:05: Enter 0705
23:18: Enter 2318
E.g.:
7:05: Enter 0705
23:18: Enter 2318
If you make an error when entering the time, press (Clear) and enter the four-digit number again.
If the number of communications within the specified time exceeds a specified limit, the report sent will contain the specified number of communications starting with the most recent.
<Backup Location>
Select the destination of the file server to which the Communication Management Report is to be sent. <Address List for Administrator> appears first, but you can also select a destination from any of the other address lists.
Printing Communication Management Reports Manually
This procedure configures the settings to allow you to view and print Communication Management Reports.
1
On the <Home> screen, press  (Status Monitor).
(Status Monitor).2
Select <Send> or <Receive> and press <Job Log>.
3
Select <Send> from the drop-down list and press <Communication Management Report>.
4
Specify the report output method.
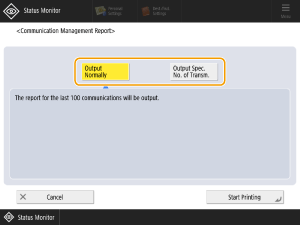
To print the 100 most recent sent/received entries, press <Output Normally>.
To specify the number of sent/received entries output, press <Output Spec. No. of Transm.> and specify a number. You can specify between 1 and 2000 entries.
NOTE
If the log does not contain the specified number of entries, the entire log up to that point is output.
If <Separate TX/RX> is specifed in <Function Settings> <Communication Management Report>, this specifies the number for sent and received entries combined.
5
Press <Start Printing>.
IMPORTANT
If <Display Job Log> in <Management Settings> is set to <Off>, you cannot configure the Communication Management Report settings. Also, if you change <Display Job Log> of <Management Settings> from <Off> to <On>, the <Print/Send Every Specified No. of Transm.> and <Print/Send at Specified Time> settings for Communication Management Reports are automatically set to <Off>.
NOTE
A Communication Management Report is a printed log of e-mails, I-Faxes and the documents sent to or received from file servers. If the machine is equipped with a fax board or the Remote Fax Kit is enabled, the send/receive log for ECMs and faxes is also printed.
If the <The printer needs to be checked. (Call service representative.)> message appears, indicating that the print function cannot be used, the communications log for the number of entries specified in <Output Spec. No. of Transm.> is printed in the post-recovery Communications Management Report.