CHYE-03R
Registering User Information in This Machine's Database for User Management
This section describes how to register user information in this machine's database.
Register user information from either the Remote UI or this machine's control panel. To register every item, use the Remote UI. While you can use this machine's control panel to register user information, you cannot use it to register every item.
IMPORTANT
Only an administrator can register user information.
NOTE
User management on this machine is primarily conducted using an authentication application called User Authentication (login service).
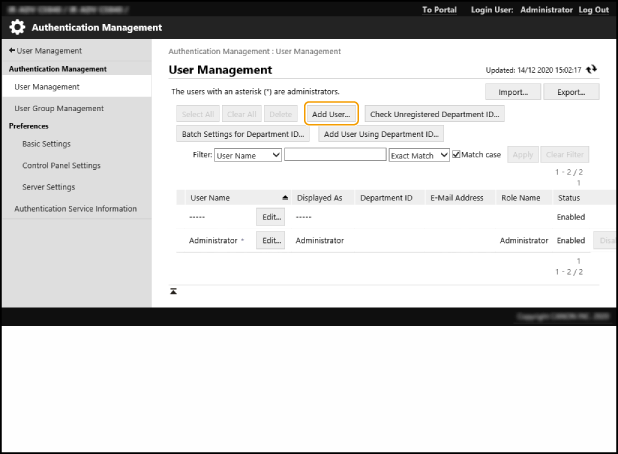
Registering from the Remote UI
1
Open the Remote UI and log in as an administrator. Opening the Remote UI
2
On the portal page, click [Settings/Registration].
3
Click [User Management]  [Authentication Management].
NOTE
Disabling the "Administrator"
By default, the registered administrator name (user name) is "Administrator." You cannot delete this user, but you can disable it once you have added another user as an administrator.
4
Click [Add User].
5
Enter the required information.
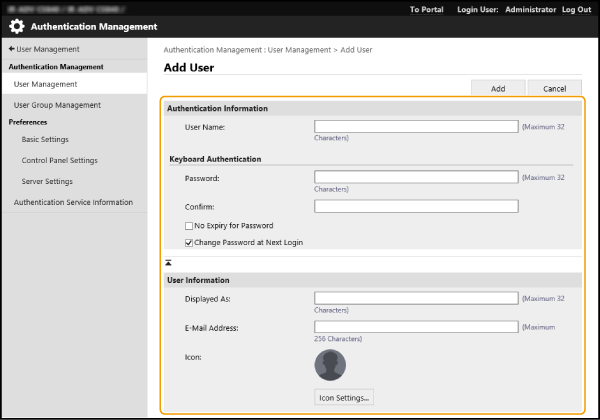
[User Name:] / [Password:] / [Confirm:]
Enter the user name and password. As confirmation, re-enter the password in [Confirm:]. User names can be entered using half-width alphanumeric characters or full-width characters.
[No Expiry for Password]
Select this check box to make the password for the registered user unlimited. You can use this setting only if [Authentication], [Password Settings Policy] and [Password Validity Period] in [Security Policy Settings] are set to [Off].
[Change Password at Next Login]
Select this check box to force registered users to change their passwords the first time they log in. Once a user has changed his or her password, the check box is automatically deselected.
[Displayed As:]
Enter the reading for the registered user name. The name shown will appear as the user name for Picture Login and Forced Hold and as the sender name for outgoing e-mails.
[E-Mail Address:]
Enter the e-mail address used by the user on his or her computer, etc. When that user sends a scanned document, the address registered here will appear along with the name of the sender. This address is also used when the user sends a document by pressing <Send to Myself>. If the user sends an I-Fax, the e-mail address registered here appears in the "Sender" field on the recipient's device.
[Icon:]
You can specify the image selected as the icon for login using Picture Login. Select an image that will be easy to locate in a list view.
NOTE
You can register multiple users as administrators.
To use the "@" symbol in [User Name:], set  (Settings/Registration) <Management Settings> <User Management> <User Management> <Allow Use of @ in User Name> to <On>.
(Settings/Registration) General users can also change their own [Password:] and [Icon:].
Select the [Allow e-mail address settings] check box to allow general users to specify their own e-mail addresses.
The following file types can be imported as icon images.
File extension: ".jpg," ".jpeg," ".png"
File extension: ".jpg," ".jpeg," ".png"
Imported images larger than 54 x 54 pixels are resized.
The resizing maintains the existing aspect ratio. If the imported image is not square, a colored background may be used as a margin.
6
Other required settings
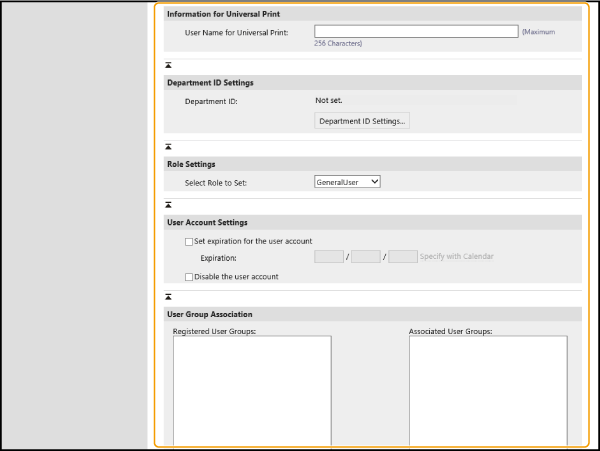
[User Name for Universal Print:]
If [Settings/Registration] [Network Settings] [Settings for Universal Print] is enabled, you can specify the email address or phone number used in the Microsoft 365 account to associate with Universal Print jobs.
[Department ID:]
When the user information is also used for department ID management, you must click [Department ID Settings] and select the ID of the user's department from the list. First register the required department ID using [Register New Department] on the list screen. If the department ID selected here is deleted, be sure to change this setting.
[Select Role to Set:]
Select one of the following as the user's privileges (role). You can use this setting to add an administrator. The settings available to the user differ depending on the assigned privileges. You can also create your own roles.
[Administrator]: As a machine administrator, the user has access to all machine operations.
[GeneralUser]: Specifies the privileges for general users.
[DeviceAdmin]: Can use the operations available to general users and can also change the settings for basic functions such as copying, printing, and sending/receiving.
[NetworkAdmin]: Can use the operations available to general users and can also change the network settings.
[Set expiration for the user account]
Select this check box to set the period of validity for the account and then specify [Expiration].
[Disable the user account]
Select this check box to temporarily disable the account.
[User Group Association]
To add a user to a group, select the registered user group from the list and click [Add].
7
Click [Add].
IMPORTANT
If a department ID or PIN registered on this machine has changed due to device information distribution, etc., you should also change the department ID registered in the user information for local device authentication.
When you are using both server authentication and local device authentication and you can no longer log in with [Department ID Management] set to [On], briefly change the login service to "Department ID Authentication" and set [Department ID Management] to [Off].
If no e-mail address is registered, you must set <Allow Unregistered Users to Send E-Mail> in (Settings/Registration) <Function Settings> to <Off> to send e-mails or I-Faxes.
(Settings/Registration) If you entered anything other than alphanumeric characters in [Display Name], you must set the display language on this machine to Japanese. If the display language is not Japanese, the registered display name will not appear in the "from" field on the e-mail recipient's device.
If local device authentication is specified, the logged-in user's display name and e-mail address appear in the "from" field on the e-mail recipient's device. However, if you entered an e-mail address that is longer than 194 characters, only the first 194 characters of the address are displayed.
If local device authentication is specified, the e-mail address of the logged-in user appears in the "Sender" field on the I-Fax recipient's device.
NOTE
Checking for unregistered department IDs
Clicking [Check Unregistered Department ID...] on the step 6 screen allows you to check for department IDs that are not registered on this machine because this procedure compares the department ID registered as user information with the department IDs registered on this machine.
Setting multiple department IDs at once
Clicking [Batch Settings for Department ID...] on the step 6 screen allows you to create a new department ID and set multiple users for that department ID at once.
If the user name consists only of numbers and it can also be expressed in seven digits or less, the same number can be assigned to the user as the department ID. If that user's registered password also consists of seven digits or less, it is simultaneously set as the PIN for the department ID.
If the user name and password do not meet the above criteria, the department IDs are automatically assigned sequentially from 0000001 onwards and "0" (none) is set as the PIN.
Registering a user name that matches the department ID
Clicking [Add User Using Department ID...] on the step 6 screen registers a new user with the same name as the department ID. This means that keyboard authentication can be performed using the numeric keys alone.
Registering Using This Machine's Control Panel
1
Log in as an administrator on this machine's control panel. Logging In as an Administrator
2
On the <Home> screen, press (Settings/Registration).
(Settings/Registration).3
Press <Management Settings> <User Management> <Authentication Management> <Register/Edit Authentication User>.
4
Press <Register>.
5
Specify each of the settings and press <OK>.
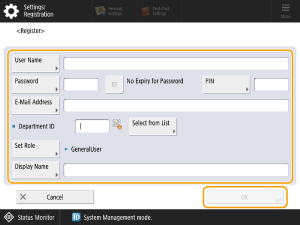
6
Press <Close>.