CHYE-03F
Managing Documents Saved on this Machine from a Computer (Remote UI)
This section describes how to print, send, or delete files and fax/I-Fax documents that are saved on this machine from the Remote UI.
Managing Files Saved in Mail Boxes on this Machine
You can print and/or send documents saved in Mail Boxes. You can also perform editing tasks such as deleting specific pages in saved documents.
1
Open the Remote UI and log in. Opening the Remote UI
2
On the portal page, click [Access Received/Stored Files].
3
On the [Mail Box] page, click the Mail Box number.
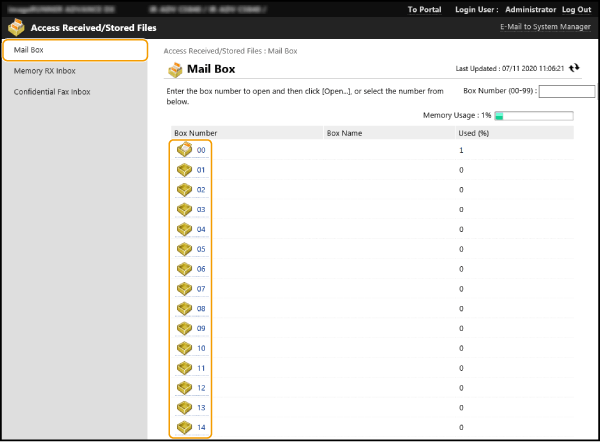
If a PIN entry page appears, enter the PIN and click [OK].
You can also specify the box by entering the Mail Box number in [Box Number (00-99)] and clicking [Open...].
4
Select the target file and take the required action.
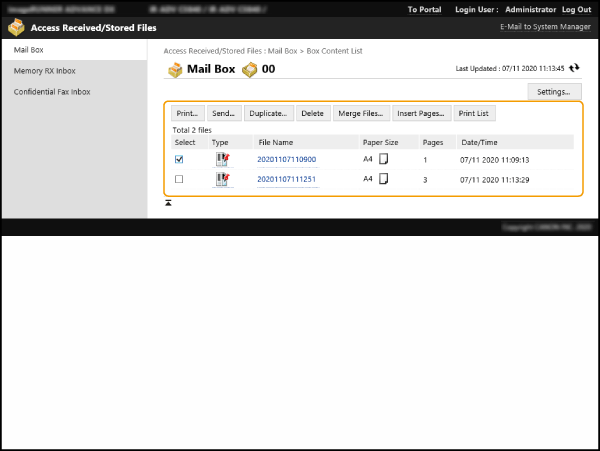
Clicking the [Type] icon or the file name displays the detailed file information.
You can print a list of the files in the Mail Box by clicking [Print List].
You can rename the Mail Box or change the PIN by clicking [Settings].
Printing Files

1
Select the check box for the file to be printed and click [Print...].
You can also select multiple files.
2
Click [Start Printing].
You can use [Move to Top], [Move Up], [Move Down], and [Move to Bottom] to change the order in which files are printed.
Click [Change Print Settings] to change the print settings.
If you select the [Delete File After Printing] check box, the file is deleted after it is printed.
Sending a File

1
Select the check box for the file to be sent and click [Send...].
You can also select multiple files.
2
Click [Select Destination], select the destination, and click [OK].
You can use [Move to Top], [Move Up], [Move Down], and [Move to Bottom] to change the order in which files are sent.
You can change the send settings by clicking [Settings] in [Set Details]. You can also change the detailed file settings in [Set Details].
If you select the [Delete File After Sending] check box, the file is deleted after it is sent.
3
Click [OK].
Merging Multiple Files into One

1
Select the check boxes for the files to be merged.
2
Click [Merge Files...] and enter the file names in [File Name].
You can use [Move to Top], [Move Up], [Move Down], and [Move to Bottom] to change the order in which files are joined together.
3
Click [Start].
Inserting Pages from a File

1
Select the check box for the file into which you want to insert a page, and click [Insert Pages...].
2
Select the file to be inserted and click [Next].
3
Enter the [File Name After Insertion] and specify the location (page) where the file is to be inserted in [Select Insertion Location].
The file is inserted in the page before the page selected in [Select Insertion Location].
4
Click [Insert].
Duplicating Files to Another Mail Box

1
Select the check boxes for the files to be duplicated and click [Duplicate...].
2
Select the target box number in [Target Box] and click [Start].
Renaming a File

1
Click the [Type] icon or the file name.
2
Click [Change File Name], enter the [File Name], and click [OK].
Deleting Pages

1
Click the [Type] icon or the file name.
2
Select the check boxes for the pages you want to delete and click [Delete Page]  [OK].
[OK].
 [OK].
[OK].Clicking [Delete Pages Consecutively] allows you to delete the pages in a specified range.
Deleting Files

1
Select the check boxes for the files to be deleted.
2
Click [Delete]  [OK].
[OK].
 [OK].
[OK].Managing Documents Temporarily Saved in the Memory RX Inbox on this Machine
You can print or forward fax and I-Fax documents temporarily saved in the Memory RX Inbox using Memory Reception.
1
Open the Remote UI and log in. Opening the Remote UI
2
On the portal page, click [Access Received/Stored Files].
3
Select [Memory RX Inbox] and click [Memory RX Inbox].
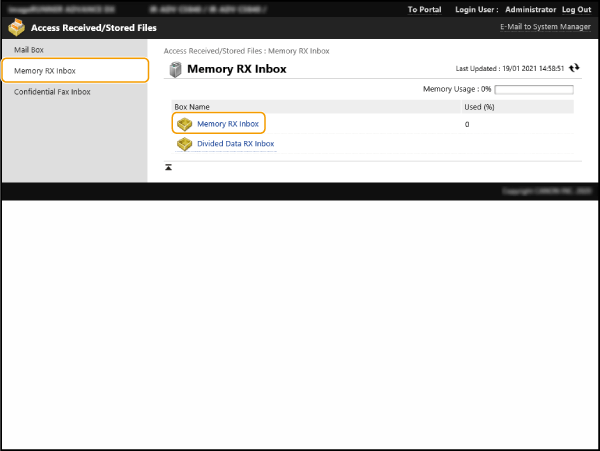
If a PIN entry page appears, enter the PIN and click [OK].
Clicking [Divided Data RX Inbox] displays a list of the document files received as divided I-Faxes.
4
Select a document and take the required action.
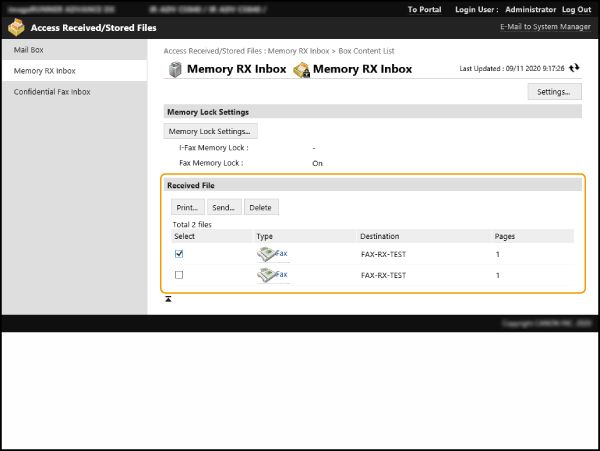
Clicking the [Type] icon displays the detailed document information.
You can change the PIN for the Memory RX Inbox by clicking [Settings] and selecting the [Set PIN] check box.
Clicking [Memory Lock Settings] allows you to specify whether Memory Reception is used for faxes or I-Faxes.
Printing a Document

1
Select the check box for the document to be printed and click [Print...].
You can also select multiple documents.
2
Click [Start Printing].
Documents are automatically deleted after being printed.
Forwarding a Document

1
Select the check box for the document to be forwarded and click [Send...].
You can also select multiple documents.
2
Click [Select Destination], select the destination, and click [OK].
You can use [Move to Top], [Move Up], [Move Down], and [Move to Bottom] to change the order in which the forwarded documents are sent.
You can change the send settings by clicking [Settings] in [Set Details]. You can also change the detailed file settings in [File Settings].
If you select the [Delete File After Sending] check box, the document is deleted after it is forwarded.
3
Click [OK].
Deleting Files

1
Select the check boxes for the files to be deleted.
2
Click [Delete]  [OK].
[OK].
 [OK].
[OK].Managing Documents Saved in the Fax Inbox on this Machine
You can print and/or delete fax and I-Fax documents temporarily saved in the Fax Inbox.
1
Open the Remote UI and log in. Opening the Remote UI
2
On the portal page, click [Access Received/Stored Files].
3
Select the [Confidential Fax Inbox] page and click the Fax Inbox number.
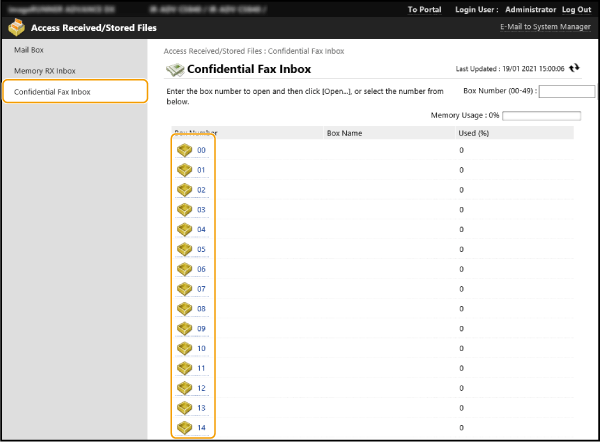
If a PIN entry page appears, enter the PIN and click [OK].
You can also specify the box by entering the Fax Inbox number in [Box Number (00-49)] and clicking [Open...].
4
Select a document and take the required action.
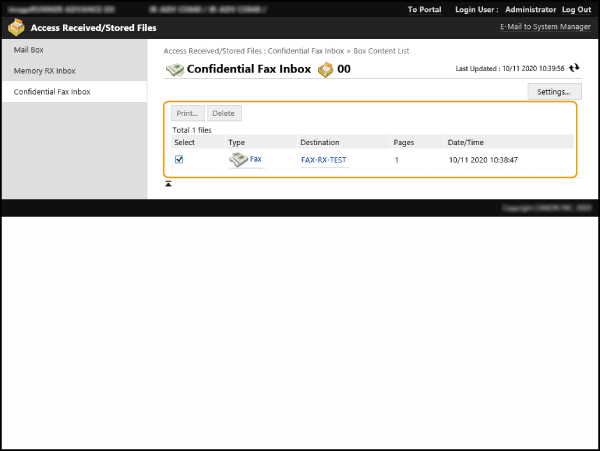
Clicking the [Type] icon displays the detailed document information.
You can rename the Fax Inbox or change the PIN by clicking [Settings].
Printing a Document

1
Select the check box for the document to be printed and click [Print...].
You can also select multiple documents.
2
Click [Start Printing].
If you select the [Delete File After Printing] check box, the document is deleted after it is printed.
Deleting Files

1
Select the check boxes for the files to be deleted.
2
Click [Delete]  [OK].
[OK].
 [OK].
[OK].