A5UY-00U
Printing/Saving Files on USB Memory Devices
This section describes how to print or save files on a USB memory device.
Even if this machine is not connected to a computer or the printer driver is not installed on the computer, you can still save files on a USB memory device and print them from this machine. You can also save documents scanned on this machine to a USB memory device, which is useful for transferring files to a computer not connected to the network.
IMPORTANT
Before inserting a USB memory device, check that it is oriented correctly. Attempting to insert a USB memory device incorrectly could cause this machine or the USB memory device to malfunction.
Always follow the correct procedure when removing a USB memory device. Failing to do so could cause this machine or the USB memory device to malfunction.
This machine only supports FAT32 or exFAT format USB memory devices.
NOTE
To use a USB memory device, specify the following settings from this machine's control panel. You must log in as an administrator to specify these settings. Logging In as an Administrator
Set <Memory Media> in  (Settings/Registration)
  <Preferences>
  <Display Settings>
  <Store Location Display Settings> to <On>.
 (Settings/Registration)
  <Preferences>
  <Display Settings>
  <Store Location Display Settings> to <On>.
Set <Use Scan Function> and <Use Print Function> in  (Settings/Registration)
  <Function Settings>
  <Store/Access Files>
  <Memory Media Settings>
  <Use Scan/Print Function> to <On>.
 (Settings/Registration)
  <Function Settings>
  <Store/Access Files>
  <Memory Media Settings>
  <Use Scan/Print Function> to <On>.
Set  (Settings/Registration)
  <Preferences>
  <External Interface>
  <USB Settings>
  <Use MEAP Driver for USB Storage Device> to <Off>.
 (Settings/Registration)
  <Preferences>
  <External Interface>
  <USB Settings>
  <Use MEAP Driver for USB Storage Device> to <Off>.
Inserting a USB Memory Device
Insert the USB memory device into the USB port on this machine.
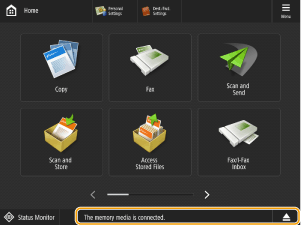
A message indicating that a USB memory device is connected and an eject key ( ) appears on the machine's control panel. (Depending on this machine's status and the login service being used, the message may not appear.)
 ) appears on the machine's control panel. (Depending on this machine's status and the login service being used, the message may not appear.)
NOTE
Check the location of the USB port as it may differ depending on your model.
If  (Settings/Registration)
  <Function Settings>
  <Store/Access Files>
  <Memory Media Settings>
  <Select Option When Connecting Memory Media> is set to <On>, shortcuts for the available functions may appear when a USB memory device is inserted.
 (Settings/Registration)
  <Function Settings>
  <Store/Access Files>
  <Memory Media Settings>
  <Select Option When Connecting Memory Media> is set to <On>, shortcuts for the available functions may appear when a USB memory device is inserted.
Because the shortcuts may not appear depending on the machine's sleep status, recover the machine from sleep mode before inserting a USB memory device.
Printing Files on a USB Memory Device
1
On the <Home> screen, press <Access Stored Files>.
When you set <Select Option When Connecting Memory Media> to <On> and insert a USB memory device, the <Print from Memory Media> shortcut appears. Press <Print from Memory Media> and proceed to step 3. Inserting a USB Memory Device
2
Press <Memory Media>.
3
Select the desired USB memory device.
4
Select a file and press <Print>.
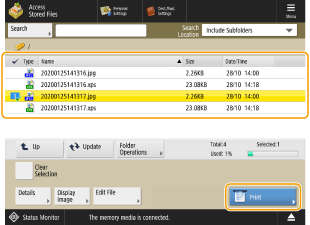
If you selected a PDF or XPS file, proceed to step 6.
NOTE
You can select and print up to six files on one USB memory device at the same time.
To deselect a selected file, press that file again.
Press <Clear Selection> to deselect all the selected files.
5
Select the paper and press <OK>.
6
Set the print mode on the Print screen and press <Start Printing>.
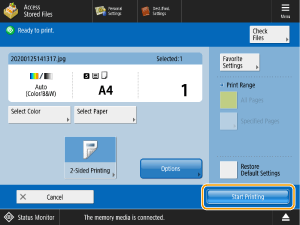
To stop printing, press <Cancel>  <Yes>.
 <Yes>.
NOTE
To print a password-protected PDF file, press <Options>  <Password to Open Doc.>
  <Encryption Password> or <Policy Password>, enter the password and press <OK>. You also need to enter the specified password when printing a PDF for which printing is prohibited or when the PDF file only permits low-resolution printing and you want to print at high resolution.
 <Password to Open Doc.>
  <Encryption Password> or <Policy Password>, enter the password and press <OK>. You also need to enter the specified password when printing a PDF for which printing is prohibited or when the PDF file only permits low-resolution printing and you want to print at high resolution.
If you proceed to <Start Printing> without entering the password and the file has an encrypted password, the password entry screen appears.
Saving Documents to a USB Memory Device
NOTE
You can only save a file to a USB memory device that has sufficient free space.
1
Place the original in the feeder or on the platen glass.
2
On the <Home> screen, press <Scan and Store>.
When you set <Select Option When Connecting Memory Media> to <On> and insert a USB memory device, the <Print from Memory Media> shortcut appears. Press <Print from Memory Media> and proceed to step 4. Inserting a USB Memory Device
3
Press <Memory Media>.
4
Select the destination memory device.
5
Display the destination and press <Scan>.
6
Specify the required scan mode.
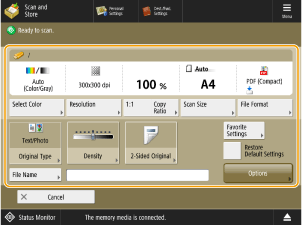
Saving under another file name

1
Press <File Name>.
2
Enter the file name and press <OK>.
You cannot use the "\", "/", ":", ",", "*", "?", """, "<", ">" or "|" characters in the file name. Note also that you cannot use a period (.) or a space at the beginning or end of a file name.
If you do not enter a file name, a name is automatically assigned in the "date/time.extension" format. For example, a JPEG file scanned and saved on October 30, 2020 at 01:05:12 pm has the file name "20201030130512.jpg."
NOTE
If the file name is too long, the character string that shows the file's location (path) may exceed the maximum of 256 alphanumeric characters and prevent the file from being specified.
If you enter a file name that is the same as another file at the destination, a number in parentheses ("(1)" to "(9)") is appended to the name (e.g. "a(1).pdf"). This does not apply to files in a Mail Box (machine's temporary storage space).
If you select <Divide into Pages> when specifying the file format, a three-digit page number is added to the end of the file name. For example, where the file name is "a.pdf," the file is divided and saved as "a_001.pdf," "a_002.pdf," and "a_003.pdf."
NOTE
Pressing <Options> allows you to select the most useful scanning mode. You can also specify combinations of scanning modes.
7
Press  (Start).
 (Start).
To stop scanning, press <Cancel> or  (Stop)
  <Yes>.
 (Stop)
  <Yes>.
If <Press the [Start] key to scan the next original.> appears

Continue placing the originals to be scanned and press  (Start). Once you have scanned all the originals, press <Start Storing> to save them as a file.
 (Start). Once you have scanned all the originals, press <Start Storing> to save them as a file.
8
Remove the originals.
NOTE
You can scan and save up to 999 pages at a time. If you use the feeder to scan two-sided originals, you can scan up to 1,000 pages. When you reach the limit for scanning originals, a message appears asking whether you want to save the scanned data.
To cancel all other modes at once, press <Restore Default Settings>.
To check the saved data, press  (Status Monitor)
  <Store>
  <Job Log>. If <NG> appears, the data was not saved correctly, and you should try scanning the originals again.
 (Status Monitor)
  <Store>
  <Job Log>. If <NG> appears, the data was not saved correctly, and you should try scanning the originals again.
Removing a USB Memory Device
Always follow the procedure below when removing a USB memory device. Failing to do so could cause the machine or the USB memory device to malfunction.
1
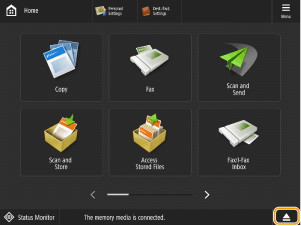
Press  .
.
 .
.
2
Select the USB memory device to be removed and press <Remove>.
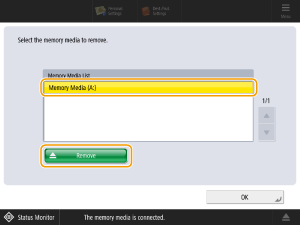
3
Remove the USB memory device from the USB port and press <OK>  <OK>.
<OK>.
 <OK>.
<OK>.