85CL-00W
How to Fix Curled Printouts
If printouts are curled, follow the procedures described in this section to solve the problems.
Eliminating the Basic Causes of Curled Paper
Find the answers to your questions about how to solve your problems.
Is the machine or paper located in a high or low humidity environment?
The humidity may cause the paper to expand or shrink. If you store the paper in an extremely high or low humidity environment, the paper may curl before printing.
Remedy
Keep the machine and paper in a room with steady temperature and humidity. If the temperature and humidity are unstable, it may cause the paper to expand or shrink, resulting in curled paper.
For the appropriate temperature and humidity, see other guides such as the User's Guide.
Before you load paper, place the package of paper near the machine so it can fully acclimatize to the temperature and humidity.
Unwrap the paper immediately before you load it into the machine.
Are the edges of the image extremely dark?
If the edges of the image are extremely dark, the paper may tend to curl during printing.
Remedy
Use heavier paper.
Decrease the density in the very dark areas to reduce the difference in the density between the dark and light areas.
Changing Settings on the Machine According to Paper Characteristics
If you still have the same problem after you follow the procedures in "Eliminating the Basic Causes of Curled Paper," change the settings to meet characteristics of the paper you are using.
IMPORTANT
This function may affect how paper is fed. Since increasing the value to a great extent may cause paper jams, we recommend adjusting the values in small increments.
1
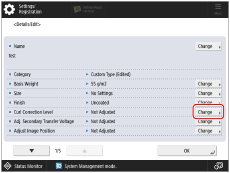
Press  → [Preferences] → [Paper Settings] → [Paper Type Management Settings].
→ [Preferences] → [Paper Settings] → [Paper Type Management Settings]. "Paper Type Management Settings" in the User's Guide > see "Curl Correction Level" under the subsection "Items that can be specified"
2
Select the paper type that you want to edit from the list → press [Details/Edit] → [Change] for <Curl Correction Level>.
3
Press [-] or [+] under [Face Up Output (Reverse)], [Face Down Output (Normal)], or [2-Sided Output] to correct the curl correction level and then press [OK].
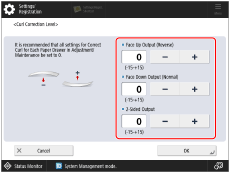
Check whether the output paper is face up or face down. For the face up output, adjust the setting for "Face Up Output (Reverse)." For the face down output, adjust the setting for "Face Down Output (Normal)."
To determine the curl direction, watch the paper as it is output to the output tray.
Adjust the curl correction level in the direction opposite to the direction that the output paper is curled.

When the paper curls upward
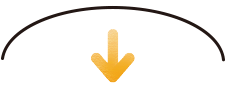
Press [-].

When the paper curls downward

Press [+].
4
Make test copies or prints on the paper for which you have adjusted the machine and check the condition of the printouts.
Repeat steps 1 to 4 to adjust the curl correction level until the paper does not curl when it is output.
NOTE
The regular procedure is to set the level of curl correction in advance to suit the characteristics of each type of paper. This is because the curl in the paper depends on the paper's materials and basis weight. However, if significant changes in the environment, such as temperature and humidity, occur for some reason, and the changes temporarily affect the condition of the paper, such as moisture content, the curl may not be corrected to your satisfaction. If this happens, see the following and adjust the level of the curl correction for the paper source in which you have loaded the paper for which you want to calibrate the machine.
"Adjusting Print and Finish Quality" > "Adjust Action" > "Curl Correction for Each Paper Drawer" in the User's GuideHow to Fix a Curl That Is Perpendicular to the Direction of Paper Feed
Printouts may not curl if you print on the back side of the paper. However, be careful of the paper's finish, because the finish of the front and back sides of the paper may differ, depending on the type of paper. If the printouts are still curled even if you print on the back side of the paper, follow the procedures described above to adjust the curl correction level.

* Feeding Direction
A Tip of a Corner of a Printout is Folded
The corner of the printout is folded because the paper is curled. Check the solutions below.
Remedy
If paper absorbs moisture from a highly humid environment, set the dehumidification switch to "|" side to dry out the paper.
"Introduction (About the Machine)"> "Parts and Their Functions" > "Back Side" in the User's Guide.IMPORTANT
Do not allow anyone to change the settings below except for the system manager. For more information on changing the settings, contact your local authorized Canon dealer.
To improve this situation, adjust the value for <Adjust Gloss/Fine Black> to match the specific characteristics of the paper.
Press → [Preferences] → [Paper Settings] → [Paper Type Management Settings] → select the type of paper you are using that is having this problem → press [Details/Edit] → [Change] for <Adjust Gloss/Fine Black> → adjust the value of [Gloss] toward the plus end.
→ [Preferences] → [Paper Settings] → [Paper Type Management Settings] → select the type of paper you are using that is having this problem → press [Details/Edit] → [Change] for <Adjust Gloss/Fine Black> → adjust the value of [Gloss] toward the plus end. "Paper Type Management Settings" in the User's Guide > see "Adjust Gloss/Fine Black" under the subsection "Items that can be specified"To improve this situation, adjust the value for <Adjust Temp. to Prevent Wrinkles> to match the specific characteristics of the paper.
Press → [Preferences] → [Paper Settings] → [Paper Type Management Settings] → select the type of paper you are using that is having this problem → press [Details/Edit] → [Change] for <Adjust Temp. to Prevent Wrinkles> → adjust the value toward the plus end.
→ [Preferences] → [Paper Settings] → [Paper Type Management Settings] → select the type of paper you are using that is having this problem → press [Details/Edit] → [Change] for <Adjust Temp. to Prevent Wrinkles> → adjust the value toward the plus end. "Paper Type Management Settings" > "Changing the Wrinkle Correction Level" in the User's Guide.