85CL-012
How to Adjust the Saddle Stitch Position
When you make a saddle stitch booklet, if you notice the following phenomena, you need to adjust the saddle stitch position. Follow the procedures below to solve the problem.

The saddle stitch fold position is not aligned with the saddle stitch position.
The saddle stitch fold and saddle stitch positions are not in the center of the booklet.
NOTE
Depending on the finisher you are using, the functions mentioned in this section may not be available.
Adjusting the Saddle Stitch Position to the Center of the Booklet
NOTE
If the saddle stitch position is exactly in the center of the booklet but the saddle stitch fold position is not, skip this step, go to the procedures in "Adjusting the Saddle Stitch Fold Position to the Center of the Booklet."
1
Press  → [Preferences] → [Paper Settings] → [Paper Type Management Settings].
 → [Preferences] → [Paper Settings] → [Paper Type Management Settings].
 "Paper Type Management Settings" in the User's Guide > see "Change Fold/Stitch Position" under the subsection "Items that can be specified"
2
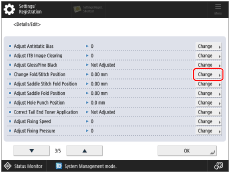
Select the paper type that you want to edit from the list → press [Details/Edit] → [Change] for <Change Fold/Stitch Position>.
3
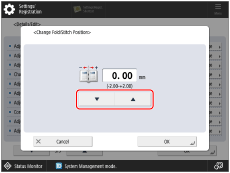
Press [ ] or [
 ] to adjust the saddle stitch position.
 ] or [
 ] to adjust the saddle stitch position.
If you want the saddle stitch position to shift to the right while facing the printed side of the printout, increase the setting value.
If you want the saddle stitch position to shift to the left while facing the printed side of the printout, decrease the setting value.
4
Make test prints and check the finish.
If the saddle stitch position is still not exactly in the center of the booklet, repeat steps 1 to 4 until the saddle stitch position is shifted exactly to the center of the booklet.

If the saddle stitch position has shifted exactly to the center of the booklet, but the saddle stitch fold position is not, go to the procedures in "Adjusting the Saddle Stitch Fold Position to the Center of the Booklet."

Adjusting the Saddle Stitch Fold Position to the Center of the Booklet
NOTE
If the saddle stitch position is not exactly in the center of the booklet, follow the procedures in "Adjusting the Saddle Stitch Position to the Center of the Booklet."
1
Press → [Preferences] → [Paper Settings] → [Paper Type Management Settings].
 → [Preferences] → [Paper Settings] → [Paper Type Management Settings].
 "Paper Type Management Settings" in the User's Guide > see "Adjust Saddle Stitch Fold Position" under the subsection "Items that can be specified"
2
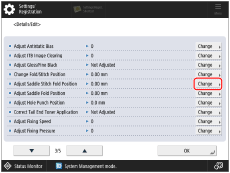
Select the paper type that you want to edit from the list → press [Details/Edit] → [Change] for <Adjust Saddle Stitch Fold Position>.
3
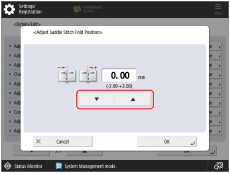
Press [ ] or [
 ] to adjust the saddle stitch fold position.
 ] or [
 ] to adjust the saddle stitch fold position.
If you want the saddle stitch fold position to shift to the right while facing the printed side of the printout, increase the setting value.
If you want the saddle stitch fold position to shift to the left while facing the printed side of the printout, decrease the setting value.
4
Make test prints and check the finish.
If the saddle stitch position is exactly in the center of the booklet, but the saddle stitch fold position is not, repeat steps 1 to 4 until the saddle stitch fold position is shifted exactly to the center of the booklet.
