86A3-003
Sending Faxes from a Computer (PC Fax)
You can install the machine's fax driver on your computer to allow you to specify a destination and send a fax when printing. Use the following steps.
IMPORTANT
When <Allow Fax Driver TX> is set to <Off> on the machine, you cannot send faxes from a computer. Change the setting to <On> with the following steps.
<Menu> <Function Settings> <Send> <Fax Settings> <Allow Fax Driver TX> <On>
<Menu>
NOTE
Screen shots of the fax driver used here may differ from those on your screen depending on the operating system and fax driver version.
Step 1 Install the fax driver on your computer
1
Download the fax driver from the Canon download website.
1
In your browser, open https://global.canon/en/support/.
2
Select your country or region.
3
Click "Support".
4
Open the download page for the driver and download the driver.
2
Install the downloaded driver.
Launch the installer, and follow the instructions on the screen to install.
Step 2 Send a fax from your computer
The steps for sending faxes depend on your computer's operating system. Send faxes according to the method for your operating system.
Windows
macOS users: Check Mac.
1
In the application used to create the document, select [Print] from the [File] menu, and display the print screen.
2
Select the machine's fax driver in the print screen.
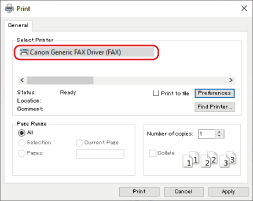
3
Click [Print] or [OK].
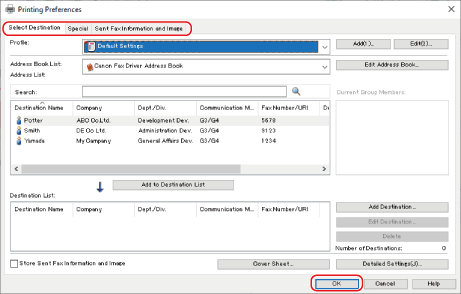
To attach a cover sheet, etc.,
1
Click [Preferences], [Printer properties], or [Properties].
2
If necessary, switch sheets and configure other settings.
3
Click [OK].
4
Specify the destination.
To specify from the Address Book,
1
Display the [Select Destination] sheet.
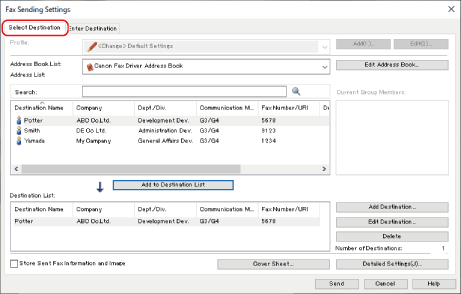
2
Select an address book from [Address Book List].
3
Select the destination.
4
Click [Add to Destination List].
To enter a destination directly,
1
Display the [Enter Destination] sheet.
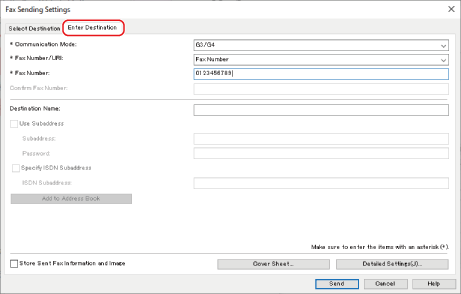
2
Select the communication mode from [Communication Mode].
3
Select [Fax Number/URI].
4
Enter the [Fax Number] or [URI].
If necessary, set other items.
5
Click [Send].
The fax is sent.
Mac
Windows users: Check Windows.
NOTE
Steps with macOS 10.15 are described here.
1
Select [Print] from the application's [File] menu.
2
Select the machine's fax driver from [Printer].
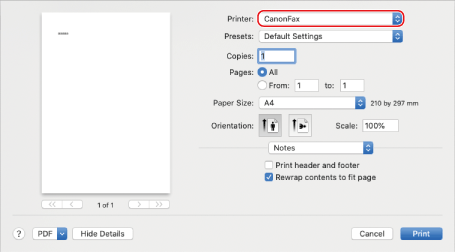
If no print options are displayed, click [Show Details] at the bottom of the screen.

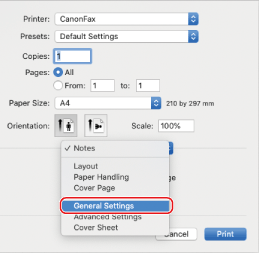
To attach a cover sheet, etc.,
1
Select the [Advanced Settings] or [Cover Sheet] panel from the pop-up menu of the print dialog box.
2
Set the required items.
3
Select the [General Settings] panel from the pop-up menu of the print dialog box.
4
Specify the destination.
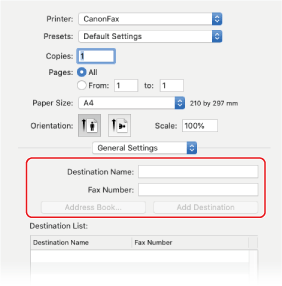
To specify from the Address Book,
1
Click [Address Book].
2
Select the destination Click [Add] or [Add Groups].
When adding a group as a destination, the number set with the highest priority is displayed for the destination. Set the number from [Edit] [Edit Distribution List] in [Contacts] in the operating system.
To enter a destination directly,
1
Enter [Destination Name].
2
Enter [Fax Number].
3
Click [Add Destination].
5
Click [Print].
The fax is sent.