8R0Y-011
Repeated Paper Jams Caused by Paper Wrapping around the Fixing Film
If paper jams or paper feed problems, such as the corner of printouts being folded, often occur even though you have followed the instructions described in the User's Guide to handle and prevent paper jams, paper may be wrapping around the fixing film. Check the solutions below.
Understanding What Causes Paper to Wrap around the Fixing Film
There are the following three possible causes of paper wrapping around the fixing film:
Paper Has Absorbed Too Much Moisture Due to High Humidity
When the humidity is high, paper may absorb too much moisture. As a result, the paper is more likely to wrap around the fixing film.
You Are Using Thin Paper or Soft and Flexible Paper
If you use thin paper or paper that is flexible and easily bends, the paper tends to curl. This kind of paper is more likely to wrap around the fixing film.
There Is a Very Dark Area Near the Leading Edge of the Paper
A dense layer of toner is applied to print a dark area. If the dark area is near the leading edge of the paper and the leading margin is very small, the toner may act as an adhesive. As a result, the leading edge of the paper sticks to the surface of the fixing film and the paper is likely to wrap around the fixing film.

* Feeding Direction
* Leading Edge
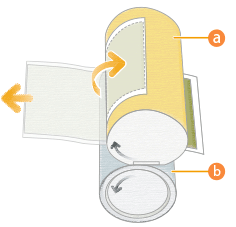
 Fixing Film
  Fixing Pressure Roller
If the leading edge margin of the paper is small and a large amount of toner is used, paper is likely to wrap around the fixing film.
 Fixing Film Fixing Pressure Roller
If the leading edge margin of the paper is large and a small amount of toner is used, paper is less likely to wrap around the fixing film.
Keeping the Paper's Moisture Content at an Appropriate Level
Use the following recommendations to keep the moisture content of the paper at an appropriate level.
Before you load paper, place the package of paper in a room with an appropriate temperature and humidity so it can fully acclimatize to the temperature and humidity. For the appropriate temperature and humidity, see other guides such as the User's Guide.
If paper absorbs moisture from a highly humid environment, turn the heater of the paper deck on to dry out the paper. For instructions on how to turn the heater on, contact your dealer or service representative.
NOTE
Check the installation and operating environment of the machine. Is the machine located in a room with steady temperature and humidity? Keep the paper in the same environment as that where the machine is located.
Before you load paper, place the package of paper near the machine so it can fully acclimatize to the temperature and humidity.
Unwrap the paper immediately before you load the paper into the machine.
Changing the Machine's Settings
If you still have the same problem after you follow the procedures in "Keeping the Paper's Moisture Content at an Appropriate Level," change the machine's settings in the following order: "Do an Automatic Gradation Adjustment → Reduce the Value of Gloss → Turn On the Toner Amount Reduction Mode."
Do an Automatic Gradation Adjustment
Doing an automatic gradation adjustment adjusts the total amount of toner that is used, which may prevent the paper from wrapping around the fixing film.
Press  → <Adjustment/Maintenance> → <Adjust Image Quality> → <Auto Adjust Gradation>.
→ <Adjustment/Maintenance> → <Adjust Image Quality> → <Auto Adjust Gradation>. "Adjusting Print and Finish Quality" > "Adjusting Gradation" in the User's Guide
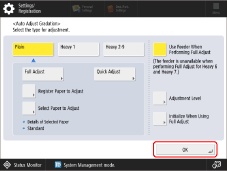
Reduce the Value of Gloss
Reducing the gloss value lowers the temperature of the fixing unit. As a result, paper may not curl, which may prevent the paper from wrapping around the fixing film. However, this setting may reduce the gloss of printed images, so print a test sheet to check the finished result.
Press → <Preferences> → <Paper Settings> → <Paper Type Management Settings> → select the type of paper you are using that is having this problem → press <Details/Edit> → <Change> for <Adjust Gloss> → adjust the value toward the minus end.
→ <Preferences> → <Paper Settings> → <Paper Type Management Settings> → select the type of paper you are using that is having this problem → press <Details/Edit> → <Change> for <Adjust Gloss> → adjust the value toward the minus end. "Managing the Machine" > "Paper Type Management Settings" in the User's Guide > see the subsection "Adjust Gloss"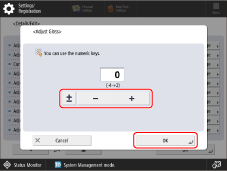
Turn On the Toner Amount Reduction Mode
Turning on the Toner Amount Reduction Mode reduces the amount of toner that is used. As a result, you may prevent the paper from wrapping around the fixing film. However, this setting may change the color of printed images, so print a test sheet to check the finished result.
Press → <Preferences> → <Paper Settings> → <Paper Type Management Settings> → select the type of paper you are using that is having this problem → press <Details/Edit> → <Change> for <Toner Amount Reduction Mode> → select <On>.
→ <Preferences> → <Paper Settings> → <Paper Type Management Settings> → select the type of paper you are using that is having this problem → press <Details/Edit> → <Change> for <Toner Amount Reduction Mode> → select <On>. "Managing the Machine" > "Paper Type Management Settings" > "Toner Amount Reduction Mode" in the User's Guide
When Alternately Printing on "Both Thin and Heavy Paper" or "Both Shorter Width and Longer Width Paper"
If paper often wraps around the fixing film when you switch the paper "from heavy to thin" or "from shorter width to longer width" while you are printing, change from the Productivity Priority mode to the Quality Priority mode as follows. This may improve the situation. However, productivity falls overall because time is needed whenever the machine switches from one type of paper to another.
Press → <Function Settings> → <Common> → <Print Settings> → <Productivity/Image Qlty. Priority for Mixed Paper Type> → <Quality Priority>.
→ <Function Settings> → <Common> → <Print Settings> → <Productivity/Image Qlty. Priority for Mixed Paper Type> → <Quality Priority>. "Settings/Registration" > "<Function Settings>" > "<Common>" > "<Print Settings>" in the User's Guide > see the subsection "<Productivity/Image Qlty. Priority for Mixed Paper Type>"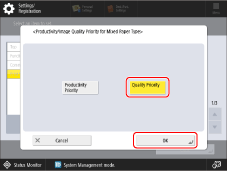
NOTE
The print speed may be slow for a while after the printing starts, depending on the job.
Try This If You Still Have the Same Problems
If the problems persist after following the procedures in steps 2 and 3, try the procedures described below. They may improve the situation. However, these procedures differ from the purchase order, so be sure to get the customer's consent beforehand.
Changing the Types of Paper to Print on
Use thicker or stiffer paper to prevent the paper from wrapping around the fixing film.
Reducing the Density
Decrease the density in very dark areas. As the amount of toner applied to the paper is reduced, the paper separates more easily from the surface of the fixing film and other parts of the machine.
Enlarging the Leading Edge Margin
Enlarge the width of the margin on the leading edge of the paper. A wider margin on the leading edge of the paper makes the paper itself separate more easily from the surface of the fixing film and other parts of the machine.
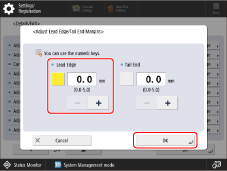
If a Certain Type of Paper Often Wraps around the Fixing Film
You can adjust the value for the leading edge margin that is used for a certain type of paper.
Press → <Preferences> → <Paper Settings> → <Paper Type Management Settings> → select the type of paper you are using that is having this problem → press <Details/Edit> → <Change> for <Adjust Lead/Tail Margins> → adjust the value for <Lead Edge> toward the plus end.
→ <Preferences> → <Paper Settings> → <Paper Type Management Settings> → select the type of paper you are using that is having this problem → press <Details/Edit> → <Change> for <Adjust Lead/Tail Margins> → adjust the value for <Lead Edge> toward the plus end. "Managing the Machine" > "Paper Type Management Settings" in the User's Guide > see the subsection "Adjust Lead/Tail Margins"