Installing a Downloaded MF Driver (Network Connection)
This explains the procedure for installing the newest version of the MF driver using an installer downloaded from the web site. It automatically searches for devices on the network and installs the MF driver.
Install with this procedure when the MF driver included in the supplied DVD-ROM is not compatible with the operating system of the computer you are using.
Prerequisites
A TCP/IP Network Environment
If you do not know the network environment you are using, check with your network administrator.
The device must be in the same subnet as the computer you are using.
When starting the computer, log on as a user with administrator privileges.
Procedures
1.
Double-click the downloaded installer.
2.
Select a language → click [Next].
3.
Read the license agreement → click [Yes].
4.
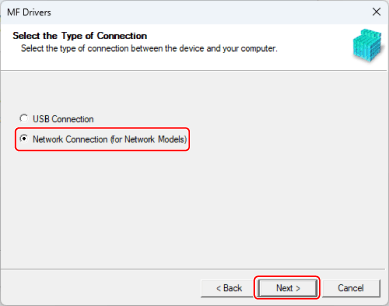
If the following screen is displayed, select [Network Connection (for Network Models)] → click [Next].

5.
Select the device you are using → click [Next].
[Create a shortcut on the desktop for Remote UI]:
Select this check box to create a shortcut containing the device name on the desktop. The shortcut can be clicked to operate the device in a Web browser using the Remote UI. For languages not supported by the Remote UI, the Remote UI is displayed in English. This check box is selected by default when the installer is started.
 NOTE
NOTEIf the device is not displayed in [Device List], check the connection state between the computer and device and the IP address settings, and click [Update Device List]. If the device is still not displayed, click [Search by IP Address] → enter the IP address of the device → click [OK]. For the IP address confirmation method, refer to the manual of the device.
The shortcut to the Remote UI on the desktop is not deleted when the driver is uninstalled. Delete it manually if required.
If the IP address of the device is changed after creating the shortcut to the Remote UI, the Remote UI will no longer be able to be opened from the shortcut.
6.
Select the driver to install → click [Next] → set as required.
If a list of drivers corresponding to the page description language is displayed after selecting a printer driver in the [Select Driver] screen, select the driver you are going to use.
If you want to use a print server, select the following.
Select the [Select Driver] screen > [Canon Driver Information Assist Service] (when acquiring device information).
Select the [Confirm Settings] screen > [Use as Shared Printer] or [Use as Shared Fax] (when you want to use the computer you are installing to as a print server).
7.
Check the settings → click [Start].
8.
Setting the default printer and test printing.
When setting as a default driver: select the driver → click [Next]
When test printing: select the check box of the driver
9.
Click [Exit].
If installed correctly, an MF driver icon is displayed in the locations shown below. If the icon is not displayed, uninstall the MF driver and reinstall it.
For a printer driver or fax driver:
From [ Settings] in the Start menu, [Bluetooth & devices] (or [Devices]) > [Printers & scanners].
 Settings] in the Start menu, [Bluetooth & devices] (or [Devices]) > [Printers & scanners].
For a scanner driver:
In the search box of [Control Panel], enter and search "View scanners and cameras" > [View scanners and cameras] > [Scanners and Cameras].