Registering an MF Scan Utility Compatible Scanner
You can register a scanner to macOS using the MF Scan Utility.
Here, the procedures for network connection and USB connection will be explained.
Prerequisites
Confirmation of the specified IP address (when connected by TCP/IP)
If you do not know the IP address, check with the network administrator.
Confirmation of the corresponding utility
For the utility corresponding to the device, refer to the Readme file.
Procedures
When registering a scanner connected over a network
1.
Click "Apps" in "Dock" → click [Canon MF Scan Utility].
MF Scan Utility starts.
When you start MF Scan Utility for the first time or if no scanners are registered, a message indicating that no scanners are registered is displayed. Close the message and proceed to step 3..
2.
Select [Network Scanner Settings] > [Canon MF Scan Utility] in the menu bar.
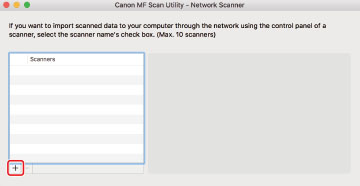
Click [+] at the bottom of the [Canon MF Scan Utility - Network Scanner] dialog.
4.
Register the scanner.
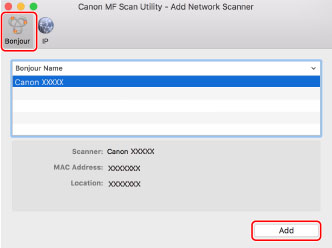
For a Bonjour connection
Display the [Bonjour] tab → select the Bonjour name → click [Add].
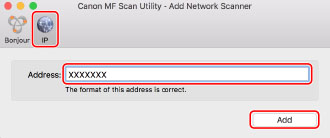
For a TCP/IP connection
Display the [IP] tab → enter the IP address of the scanner → click [Add].
5.
Start the MF Scan Utility.
6.
In the main dialog of [Canon MF Scan Utility], check that the registered scanner is displayed in [Scanner]/[Product Name].
If the registered scanner is not displayed, reinstall the driver.
When registering a scanner connected by USB
1.
Turn the scanner on → connect the scanner and the computer by USB cable.
2.
Click "Apps" in "Dock" → click [Canon MF Scan Utility].
MF Scan Utility starts.
3.
In the main dialog of [Canon MF Scan Utility], check that the registered scanner is displayed in [Scanner]/[Product Name].
If the scanner is not displayed, restart the MF Scan Utility after reconnecting the USB cable. If the scanner is still not displayed, reinstall the driver.