Scanning from the MF Scan Utility
This explains the basic procedure for scanning using the MF Scan Utility.
1.
Set the original in the device.
2.
Set the device to online.
If [System Management Settings] > [Auto Online for Remote Scan] is disabled, select [Scan] > [Remote Scanner] from the scan functions screen and set it to online. For details, refer to the manual of the device.
3.
Click "Apps" in "Dock" → click [Canon MF Scan Utility].
The MF Scan Utility main dialog is displayed.
4.
Select the device to use from [Scanner]/[Product Name].
If necessary, click [Settings] and configure the detailed settings.
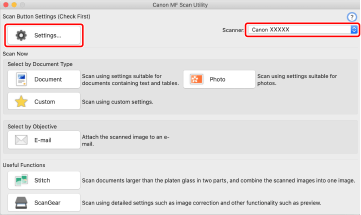
5.
Click an icon such as [Document], [Photo], etc. according to your needs.
Scanning starts.
The scanned image is saved to the folder specified in the [Save Settings] pane > [Save in] in the [Settings] dialog.