MF Scan Utility Settings
This section explains the main dialog that is displayed first when the MF Scan Utility is started and the [Settings] dialog for setting details when scanning.
Main Dialog
You can select the main scanning functions that can be specified with the MF Scan Utility.

[Settings]
Sets details when scanning with the MF Scan Utility.
[Scanner]/[Product Name]
Specifies the device to be used for scanning.
[Document]
Scans with settings suitable for documents that include text and diagrams.
[Photo]
Scans with settings suitable for photographs.
[Custom]
Registers frequently used settings as a "profile."
[E-mail]
Attaches a scanned image to specified e-mail software.
[Stitch]
Combines multiple scans of an original that is too large to fit on the platen into one image.
You can scan originals that are up to about twice the size of the platen.
[Image Stitch] Dialog
Toolbar([ /
/ /
/ /
/ /
/ ])
])
You can delete, manipulate in the preview, enlarge, reduce, rotate, etc. a selected image.
[Select Output Size]
Specifies an output size after combining.
[Scan Direction]
Specifies a direction for combining.
[Scan Image 1]
Scans the part of the original to be scanned first (the part displayed as "1" in the preview area) and displays it in a preview.
[Scan Image 2]
Scans the part of the original to be scanned next (the part displayed as "2" in the preview area) and displays it in a preview.
[Adjust cropping frames]
When adjusting the area to be saved, adjusts the cropping frame (the dotted-line border) displayed in the preview area.
[Save Image]
Saves the combined image.
[ScanGear]
Displays the ScanGear MF dialog to set scanning details and start scanning.
You can adjust the scanning area, set image correction functions, etc. while checking the preview.
[Settings] Dialog
You can set scanning details before scanning with the MF Scan Utility.
Toolbar |
Select whether to scan from the computer or the device, and set details. Also sets basic items for using the MF Scan Utility.
[ ] (scanning from a computer)
Sets details when scanning from the computer using the MF Scan Utility and operations after scanning.
After selecting an icon for one of the items displayed on the left side of the [Settings] dialog, set the necessary items in the pane displayed on the right side. The set items are applied when scanning from the main dialog.
The functions corresponding to the icons of the items displayed on the left side of the [Settings] dialog are the same as the scan functions that you can select in the main dialog.
[ ] (scanning from a device)
Sets details when scanning from the control panel of the device and operations after scanning.
When confirming settings, after selecting the icons for the following items displayed on the left side of the [Settings] dialog, you can confirm them in the pane displayed on the right side.
[Color Scan]/[B&W Scan]
The initial values for color and black-and-white scanning are displayed.
[Custom 1]/[Custom 2]
The initial values according to the device are displayed. Depending on the device, you can change the icon names.
[ ] (basic settings)
Sets basic items such as the e-mail attachment data size to be used with the MF Scan Utility, the save destination folder for temporary files, etc.
[E-mail Attachment Size]
When attaching a scanned image to an e-mail, specifies the file size.
[Folder for Temporary Files]
Specifies the folder where images will be temporarily saved.
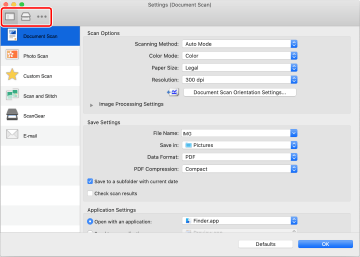
[Scan Options] Pane |
When scanning, sets the position to place the original (the platen glass or feeder), the color mode, original size, etc.
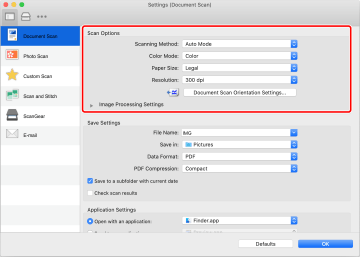
[Scanning Method]
When scanning, sets the position to place the original (the platen glass or feeder).
If you select [Auto Mode], the original will be scanned from the feeder if it is set in the feeder. If the original is not set in the feeder, the device will scan from the platen.
[Color Mode]
Specifies the color mode of the original to be scanned.
[Paper Size]
Sets the size of the original to be scanned.
If you select [Custom], you can set any desired original size.
If [Flexible] is selected, scanning will be performed according to the size of the originals loaded in the feeder.
[Resolution]
Specifies a resolution when scanning.
[Document Scan Orientation Settings]
When the original is set in the feeder, set the scanning direction to match the orientation of the original.
[Scan both sides when scanning from the feeder]
Specify this when scanning both sides of an original set in the feeder.
[Image Processing Settings]
Sets a detailed image processing method. If you click [ ], you can set the following items.
], you can set the following items.[Correct black text]
Clarifies the contours of black text.
[Sharpen outline]
Emphasizes the contours of images to give them a sharp effect. This is effective when scanning photographs etc. that are out of focus.
[Reduce moire]
Reduces density inconsistencies and moire (striped) patterns that occur when scanning printed photographs, color magazines, etc.
[Save Settings] Pane |
Sets the file name, save destination, data format, etc. of scanned image data.
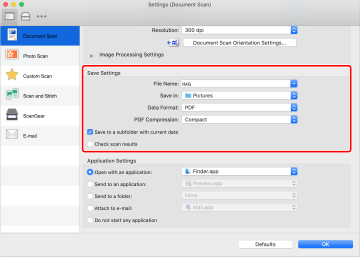
[File Name]
Specifies file names for images to be saved.
When scanning an image, the date and a four-digit number such as "20XX0101_0001" are attached after the specified file name.
[Save in]
Specifies the save destination for a scanned image.
[Data Format]
Sets the format to save the scanned image data as.
[JPEG Image Quality]
If you have selected [JPEG/Exif] for [Data Format], set the image quality.
[PDF Compression]
If you have selected [PDF (Divide into Single-Page Files)]/[PDF] for [Data Format], set a compression ratio.
[Save to a subfolder with current date]
A subfolder named after the scan date is automatically created in the folder specified in [Save in], and the image is saved therein.
[Check scan results]
When you begin scanning, the [Save Settings] dialog is displayed. Specify the data format, image order, save destination, etc. while checking the thumbnail image of the scan result.
[Save Settings] Dialog
Thumbnail images
You can manipulate the image, change the save order, rotate the image, etc.
To change the save order: drag and drop the images
To rotate an image: select the image → click []/[].
]/[].Items in the [Save Settings] dialog other than the thumbnail images are the same as the items in the [Save Settings] pane.
[Application Settings] Pane |
Sets the method of linking to an application when opening and processing scanned images.
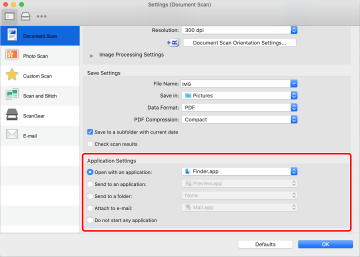
[Open with an application]
Specifies an application to use for editing scanned images.
[Send to an application]
Specifies an application to transfer to for viewing and managing scanned images.
[Send to a folder]
Specifies the save destination when saving a scanned image to a folder other than the prescribed folder.
Normally, scanned images are saved to the folder specified in the [Save Settings] pane > [Save in] in the [Settings] dialog.
[Attach to e-mail]
Specifies the e-mail software to use in order to attach a scanned image to an e-mail.
[Do not start any application]
Saves the scanned image to the prescribed folder without opening another application.
Normally, scanned images are saved to the folder specified in the [Save Settings] pane > [Save in] in the [Settings] dialog.
[E-mail Client]
Adds mail software.