啟動和結束 Desktop Monitor Setup
您可以在 Desktop Monitor Setup 中設定連接埠和印表機設定。
如需更多安裝的相關資訊,請參閱《iW Desktop 安裝手冊》。
啟動Desktop Monitor Setup
請遵循下列步驟以啟動 Desktop Monitor Setup。
1.
啟動 Windows 並以具有管理員權限的使用者登入系統。
2.
在工具列的  (主要) 上按一下滑鼠右鍵,然後選取「啟動 Monitor Setup」。
|
注意
|
|
如果工具列中沒有顯示
使用 Windows XP 時,按一下「開始」功能表 >「程式」>「Canon iW」>「Canon iW」>「iW Desktop」>「iW Desktop Printer Monitor」。
使用 Windows Vista/7 時,按一下「開始」功能表 >「所有程式」>「Canon iW」>「Canon iW」>「iW Desktop」>「iW Desktop Printer Monitor」。
當使用 Windows 8 時,請按一下「開始」畫面上的「iW Desktop Printer Monitor」圖磚。
當使用 Windows 8.1 時,請按一下「開始」畫面上的
Printer Monitor 中
|
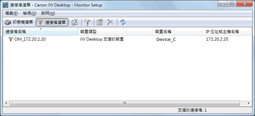
此時會顯示「Desktop Monitor Setup」主視窗。
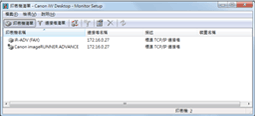
啟動 Desktop Monitor Setup 時,印表機清單會顯示於主視窗中。按一下「連接埠清單」切換顯示連接埠清單。
結束Desktop Monitor Setup
請遵循下列步驟以結束 Desktop Monitor Setup。
1.
按一下「Desktop Monitor Setup」中的 (關閉)。
(關閉)。
或是選取「檔案」功能表 >「結束」。