Setting Hole Punching
You can specify hole punch settings for documents.
|
NOTE
|
|
This function can only be used when you select a Canon printer and the [Use print settings of Editor] check box on the [Print Settings] tab on the Details Window, the ribbon command, or the tool button.
When the print location of the header/footer overlaps with the hole punch position, adjust the print position by setting the gutter with the printer properties.
|
1.
Select the hole punch setting in [Detailed Settings for Printing] on the [Print Settings] tab on the Details Window.
Or, click  (Hole Punch) on the ribbon and select the hole punch setting.
(Hole Punch) on the ribbon and select the hole punch setting.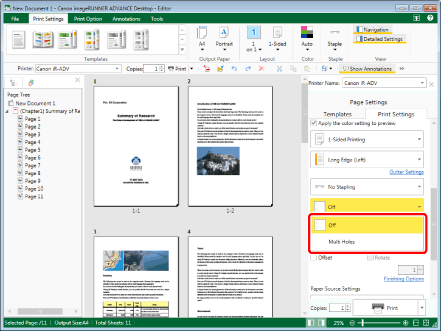
The Work Window is updated according to the settings.
|
NOTE
|
|
If the Details Window is not displayed, see the following.
The hole punch options vary depending on the printer selected in [Printer].
The hole punch position varies depending on the following settings.
The printer selected in [Printer]
The output size/orientation
Binding Location
The output paper size setting, staple setting, and fold setting may change the hole punch setting that has already been specified.
If [Auto (Size)] is selected as the output paper size setting, the hole punch setting is changed to [Punch Off].
If the gutter is set to less than 25/32 inch (20 mm), setting hole punching causes a message to be displayed. Clicking [Yes] automatically sets the gutter to 25/32 inch (20 mm). Clicking [No] cancels the gutter setting.
If commands are not displayed on the ribbon of Desktop Editor, see the following to display them.
This operation can also be performed with the tool buttons on the toolbar. If tool buttons are not displayed on the toolbar of Desktop Editor, see the following to display them.
|