Canceling Tab Paper/Sheets Inserted for the Entire Document on a Chapter Basis
If tab paper or an inserted sheet is set as a sheet for insertion for the entire document, you can cancel the sheet for insertion setting on a chapter basis.
|
NOTE
|
|
For information on setting inserted sheets and tab paper for the entire document, see the following.
For more information on how to cancel the settings on a chapter basis, see the following.
|
1.
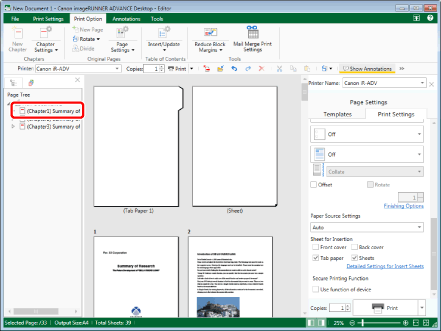
Select  (Chapter) for the chapter to cancel tab paper/sheet settings for on the [Page Tree] tab of the Navigation Window.

|
NOTE
|
|
If the [Page Tree] tab on the Navigation Window is not displayed, see the following.
|
2.
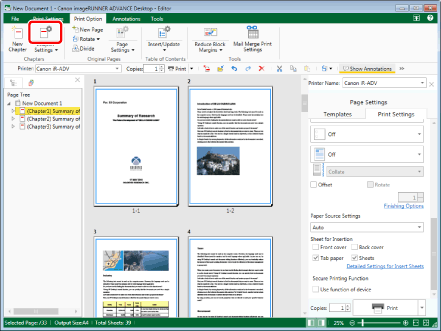
Click  (Chapter Settings) on the ribbon.
 (Chapter Settings) on the ribbon.
Or, follow one of the steps described below.
Click  for
for  (Chapter Settings) on the ribbon, and select [Chapter Settings]
 for
for  (Chapter Settings) on the ribbon, and select [Chapter Settings]
Click  (Chapter Settings) on the ribbon
 (Chapter Settings) on the ribbon
Right-click and select [Chapter Settings]

The [Chapter Settings] dialog box is displayed.
|
NOTE
|
|
If commands are not displayed on the ribbon of Desktop Editor, see the following to display them.
This operation can also be performed with the tool buttons on the toolbar. If tool buttons are not displayed on the toolbar of Desktop Editor, see the following to display them.
|
3.
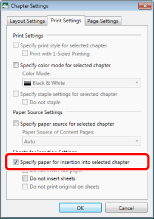
Select the [Specify paper for insertion into selected chapter] check box on the [Print Settings] tab.

4.
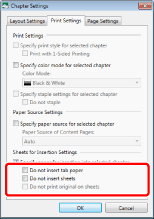
Select the following check boxes as necessary.

|
[Do not insert tab paper]
|
Select this check box when you do not want to insert tab paper.
|
|
[Do not insert sheets]
|
Select this check box when you do not want to insert sheets.
|
|
[Do not print original on sheets]
|
[Do not print original on sheets] can be selected in the following cases.
When the [Do not insert sheets] check box is not selected
When you have specified to insert sheets for the entire document, and the [Print original on sheets] check box is selected in the [Sheets for Insertion Settings] dialog box
|
5.
Click [OK].
The chapter icon displayed on the [Page Tree] tab on the Navigation Window changes to  and the chapter name changes to blue.