Installation Precautions
Avoid Installing the Machine in the Following Locations
Avoid locations subject to temperature and humidity extremes, whether low or high.
For example, avoid installing the machine near water faucets, hot water heaters, humidifiers, air conditioners, heaters, or stoves.

Avoid installing the machine in direct sunlight.
If this is unavoidable, use curtains to shade the machine. Be sure that the curtains do not block the machine's ventilation slots or louvers, or interfere with the electrical cord or power supply.

Avoid poorly ventilated locations.
This machine generates a slight amount of ozone etc. during normal use. Although sensitivity to ozone etc. may vary, this amount is not harmful. Ozone etc. may be more noticeable during extended use or long production runs, especially in poorly ventilated rooms. It is recommended that the room be appropriately ventilated, sufficient to maintain a comfortable working environment, in areas of machine operation.

Avoid locations where a considerable amount of dust accumulates.
Avoid locations where ammonia gas is emitted.

Avoid locations near volatile or flammable materials, such as alcohol or paint thinner.
Avoid locations that are subject to vibration.
For example, avoid installing the machine on unstable floors or stands.

Avoid exposing the machine to rapid changes in temperature.
If the room in which the machine is installed is cold but rapidly heated, water droplets (condensation) may form inside the machine. This may result in a noticeable degradation in the quality of the copied image, the inability to properly scan an original, or the copies having no printed image at all.

Avoid installing the machine near computers or other precision electronic equipment.
Electrical interference and vibrations generated by the machine during printing can adversely affect the operation of such equipment.
Avoid installing the machine near televisions, radios, or similar electronic equipment.
The machine might interfere with sound and picture signal reception. Insert the power plug into a dedicated power outlet, and maintain as much space as possible between the machine and other electronic equipment.
Contact an authorized Canon dealer if communication is unavailable.
Depending on your locale or your telephone connection, you may be unable to perform data communication. In this case, contact your local authorized Canon dealer.
Do not remove the machine's leveling feet.
Do not remove the machine's leveling feet after the machine has been installed.
If you put weight on the front of the machine while the drawers, paper decks, or units within the machine are pulled out, the machine may fall forward. To prevent this from happening, make sure that the machine's leveling feet are in place.
Avoid installing the machine at high altitudes of about 3,000 meters above sea level, or higher.
Machines with a hard disk may not operate properly when used at high altitudes of about 3,000 meters above sea level, or higher.
Select a Safe Power Supply
Specification of this machine's power source is 120 to 127 V AC and maximum 16 A. Connect the plug of this machine to an outlet that is 120 to 127 V AC 16 A or greater.
Make sure that the power supply for the machine is safe, and has a steady voltage.
Do not connect other electrical equipment to the same power outlet to which the machine is connected.
Do not connect the power cord to a multiplug power strip, as this may cause a fire or electrical shock.
The power cord may become damaged if it is stepped on, affixed with staples, or if heavy objects are placed on it. Continued use of a damaged power cord can lead to an accident, such as a fire or electrical shock.

The power cord should not be taut, as this may lead to a loose connection and cause overheating, which could result in a fire.
If excessive stress is applied to the connection part of the power cord, it may damage the power cord or the wires inside the machine may disconnect. This could result in a fire. Avoid the following situations:
Connecting and disconnecting the power cord frequently.
Tripping over the power cord.
The power cord is bent near the connection part, and continuous stress is being applied to the power outlet or the connection part.
Applying excessive force on the power plug.
Moving the Machine
If you intend to move the machine, even to a location on the same floor of your building, contact your local authorized Canon dealer beforehand. Do not attempt to move the machine yourself.

Provide Adequate Installation Space
Provide enough space on each side of the machine for unrestricted operation.
For the imageRUNNER ADVANCE 8205/8295
When the Booklet Finisher-Q1 PRO and Duplex Color Image Reader Unit-G1 are attached.

*1 Make sure to provide at least 31 1/2" (800 mm) of space if you install one or more of the following: Booklet Trimmer-D1, Paper Folding Unit-H1, Professional Puncher-C1, or Document Insertion Unit-K1.
When the Booklet Finisher-N1 and Duplex Color Image Reader Unit-G1 are attached.

*2 Make sure to provide at least 31 1/2" (800 mm) of space if you install one or more of the following: Paper Folding Unit-H1, Professional Puncher-C1, or Document Insertion Unit-K1.
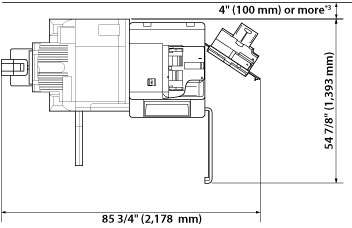
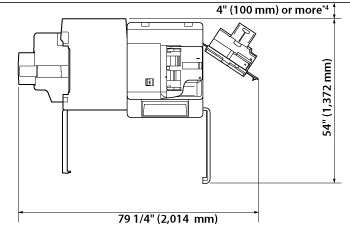
For the imageRUNNER ADVANCE 8285
When the Booklet Finisher-Q1 PRO and Duplex Color Image Reader Unit-G1 are attached.

*3 Make sure to provide at least 31 1/2" (800 mm) of space if you install one or more of the following: Booklet Trimmer-D1, Paper Folding Unit-H1, Professional Puncher-C1, or Document Insertion Unit-K1.
When the Booklet Finisher-N1 and Duplex Color Image Reader Unit-G1 are attached.

*4 Make sure to provide at least 31 1/2" (800 mm) of space if you install one or more of the following: Paper Folding Unit-H1, Professional Puncher-C1, or Document Insertion Unit-K1.
For the imageRUNNER ADVANCE 8205/8295/8285
When the Booklet Trimmer-D1, Booklet Finisher-Q1 PRO, Paper Folding Unit-H1, Professional Puncher Integration Unit-B1, Professional Puncher-C1, Document Insertion Unit-K1, Duplex Color Image Reader Unit-G1, and POD Deck Lite-A1 are attached.

*5 Make sure to provide at least 4" (100 mm) of space if none of the Booklet Trimmer-D1, Paper Folding Unit-H1, Professional Puncher-C1, or Document Insertion Unit-K1 is installed.
When the Booklet Finisher-N1, Paper Folding Unit-H1, Professional Puncher Integration Unit-B1, Professional Puncher-C1, Document Insertion Unit-K1, Duplex Color Image Reader Unit-G1, and POD Deck Lite-A1 are attached.

*6 Make sure to provide at least 4" (100 mm) of space if none of the Paper Folding Unit-H1, Professional Puncher-C1, or Document Insertion Unit-K1 is installed.