Checking Jobs from the Job Log Screen
This section describes the operations that you can perform from the Job Log screen.
|
NOTE
|
|
You can select a job type from the drop-down list to display only jobs of a specific type in the list.
|
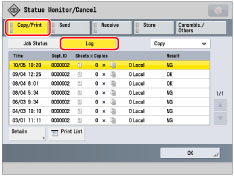
Checking and Cancelling Copy/Print Jobs
1.
Press  (Status Monitor/Cancel).
 (Status Monitor/Cancel).
2.
Press [Copy/Print] → [Log].

3.
Select the desired job → select the operation to perform.
You can select the following operations.
|
[Details]:
|
Displays detailed information for the selected job. Check the detailed information → press [OK] to return to the Copy/Print screen.
|
|
[Print List]:
|
Prints the job log list. Press [Print List] → [Yes] to print the list.
|
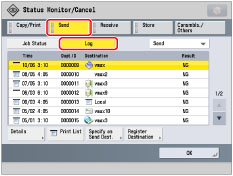
Checking and Cancelling Send Jobs
1.
Press  (Status Monitor/Cancel).
 (Status Monitor/Cancel).
2.
Press [Send] → [Log].

3.
Select the desired job → select the operation to perform.
You can select the following operations.
|
[Details]:
|
Displays detailed information for the selected job. Check the detailed information → press [OK] to return to the Send screen.
|
|
[Print List]:
|
Prints the job log list. Press [Print List] → [Yes] to print the list.
|
|
[Specify as Send Dest.]:
|
Displays a screen in which the address of the selected job is entered. Check the address → press [OK] to display the Send screen.
|
|
[Register Destination]:
|
Registers the selected job as the destination. Select [Address Book] or [One-Touch] to display the Settings/Registration screen. (See "Register Destinations" or "Registering One-Touch Buttons.")
If [Address Book PIN] is set in [Set Destination] (Settings/Registration), a screen appears prompting you to enter the password. (See "Setting the Address Book.")
|
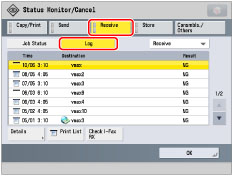
Checking and Cancelling Receive Jobs
1.
Press  (Status Monitor/Cancel).
 (Status Monitor/Cancel).
2.
Press [Receive] → [Log].

3.
Select the desired job → select the operation to perform.
You can select the following operations.
|
[Details]:
|
Displays detailed information for the selected job. Check the detailed information → press [OK] to return to the Receive screen.
|
|
[Print List]:
|
Prints the job log list. Press [Print List] → [Yes] to print the list.
|
|
[Check I-Fax RX]:
|
Reception starts if an I-fax has been received by the POP server.
[Check I-Fax RX] is displayed when a received job is selected. |
|
NOTE
|
|
To use [Check I-Fax RX], set <POP> to 'On' in [Communication Settings] to enable the machine to receive via POP. (See "Common Communication Settings for E-Mail/I-Fax.")
You can check reception without pressing the Check I-Fax RX key in the following cases (See "Common Communication Settings for E-Mail/I-Fax."):
<POP Interval> in [Communication Settings] is set to a value other than '0'.
I-faxes are received with SMTP without going via a server.
|
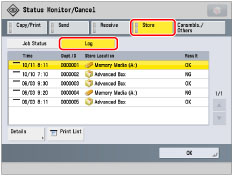
Checking and Cancelling Store Jobs
1.
Press  (Status Monitor/Cancel).
 (Status Monitor/Cancel).
2.
Press [Store] → [Log].

3.
Select the desired job → select the operation to perform.
You can select the following operations.
|
[Details]:
|
Displays detailed information for the selected job. Check the detailed information → press [OK] to return to the Store screen.
|
|
[Print List]:
|
Prints the job log list. Press [Print List] → [Yes] to print the list.
|
|
NOTE
|
|
The list can be printed only if A3, B4, A4, or A4R (plain, recycled, thin, or color) is loaded in one of the paper sources that is set to 'On' in [Other] in [Paper Drawer Auto Selection On/Off]. (See "Enabling Paper Drawer Auto Selection.")
However, if [Consider Paper Type] for [Copy] is set to 'On' in [Paper Drawer Auto Selection On/Off], you cannot print from a paper source with colour paper specified.
|