Menus and Their Functions
When the Bar Code Printing function is activated, the BarDIMM and FreeScape menus become available in the PCL/PS menu.
Accessing the Menus
Follow the procedure below to access the BarDIMM or FreeScape menu.
1.
Press  .
.
 .
. 2.
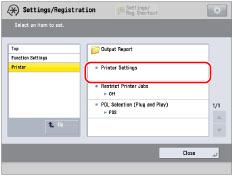
Press [Function Settings] → [Printer] → [Printer Settings].

3.
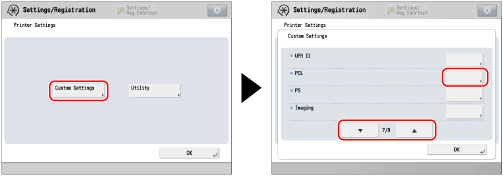
Press [Custom Settings] → press or
or  until [PCL] appears → press [PCL].
 or
or  until [PCL] appears → press [PCL].
4.
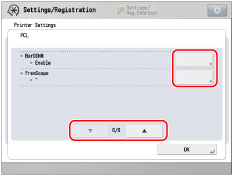
Press  or
or  until [BarDIMM] or [FreeScape] appears → select [BarDIMM] or [FreeScape].
 or
or  until [BarDIMM] or [FreeScape] appears → select [BarDIMM] or [FreeScape].
BarDIMM Menu
Enable, Disable*
This setting enables you to print bar codes supported by the Barcode Printing Kit.
If [Enable] is selected, the machine will generate bar codes when it receives bar code commands from the host computer.
If [Disable] is selected, bar codes will not be generated, even if bar code commands are sent from the host computer.
|
IMPORTANT
|
|
To enable the BarDIMM menu, it is necessary to activate the Barcode Printing Kit.
When you are not printing bar codes, make sure to disable the BarDIMM menu. Otherwise, the processing speed of regular print jobs may be reduced.
|
|
NOTE
|
|
The default setting is [Disable]. If you activate the Barcode Printing Kit, it changes to [Enable].
[FreeScape] appears only if the BarDIMM menu is enabled.
|
FreeScape Menu
Off, ~*, ", #, $, /, \, ?, {, }, |
You can specify the AEC (Alternate Escape Code) to be used for bar code commands when the host computer does not support the standard Escape Code.
|
NOTE
|
|
Make sure that the Bar Code Printing function is enabled before you print bar codes.
[FreeScape] appears only if the BarDIMM menu is enabled.
When the Bar Code Printing function is activated, [BarDIMM] and [FreeScape] appear on the Configuration Page (from the Settings/Registration screen).
For more information on using the touch panel display, see "Menu Functions."
You can specify settings from your computer using the Remote UI function of your machine. For more information, see "Managing Copy/Print Jobs."
An asterisk (*) indicates the default setting.
|