Scanning from an Application
|
NOTE
|
|
Before scanning, the scanner must be set to online from device control panel (see "Switching the Scanner Online and Offline").
If you use the Color Network ScanGear 2 driver with the WIA-TWAIN compatibility mode of the operating system, the existing UI of the operating system is displayed and the procedure differs.
|
1.
Set the original in the scanner.
When scanning from the platen glass, place the original face down on the platen glass.
When scanning from the feeder, set the original in the feeder with the side you want to scan face up.
|
NOTE
|
|
After scanning from the feeder, if you intend to scan from the platen, be sure to open the feeder/platen cover completely when setting the original on the platen glass.
|
2.
Run the application you want to scan from in the computer → run [Color Network ScanGear 2].
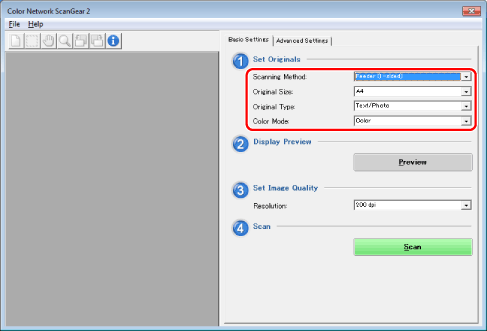
The Color Network ScanGear 2 driver starts and the [Color Network ScanGear 2] main window is displayed.
The method for running the WIA and TWAIN drivers varies from application to application. For details, refer to the manuals provided with each application.
|
NOTE
|
|
Depending on the TWAIN-compatible application you are using, when you select the scanner driver, both the TWAIN-compatible driver and WIA-compatible driver in WIA-TWAIN compatibility mode may be displayed with the same name.
|
3.
In the [Basic Settings] tab, configure the [Scanning Method], [Original Size], [Original Type], and [Color Mode] settings.

|
NOTE
|
|
You can configure detailed settings for scanning in the [Advanced Settings] tab.
In addition to items that can be set in the [Basic Settings] tab, you can set the following.
Original orientation
Pages to scan
Specifying the scan area as a numerical value
Density adjustment of scanned images
Color settings
Deleting borders
Compression ratio of scanned images
For details about settings, refer to Help (see "Viewing Help").
|
4.
When scanning from the platen glass, click [Preview] → specify the scanning area.
The area to be scanned is specified by dragging the cursor from one corner of the desired (rectangular) area to the opposite corner, enclosing the desired area in a box.
For details, see "Specifying the Scanning Area".
|
NOTE
|
|
You cannot use [Preview] in the following circumstances:
When [Auto] is selected for [Original Size].
When scanning from the feeder.
|
5.
If necessary, select a resolution from [Resolution].
6.
Click [Scan].
Scanning starts.
The scanned image appears in the window of the application when scanning finishes.
|
NOTE
|
|
After clicking [Scan], do not attempt any operations in the Color Network ScanGear 2 main window until the scan progress dialog box appears.
If the Color Network ScanGear 2 main window does not close automatically when scanning finishes, click [
 ] (Exit) to close it. ] (Exit) to close it. |