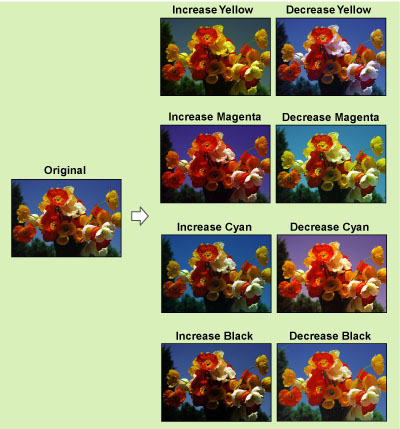
Adjusting the Colour
You can make fine adjustments to the colour by varying the relative strength and density of yellow, magenta, cyan, and black. The colour adjustments that you make can be stored and recalled for future use.
|
IMPORTANT
|
|
For information on the modes which cannot be set in combination with this mode, see "Unavailable Combination of Functions."
|
|
NOTE
|
|
You can change the colour (and its tone) for the Full Color mode in [Full Color Printing Vividness Settings]. (See "Making the Colour More Vivid When Printing with Full Colour.")
|
Adjusting the Colour Balance
1.
Press [Copy].

2.
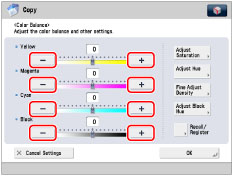
Press [Options] → [Color Balance].
_copy_en_US/b_copy_049_08_b_C.jpg)
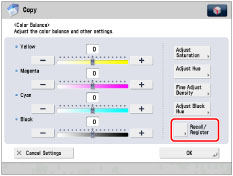
3.
Press [-] or [+] to adjust the strength of each colour.
You can also press [Recall/Register] to recall and change the previously stored colour balance settings. (See "Recalling Colour Balance Settings.")
4.
Specify Saturation, Hue, and Density.
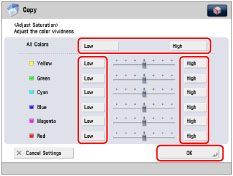
If [Adjust Saturation] is selected:
Press [Low] or [High] to adjust the saturation level of the selected colour or all the colours → press [OK].
If [Adjust Hue] is selected:
Adjust the hue level of the selected colour or all the colours → press [OK].
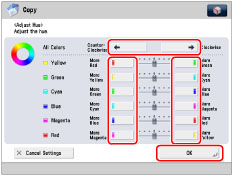
To adjust the hue level of all the colours, press [Counter-Clockwise] or [Clockwise].
To adjust the hue level of each colour, press [More Red], [More Green], [More Yellow], [More Cyan], [More Blue], or [More Magenta] for each colour.
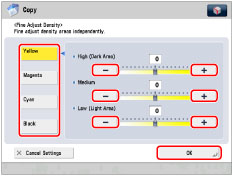
If [Fine Adjust Density] is selected:
Select the colour that you want to adjust → press [-] or [+] to adjust the density level for the darker (high), medium, and lighter (low) density areas → press [OK].
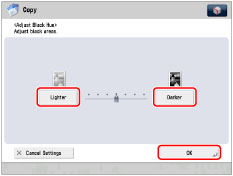
If [Adjust Black Hue] is selected:
Press [Lighter] or [Darker] to adjust the hue of the black colour → press [OK].
5.
Press [OK].
Storing Colour Balance Settings
You can store colour balance settings and then recall them for future use. Up to four different settings can be stored.
1.
Press [Copy].
2.
Press [Options] → [Color Balance].
3.
Specify the colour balance, saturation, hue, and density settings that you want to store → press [Recall/Register].
For instructions on adjusting the colour balance, see "Adjusting the Colour Balance."
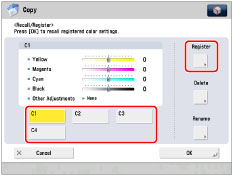
4.
Select a key ([C1] to [C4]) for storing the colour balance settings → press [Register].
|
NOTE
|
|
If you select a key that already has settings stored in it, the settings are displayed.
|
If you select a key without settings:
A screen appears, asking for your confirmation to store the settings. Press [Yes].
If you select a key that already has settings stored in it:
A screen appears, asking for your confirmation to overwrite the previous settings. Press [Yes].
5.
Press [Cancel] → [Cancel].
Naming a Colour Balance Key
1.
Press [Copy].
2.
Press [Options] → [Color Balance].
3.
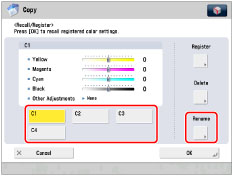
Press [Recall/Register].
4.
Select a key ([C1] to [C4]) to name → press [Rename].
|
NOTE
|
|
You can also name keys with no settings stored in them.
|
5.
Enter a name → press [OK].
|
NOTE
|
|
If you press [OK] without entering any characters, the key name reverts to its current name (default C1 to C4).
|
6.
Press [Cancel] → [OK].
Recalling Colour Balance Settings
1.
Press [Copy].
2.
Press [Options] → [Color Balance].
3.
Press [Recall/Register].
4.
Select the key containing the colour balance settings that you want to recall → verify the settings → press [OK].
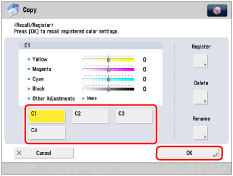
If you select a key that does not have colour balance settings stored in it, [OK] is grayed out and cannot be pressed. You can select another key that has colour balance settings stored in it, or press [Cancel].
|
NOTE
|
|
Recalling colour balance settings from memory cancels the current colour balance settings.
You can make changes to the recalled colour balance settings.
If you press another key, the colour balance settings stored in that key are recalled.
|
5.
Press [OK].
Erasing Colour Balance Settings
1.
Press [Copy].
2.
Press [Options] → [Color Balance].
3.
Press [Recall/Register].
4.
Select the key containing the color balance settings that you want to erase → press [Delete].

|
IMPORTANT
|
|
Make sure to check the settings first before erasing them.
|
5.
Press [Yes].
|
NOTE
|
|
Key names are not erased. For instructions on changing a key name, see "Naming a Colour Balance Key."
|
6.
Press [Cancel] → [OK].