Watermark Printing
This mode enables you to print watermark on copies you select. You can also add user-defined text to the watermark.
1.
Press [Copy].

2.
Press [Options] → [Watermark].

3.
Set the image orientation and print position.
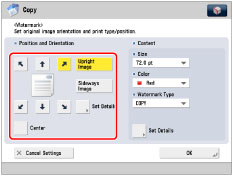
Orientation:
|
[Upright Image]:
|
Press this if you are placing originals upright.
|
|
[Sideways Image]:
|
Press this if you are placing originals sideways.
|
|
Upright Image
|
Sideways Image
|
|||
 |
 |
 |
 |
 |
|
Vertical Placement
|
Horizontal Placement
|
Vertical Placement
|
Horizontal Placement
|
|
If you select [Center] for the print position, the watermark is printed on the center of the paper.
|
NOTE
|
|
If you set any two of [Page Numbering], [Copy Set Numbering], or [Print Date] to print in the same position, a confirmation message appears when you press
 . . |
You can press [Set Details] to adjust the printing position.

To adjust the printing position, press [X] or [Y] → adjust the printing position with [-] or [+] → press [OK].
To set the printing position for the back side when performing two-sided copying, select [Opposite to Front Side] or [Same as Front Side] → press [OK].
4.
Specify the print settings for the watermark.
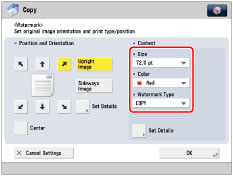
Press the <Size> drop-down list → select the size of the watermark.
Select the size of the watermark from [10.5 pt], [12.0 pt], [14.0 pt], [24.0 pt], [36.0 pt], [54.0 pt], and [72.0 pt].
Press the <Color> drop-down list → select the colour of the watermarks.
Press the <Watermark Type> drop-down list → select the type of watermark.
If you select [Custom], press [Enter] and enter the custom text → press [OK] → [OK].
|
IMPORTANT
|
|
Text that you enter in [Custom] is not automatically saved. If you want to register text to be selected with watermarks whenever necessary, press [Register] → enter the text to be registered.
|
|
NOTE
|
|
You can also select text that has been registered in [Register Characters for Page No./Watermark]. (See "Registering/Editing/Deleting User-Defined Text for Page Numbers and Watermarks.")
|
5.
To specify detailed watermark settings, press [Set Details].
If you do not want to specify other settings, proceed to step 6.
Setting the pages to print the watermark:
Press [Pages to Print].
Select the pages to print the watermark → press [OK].
Setting the print type:
Press [Print Type].
Select the print type → press [OK].
If you select [Transparent], press [Light] or [Dark] to adjust the halftone density.
6.
Press [OK] → [Close].
|
IMPORTANT
|
|
For information on the modes which cannot be set in combination with this mode, see "Unavailable Combination of Functions."
Printing performance may not be optimal, depending on the original content and combination of settings.
If you use [Watermark] with [Add Cover] or [Insert Sheets], numbers will not be printed on the inserted pages.
|