Using the Setup Guide to Configure the Machine
When the power is turned ON for the first time after installing the machine, the Setup Guide screen is displayed.
It is recommended that you follow the instructions that appear on the touch panel display to configure the machine.
|
NOTE
|
|
You can restart the Setup Guide from
 (Settings/Registration). (Settings/Registration).You can change settings registered in the Setup Guide from the items in
(Settings/Registration). For more information, see each step.For most settings in the Setup Guide, you can move to the next setting even without entering anything. Unset items can be set separately. You can set them after finishing the Setup Guide.
You cannot exit the Setup Guide until it is finished.
If the power is turned OFF while using the Setup Guide, when you turn the power back ON, the Setup Guide is automatically started. Perform Setup Guide settings once again.
Once the Setup Guide has been completed, it will not start up again when turning ON the machine.
|
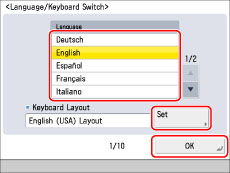
1.Configuring the Touch Panel Display's Language and Keyboard Layout
(1)Set the language and keyboard layout → press [OK].
|
NOTE
|
|
The language and keyboard layout can be changed after finishing the Setup Guide. For more information, see "Changing the Display Language/Keyboard on the Touch Panel Display."
|
2.Mixing the Toner
Mixing the toner will take a maximum of seven minutes to complete. Until toner mixing is completed, you cannot move on to the next step.
(1)Press [Start].
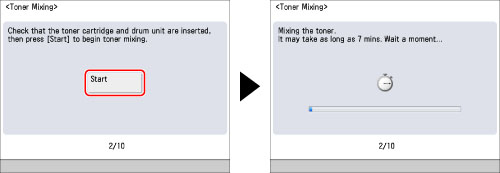
After the toner finishes mixing, press [OK].
|
IMPORTANT
|
|
Perform this operation after making sure that the toner cartridge and the drum unit are inserted properly.
|
3.Registering the Paper Information That Was Loaded When Installing the Machine
(1)Select the paper source that you want to load the paper type for → press [Set].
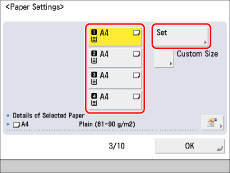
(2)Select the paper type → press [OK].
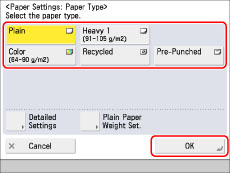
If you select [Plain], you can select the paper weight from [Plain Paper Weight Set.].
If there is no button for the loaded paper, press [Detailed Settings] → select the paper type from the detailed setting screen.
|
IMPORTANT
|
|
Be sure to correctly set the paper type. If the type of paper is not set correctly, it could adversely affect the quality of the image. Moreover, the fixing unit may become dirty and require a service repair, or the paper could jam.
|
|
NOTE
|
|
For more information on paper, see "Available Paper Stock."
If the paper type of the paper that you have loaded is not listed in the detailed setting screen, you can register it in the paper type list. For details on registering paper types, see "Registering/Editing Custom Paper Types."
The paper type settings can be changed after finishing the Setup Guide. For more information, see "Registering the Paper Size and Type for a Paper Source."
|
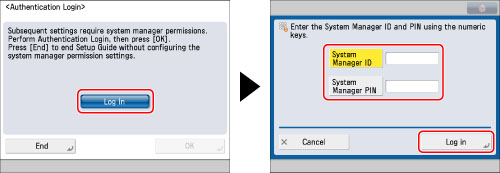
4.Logging In
In order to continue on with network settings, date/time, and fax settings, it is necessary to log in as an administrator.
To end setting configuration here, press [Skip] and see step 14.
(1)Press [Log In] → enter the authentication information → press [Log in] → [OK].
|
IMPORTANT
|
|
The default setting for both the System Manager ID and System Manager PIN is '7654321'. After installing the machine, when logging in for the first time, enter '7654321' for both the System Manager ID and System Manager PIN.
|
5.Setting the Date and Time
(1)Select the time zone from the <Time Zone> drop-down list.
(2)Enter the current date and time using  -
-  (numeric keys) → press [OK].
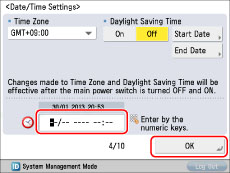
Enter the day and the month using four digits (including zeros). The time is displayed in 24-hour notation.
Examples:
May 6 → 0605
7:05 a.m. → 0705
11:18 p.m. → 2318
If you make a mistake when entering values, press  (Clear) → enter the values again, starting with the day.
|
NOTE
|
|
The standard time zones of the world are expressed globally in terms of the difference in hours (± up to 12 hours) from GMT (± 0 hours). A time zone is a region throughout which this time difference is the same.
The default time zone may differ depending on the country.
If you set Daylight Saving Time, specify both the starting and ending date in [Start Date] and [End Date]. The machine automatically sets the standard time of the machine one hour forward at the specified date and time.
The date/time settings can be changed after finishing the Setup Guide. For more information, see "Current Date and Time."
|
6.Setting an IP Address
You can perform the following settings in order to connect to and use a TCP/IP network with the machine. Set IPv4 here.
|
NOTE
|
|
For information on IPv6 settings, see "TCP/IPv6 Settings."
|
(1)Set [Use IPv4] to 'On' → set [Use IPv6] to 'Off' → press [Next].
(2)Specify each setting → press [OK].
For manual entry:
When the network administrator connects to a network where each machine has a fixed IP assigned to it, the IP address must be set manually.
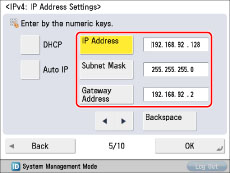
If you do not know the IP, contact your administrator.
To enable DHCP:
When connecting to a network where each machine's IP address is automatically assigned to it by DHCP, set [DHCP] to 'On'.

|
NOTE
|
|
By setting [Auto IP] to 'On', you can have the machine automatically search the network (LAN) being used for usable IP addresses and assign one to the machine. This function bypasses the DHCP server to automatically assign IP addresses, however the machine cannot communicate over the router when using this function.
|
7.Setting the DNS Server
DNS is the abbreviation of Domain Name System, and is the function that binds an IP address and a name (in this machine, host name). By setting the DNS server address for this machine, when accessing this machine through the network, this machine is accessed not by IP address but by a name such as "iR-ADV XXXX."
When using DHCP, the IP address may change, so it is necessary to update IP addresses bound to names. In these cases, it is necessary to configure "Dynamic Update" to update the links between IP addresses and names.
A dynamic DNS server is required to use DNS Dynamic Update.
This section describes how to specify the IPv4 settings.
|
NOTE
|
|
For information on IPv6 settings, see "TCP/IPv6 Settings."
|
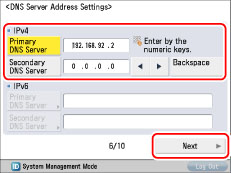
(1)Specify the following settings in <IPv4> → press [Next].
To enable DNS Dynamic Update:
Enter the DNS server IPv4 address in [Primary DNS Server].
To disable DNS Dynamic Update:
Enter [Primary DNS Server] and [Secondary DNS Server].
|
NOTE
|
|
Secondary DNS Server:
The substitute DNS server that is used when the primary DNS server cannot be used. If you do not want to set the secondary DNS server, enter <0.0.0.0>. When using DNS Dynamic Update, setting this is not necessary. |
(2)Enter the [Host Name] and [Domain Name] for <IPv4> → press [Next].
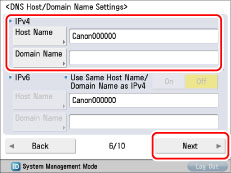
[Host Name]: The name that appears on the network (the machine's name, etc.)
[Domain Name]: The network domain that this machine belongs to
(3)Specify <DNS Dynamic Update> for <IPv4> → press [OK].

By setting <DNS Dynamic Update> to 'On', DNS Dynamic Update is enabled.
|
NOTE
|
|
The DNS server settings can be changed after finishing the Setup Guide. For more information, see the following.
When setting IPv4: TCP/IPv4 Settings
When setting IPv6: TCP/IPv6 Settings
|
8.Setting the Proxy Server
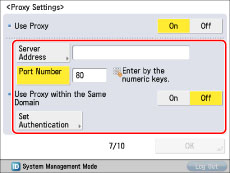
If accessing the internet or other external network through a proxy server from this machine, these settings are required.
|
[Server Address]:
|
Enter the IP address of the proxy server or the path of the server (i.e., example.company.com).
|
|
[Port Number]:
|
Enter the port number of the proxy server.
|
|
<Use Proxy within the Same Domain>:
|
If using the proxy within the same domain, press [On].
|
|
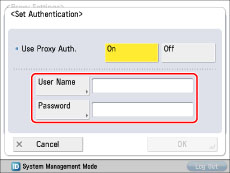
[Set Authentication]:
|
If authentication is required when accessing an external network through a proxy server, enter the user name and password registered on the server.
|
|
[User Name]:
|
Enter the user name for the proxy authentication.
|
|
[Password]:
|
Enter the password for the proxy authentication.
|
If a fax board is installed on the machine, proceed to "9.Setting Country/Region."
If a fax board is not installed on the machine, proceed to "13.Specifying the System Manager Information Settings."
|
NOTE
|
|
The proxy settings can be changed after finishing the Setup Guide. For more information, see "Settings Common to TCP/IPv4 and TCP/IPv6."
|
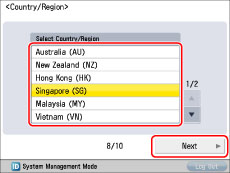
9.Setting Country/Region
(1)Select the country/region where the machine is located → press [Next].
|
NOTE
|
|
This setting is necessary to specify the fax line settings. This setting can only be carried out in the Setup Guide.
If the machine cannot automatically determine the Country/Region, this setting may be unnecessary.
To change <Country/Region>, you must change it from [Start Setup Guide] (Settings/Registration).
|
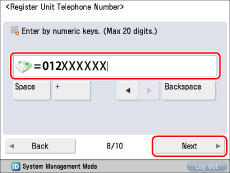
10.Registering Your Machine's Fax Number
This section describes how to register the fax number your machine uses when sending faxes. This number is printed on the document that you fax to the receiving party.
(1)Enter the fax number → press [Next].
|
NOTE
|
|
The machine's fax number can be changed after finishing the Setup Guide. For more information, see "Fax Line Settings."
|
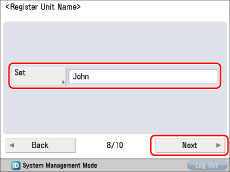
11.Registering the Unit Name
The unit's name appears on the receiving party's fax machine, or is printed on the received document as the Sender Name. You can register the name of your company or department as the unit name.
(1)Press [Set] → enter the unit name → press [Next].
|
NOTE
|
|
The unit name can be changed after finishing the Setup Guide. For more information, see "Fax Line Settings."
|
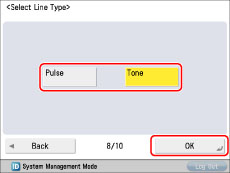
12.Setting the Line Type
You can set the phone line type to use for sending.
(1)Select the line type→ press [OK].
|
NOTE
|
|
Depending on the machine's settings, this setting may be unnecessary.
The fax line settings can be changed after finishing the Setup Guide. For more information, see "Fax Line Settings."
|
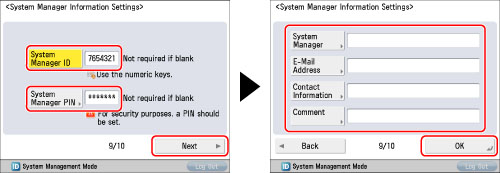
13.Specifying the System Manager Information Settings
You can register the System Manager Information Settings.
Change the authentication information → press [Next] → enter information if necessary→ press [OK].
|
IMPORTANT
|
|
The default setting for both the System Manager ID and System Manager PIN is '7654321'. Make sure to change these settings.
The System Manager Information Settings can be changed after finishing the Setup Guide. For more information, see "Specifying the System Manager Settings."
|
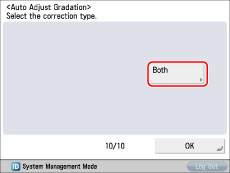
14.Recalibrating the Gradation and Density Settings of the Machine Precisely
The procedure involves making test pages and placing them on the platen glass for scanning. Once this is complete, the machine automatically corrects the irregularities.
|
IMPORTANT
|
|
Three test pages are output by the machine during this adjustment.
|
(1)Press [Both].
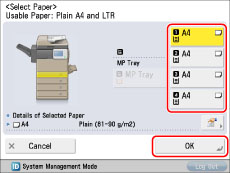
(2)Select the paper source → press [OK].
(3)Press [Start Printing].
(4)Place the first test page on the platen glass → press [Start Scanning].
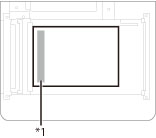
*1 Place the test page face down on the platen glass, with the black band along the left edge of the platen glass
(5)Remove the first test page from the platen glass → press [Start Printing].
(6)Repeat steps 4 and 5 two more times.
(7)Remove the third test page from the platen glass.
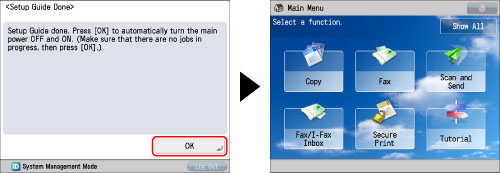
15.Closing the Setup Guide
Closing the Setup Guide by pressing [OK] causes the machine to restart.
After the restart, the main menu is displayed and you can use the machine.
|
NOTE
|
|
If you start the Setup Guide using
(Settings/Registration), make sure that there are no jobs currently in progress, then press [OK]. |